
What are the basic recommended WordPress settings for a blog before you start?

After installing WordPress, it is important to complete some initial setup and configuration before publishing content and going live. Properly optimizing key WordPress settings can enhance your site’s security, performance, and SEO.
WordPress is the most popular content management system (CMS) for blogging, powering over 26% of all sites on the web. The platform is built on PHP and MySQL, with a focus on extensibility, customization, and search engine optimization.
For self-hosted WordPress sites, you have full control over the site settings and configuration. While the out-of-the-box defaults work, taking a few minutes to optimize the key settings for your particular blog can pay dividends down the road. Areas like permalinks, media uploads, comments, and syndication feeds deserve special attention during the basic setup process.
Along with configuring the built-in WordPress settings, installing a few essential plugins is also recommended when launching a new blog. Plugins extend WordPress’ functionality for security, SEO, performance, and user experience. However, it is important not to go overboard with plugins initially, as too many can slow down your site.
With a thoughtful approach to initial configuration and setup, your new WordPress blog will be off to a great start before you publish your first piece of content. A solid technical foundation ensures it can easily scale as your site grows.
Basic WordPress Settings after New Installation
The primary settings of the WordPress site after the first installation are essential. For these changes, go through each link in ‘Dashboard’ mainly to blog settings – Permalink structure, General settings, writing, reading, pinging services, and a few other WordPress settings.
To do this first, follow the steps below
1. Remove Dummy Content
Once you install a WordPress blog, you will get a default post “Hello World” and a default comment. Delete them and follow the rest of the tutorial:
1. Sample Comment: This is the default sample comment that comes with WordPress CMS. To remove this comment, click the “Comments” link from the Dashboard (from the left column). Hover the comment body and click on “Trash.”

2. Sample Post: This also defaults post comes with WordPress CMS “Hello World” post body then click on “Trash.” This will remove the post.
3. Sample Page: This default page comes with WordPress CMS script along with posts and comments. To eliminate this sample page, go Pages > All Pages. To remove this, hover the page titled “Sample Page” and click “Trash.”

4. Hello Dolly Plugin: This is a dummy plugin installed with WordPress scripts like dummy post, page, and comment. To remove this, Go to Plugins > Installed Plugins then find out the “Hello Dolly.”

2. General settings: Change the Site Title taglines, and more
Adjusting these WordPress General Settings is very important. Most of the newbies are not configuring properly. You shouldn’t make the same mistake.
You can make the changes from the one page. To do this, go to “Settings > General.”

- Site title: This is the WordPress site Title. There are different options available to adjust the site title, tagline and some other relevant options to do your blog are explainable. In the “Site Title” field, give the blog a unique and short title.
- Tagline: You can use or explain your blog with smart words in “Tagline.” But do not use the long tagline.
- WordPress Address (URL): Check your blog URL correctly either your URL with WWW or without WWW. There is not much importance in this by adding WWW additionally.
- Site Address (URL): Enter the address here if you want your site homepage to be different from your WordPress installation directory.
- Email Address: Add your Professional Email address here. (How to create a professional email ID).
- Membership: This is the option to enable new user registrations as subscribers, Contributors, and authors. If you are using the multi-author blog, this is the place to allow multi-author registration. Just check the box to enable it. Now, for security reasons, if you have a single-authored blog. I suggest you disable the WordPress registration option. Check this checkbox if you want anyone to be able to register an account on your site
- New User Default Role: This is the default role in enabling the newly registered user. My suggestion is to keep this as in “Subscriber.”
- Time Zone: This is a WordPress Timezone Setting. Choose a city in the same time zone as per UTC (Coordinated Universal Time).
- Date Format: Choose the style of Date format to display in your blog posts
- Time Format: Choose the style of Time to display in your blog posts
- Week Starts On: It depends on the type of blog and its country. If you decide week begins with Sunday choose it. By default, it is on Saturday.
- Site Language: By default English (United States) will be selected in site language. You can change your language here.
3. Updating WordPress Ping List at Writings section
At this stage, we will set up WordPress blog settings related to writing.
By default, WordPress adds a category “Uncategorized” which doesn’t look so ideal. Here you can change the default category to any other category.
You can go to posts> Categories from the left side panel, and add a new category.
Come back, and change the WordPress default category to the newly created category. This is one of the important WordPress settings.
One of the major differences between a static Website and a blog is the ability to ping.
By pinging search engine bots, our WordPress blog notifies the search engines about the newly published blog post.
You should update your ping list with all the main ping services. Add all the ping services URL and click on the update button.
I also recommend you use the PushPress plugin to ping cloud ping servers.
To do this, Settings > Writings, in the page scroll down and you will find Update Services. Now click on the Update Service link and copy the ping list and paste at the below empty box of the Writings page then click on Save Changes. (Or) Copy the below-given ping list into your Writings Page > Update Service box.

Here I have compiled a list of Ping services for WordPress, which will help you with more services.
- Updated Ping List
- An alternative is Feed Shark, which pings over 60 services for free.
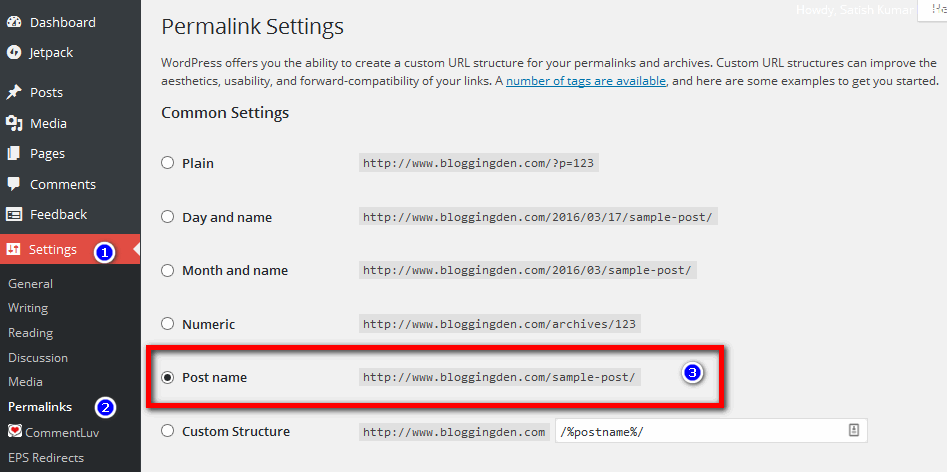
4. Change your permalink settings
Permalinks are the addresses for the posts and pages on your WordPress site. The default permalink structure is not perfect for regular bloggers.
This is not suitable for SEO. It should be easy to remember, so you must change this.
The default permalink structure looks like:
In the Settings > Permalinks, you can choose one of the “Common settings” or enter your own in the “Custom structure” field using the structure tags as – /%postname%/.
The most recommended permalink structure.
5. Change your default admin account
Changing of default admin account is very important. To do these just go for, Users > New user then clicks on New user and fill all details like Username, Email, First name, Last Name, Website, and enable the user Role as Administrator.
After these changes Click on Add New User.
Now login with your newly created user account login details into your WordPress Blog. From WordPress. Now delete default old user details. This is a vital security tip.

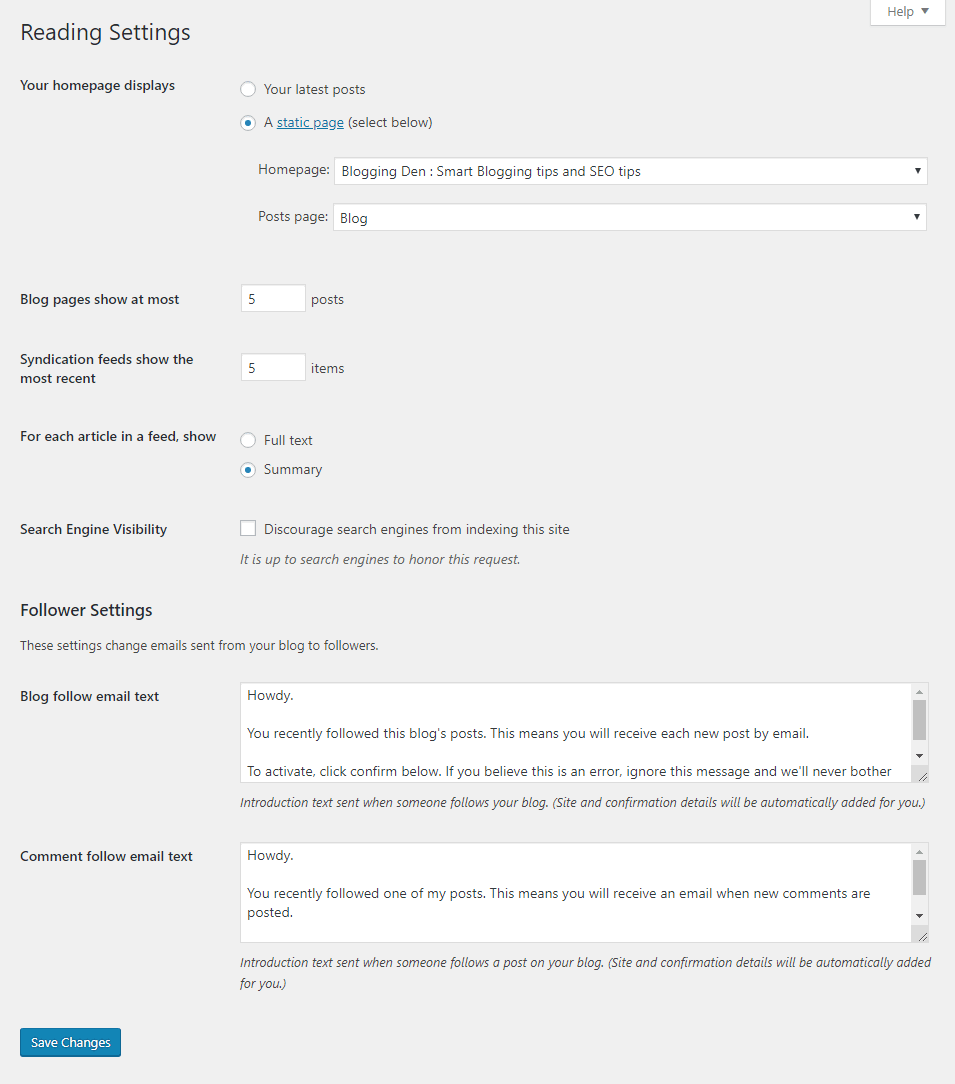
6. Configure the Reading settings
Now, at this WordPress setup page, you can configure many things like what should be your blog homepage. We are using a custom home page and not a regular blog page.
So, we changed the homepage to the custom static page we designed.
For a regular blog, you can let the setting be “Your latest posts” as shown in the screenshot.
The given steps are essential in WordPress blog settings. This can be done under the reading setting as shown in the image below.
Here we configure comment related blog settings on our blog, and also one important setting which happens due to comment pagination.
Here are a few blog settings which I usually use on my blogs: I’m writing down the blog settings which need being on.
- Attempt to notify any blogs linked to from the article
- Allow link notifications from other blogs (Pingbacks and Trackbacks)
- Allow people to post comments on new articles
- Comment author must fill out the name and e-mail
- Enable threaded (nested) comments
- Anyone posts a comment
- A comment is held for moderation
- An administrator must always approve the comment
7. Choose Your Avatar in Discussion settings
This is the page to moderate the comments and its settings. Read each option carefully before choosing as per your blog needs.
Now, if you are new to WordPress, I suggest you go to Gravatar.com and create an account and upload your image for your Email address. And here, you can make changes like gravatar rating and default gravatar. If you are new here, I wrote a complete guide on How to Create a Gravatar account? Just follow the steps.
In the AVATARS section, select the options listed below.
- Avatar display: Tick mark in Show Avatars
- Maximum Rating: G-Suitable for all audiences
- Default Avatar: Gravatar Logo
Bonus tip: If you are really paranoid about your site loading speed, you might like to disable the Gravatar.
8. Change the default Images sizes in Media
Though you can skip setting up this part, I usually suggest users make necessary changes to avoid lots of image files.
By default, when you upload images in WordPress, it creates images in 3 different sizes.
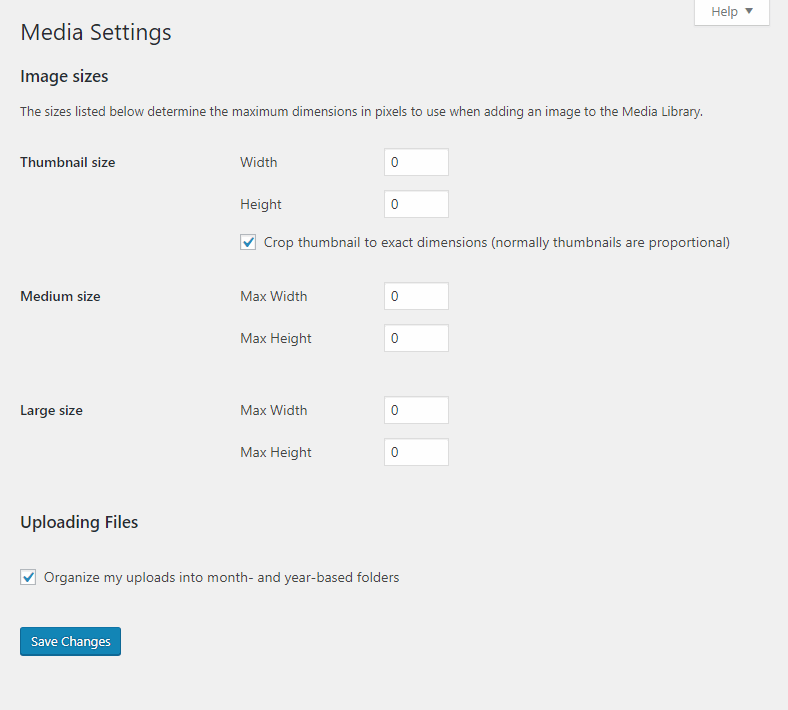
Here you can set sizes as 0 X 0 and keep only one desired size as enabled along with size.
This is the default primary setting in Media.
The image dimensions will change along with themes, you have to choose in further steps.
9. Choose WordPress Privacy settings
This is the blog settings tab, where you configure if you want to search engines like Google to show your blog in searches or not.
I usually keep it off until I am completely done with WordPress setup and ready to write my first post.
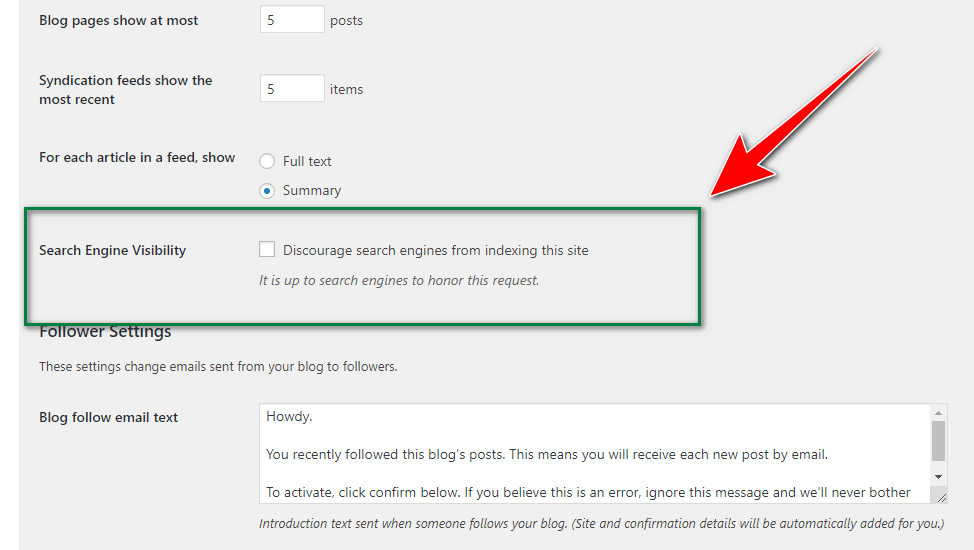
If you are done with the setup, select Settings > Reading and deselect “Discourage search engines from indexing this site.”
10. Creating Categories
You can create different categories and tags to your posts. The “Uncategorized” category is the default. If you do not create any categories, your posts will be included in the Uncategorized category.
By adding categories, the user experience will be improved to browse your blog more quickly. To create a new category, go for Posts > Add new Categories and create as many you want.

If you are installing WordPress for the first time, this post will help you to quickly set up a WordPress site. Once done with all the settings above, it is time to install themes and Plugins.
Final Words
After getting a Domain name and WordPress hosting, you must install WordPress in your hosting account then adjust few WordPress Settings to get the full blog’s functionality of your blog. The Essential Settings after WordPress Installation for the first time are essential. I have explained in ten important points about Setting up a WordPress site. You can refer to this post, to quickly check done these settings.
The article on WordPress settings after WordPress Installation (Setting up WordPress site) is very helpful for every WordPress user to check or configure the blog in a proper way.