How to Create a YouTube account for new channel creation?
YouTube is a video-sharing platform where users can watch, upload, and share videos. It is one of the most popular websites in the world, with over 2 billion active users. YouTube was founded in 2005 by three former PayPal employees: Chad Hurley, Steve Chen, and Jawed Karim. The company is headquartered in San Bruno, California. Google owns YouTube.
To create a YouTube account, you must provide your name, email address, and password. You can also create a YouTube account using your Google account. Once you have created an account, you can start watching, uploading, and sharing videos.
Here are some tips for creating a successful YouTube channel:
- Choose a niche that you are passionate about.
- Create high-quality videos that are relevant to your niche.
- Promote your channel on social media and other websites.
- Interact with your viewers and build a community.
P.S. I also saw a lot of YouTubers grow during the COVID-19 lockdown. It was a great time to learn new things, be entertained, and connect with others through video content.
What is YouTube?
YouTube is a viral video hosting site from Google. It is an American online Video-sharing platform. The headquarters of this video hosting is in San Bruno, California.
YouTube was launched in February 2005 by three former PayPal employees: Chad Hurley, Steve Chen, and Jawed Karim. Google acquired the site in November 2006 for $1.65 billion.

Internet speeds have been increasing steadily, from broadband to 3G to 4G, and we are now on the cusp of 5G. As a result, the number of YouTube users is growing daily, with more than 5 billion videos being watched daily.

It makes it more important than ever for businesses to have a YouTube channel and create a visual content strategy.
YouTube content is diverse and includes music videos, movie trailers, educational videos, comedy sketches, and more. Users can also create their channels to share videos with others. YouTube is a great way to learn new things, stay entertained, and connect with others.
YouTube is a great way to learn new things, stay entertained, and connect with others. The platform offers a variety of features that make it easy to find and watch videos, including:
- A powerful search engine that allows users to search for videos by keyword, title, or category
- A recommendation engine that suggests videos that users might be interested in
- A variety of filters that allow users to narrow down their search results
- The ability to create and share playlists
- The ability to comment on and like videos
- The ability to subscribe to channels
- You can earn money from your YouTube channel with enough subscribers and views.
YouTube is a valuable resource for people of all ages and interests. It is a great way to learn new things, stay entertained, and connect with others. It’s free to use, and there’s something for everyone.
How to Create a YouTube Account?
Many people believe that making videos is a very difficult process. While it can be time-consuming, a good Video editor can simplify the process. Video content often performs better on social media, and YouTube is one of the most popular video-sharing platforms in the world. It is the second largest search engine after Google.
I suggest utilizing a top-tier AI-based online video editing tool to efficiently produce videos that will enhance viewership on various video hosting platforms, such as YouTube, Instagram, and other social media platforms. It is a free, simple, yet powerful web-based video maker that creates videos in minutes.
- YouTube is also a great way to reach a large audience, as many people now watch videos on their Smart TVs instead of traditional televisions.
- Many people are already making money by uploading videos to YouTube.
- While video marketing strategies can be complex, YouTube can help you simplify your marketing and business strategies by attracting more users.
Here are some tips for making videos that perform well on YouTube:
- Choose a topic that you are passionate about and that you know a lot about.
- Create high-quality videos that are well-lit and well-edited.
- Promote your videos on social media and other channels.
- Interact with your viewers and respond to their comments.
- Publish videos on a regular schedule.
Following these tips, you can create videos to help you reach your target audience and achieve your business goals.
Step 1: Create a New Google Account
To use the YouTube platform, you need a Google account. With this new account, you can access all of the Google services like Gmail, Google Drive, Google Maps, Photos, Google Docs, Translator, Play store and more features along with YouTube. Here are the basic steps to follow.
Steps to Create a New Google Account
- Sign in youtube with gmail account. To do this, Open Google.com
- Click on the “Sign In” button, which is located at the right-side top corner. If you have Gmail ID, just enter the email address and sign in.

- If you don’t have any Gmail, click on Create account
- In the next screen, you will get the form. Fill the form, accept the Privacy terms and activate your new Google account.
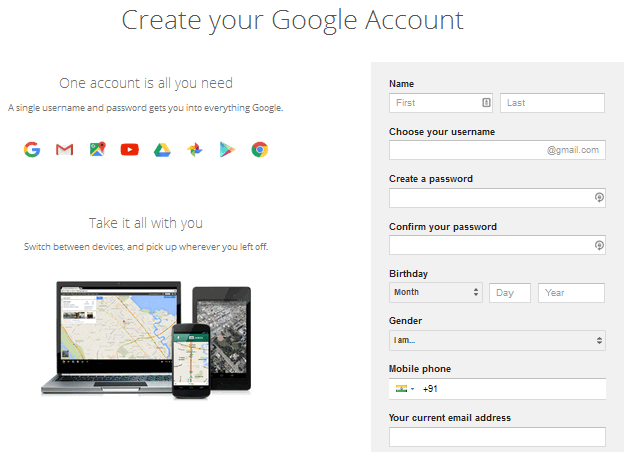
- Now you are ready to access all the features and services provided by Google.
- From those services, YouTube is one of the popular video hosting services.
- Now go for YouTube by choosing the red play button icon and start filling the profile now.
YouTube is a video-sharing platform that allows users to watch, upload, and share videos. To use YouTube, you must first create a Google account. You can create a Google account for free on the Google website. Once you have created a Google account, you can sign in to YouTube by clicking the “Sign In” button in the top right corner of the YouTube website.
You can start exploring the platform once you are signed in to YouTube. You can search for videos by keyword, browse by category, or watch recommended videos. You can also subscribe to channels for updates when new videos are uploaded.
If you want to upload your videos to YouTube, you can click the “Upload” button in the top right corner of the YouTube website. You can then select the videos you want to upload and add titles, descriptions, and tags.
YouTube is a great way to watch videos, listen to music, and learn new things. It is also a great way to connect with friends and family and share your videos.
Here are some of the benefits of using YouTube:
- Access to a vast library of videos
- Ability to watch videos on demand
- Ability to upload and share your videos
- Opportunity to connect with others who share your interests
- Potential to earn money from your videos
Step 2: Create a new YouTube Account
To create a YouTube account, you must first create a Google account. Once you have a Google account, you can sign in to YouTube and click on the “9 dots” icon in the top right corner of the screen.
Step 3: Start Creating a new YouTube Channel
After creating a YouTube account, you have to go for the YouTube Homepage and click on the profile pic icon on the right-side top corner. Then click on the Settings option.
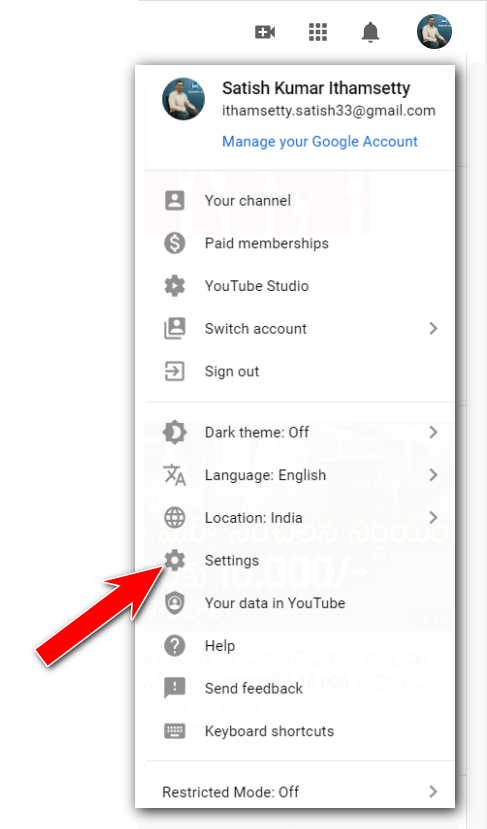
YouTube Account Settings
To manage your YouTube account settings, follow these steps:
- Go to the YouTube homepage.
- Click on your profile picture in the top right corner.
- Select Settings.
- In the left sidebar, select the following options to manage your settings:

An introduction to YouTube’s new design
- Account: Create a channel, manage your email notifications, and change your language settings.
- Notifications: Turn on or off email notifications and change your notification settings.
- Playback and Performance: Control your video viewing experience and playback settings.
- Privacy: Control who can see your saved playlists and subscriptions.
- Connected accounts: Connect partner accounts to earn rewards and live-stream games.
- Watch on TV: Connect your TV to YouTube and play videos.
- Billing and Payments: Purchase YouTube Premium and manage your payment settings.
- Advanced settings: Configure advanced settings for your YouTube account.
For more information on YouTube account settings, please visit the YouTube Help Center.
Create a new YouTube Channel
To create a new channel, go to the Account tab, select “Add or manage channels,” and then click “Create a new channel.”
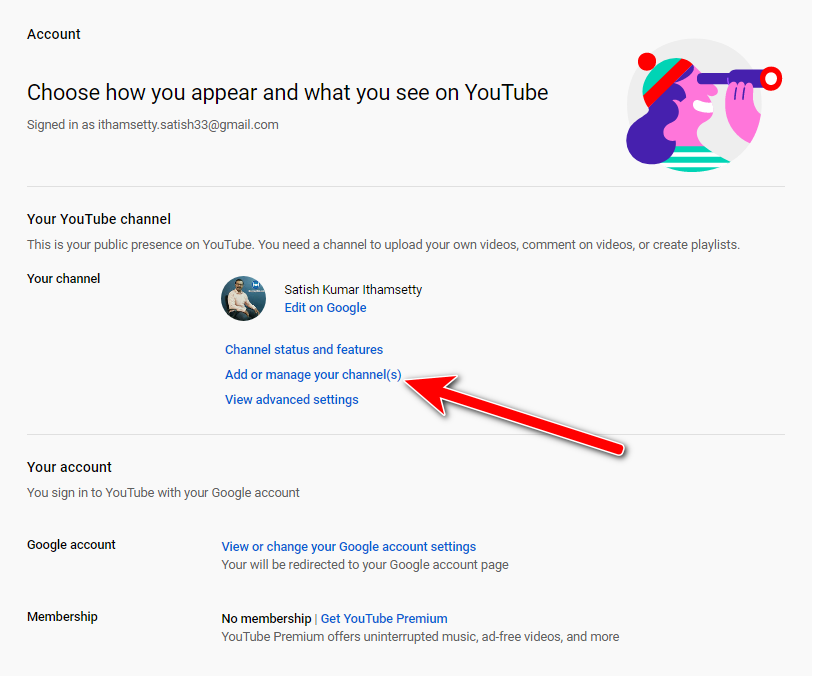
Once you click on “Add or manage your channels,” you will be taken to the new channel creation page. Click on “Create a new channel” to proceed.
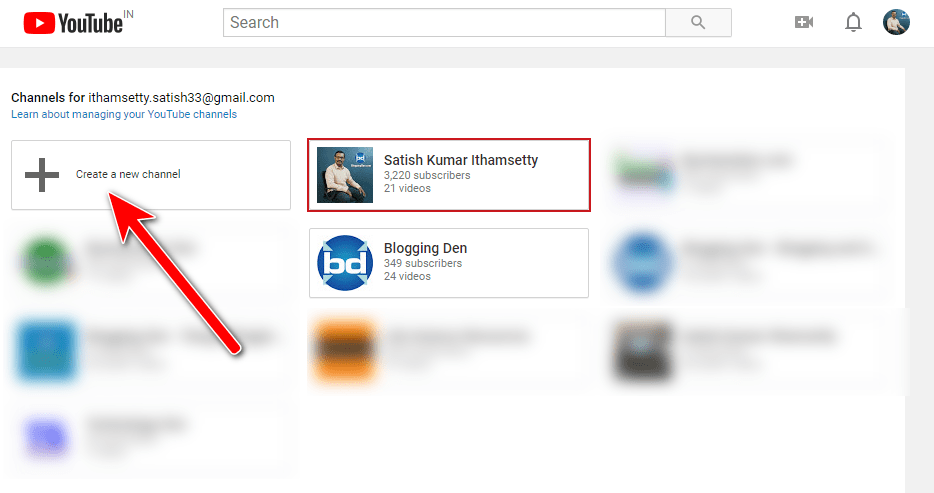
Enter the Brand Account Name in the box and hit the Create button.

Finally, agree with the page terms and conditions to complete the process.
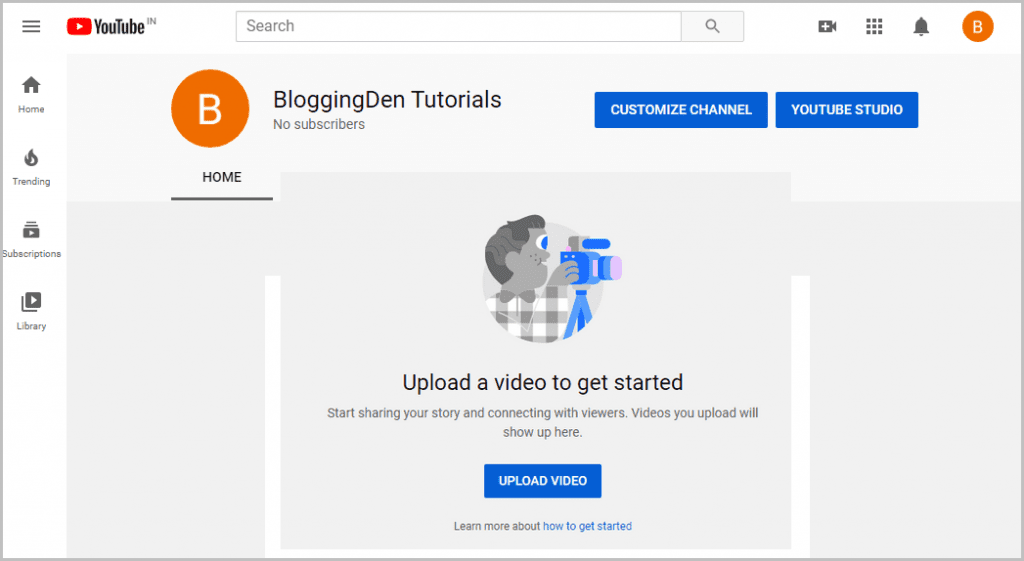
Once your channel page is ready, you can upload videos. Before doing this, you must upload a profile picture and channel art and fill out the form. That’s it!
Congratulations! Your YouTube channel is now ready to upload videos.
How to Create YouTube Channel Art?
YouTube channel art is a very important area to reflect the brand, motto, and personality with your audience. It is just similar to Facebook cover.
Here’s how to create YouTube channel art:
- YouTube channel art is a very important area to reflect your brand, motto, and personality to your audience. It is similar to a Facebook cover.
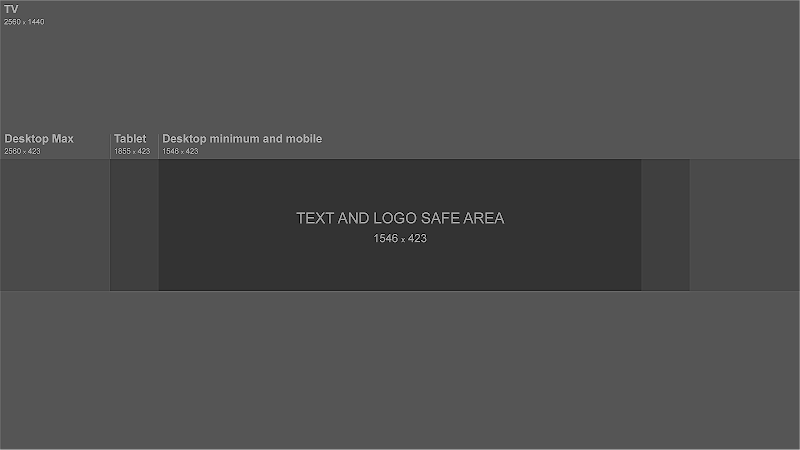
- The recommended size for YouTube channel art is 2560 x 1440 pixels. However, this dimension may vary depending on the device. The channel art’s safe area is at least 2048 x 1152 pixels. It is where text and logos will be visible without being cut off when displayed on different devices.
Channel art appears differently on desktop, mobile, and TV displays; larger images may be cropped. We recommend uploading a single 2560 x 1440 px image for the best results on all devices.
- The minimum dimensions for uploading are 2048 x 1152 px. The minimum safe area for text and logos is 1546 x 423 px. Larger images may be cropped on certain views or devices.
- The maximum width is 2560 x 423 px. The “safe area” is always visible at this width, regardless of screen size. The areas to either side of the channel art are visible or cropped depending on the browser size.
- The file size must be 6 MB or smaller.
- YouTube also provides a few channel art templates in both PNG and PSD formats.
To design YouTube channel art, you can use free online tools, such as Canva, Snappa, Fotor, Design Wizard, and more. Once you have chosen a tool, register your details, choose a design, edit the text, and download the image. Then, upload the image to the YouTube channel art area and save it.
Here are some tips for creating perfect channel art:
- The text and logos should be in the safe area of 1546 x 423 pixels, which is the center of the YouTube channel art template. It ensures that your text and logos will be visible on all devices.
- The branding taglines and key images should also be in the safe area.
- To add channel art to your YouTube channel, go to your channel homepage and click on the “Add channel art” button.
After clicking on the blue button, a pop-up window will appear with options to upload photos from various sources, such as “Upload photos,” “Your photos,” and “Gallery.”
How to add Channel art to Your YouTube channel?
To upload your designed image to your YouTube channel art, follow these steps:

- Click on the “Add channel art” button.
- Choose “Upload photos” and select a photo from your computer.
- Check the device preview and save the changes.
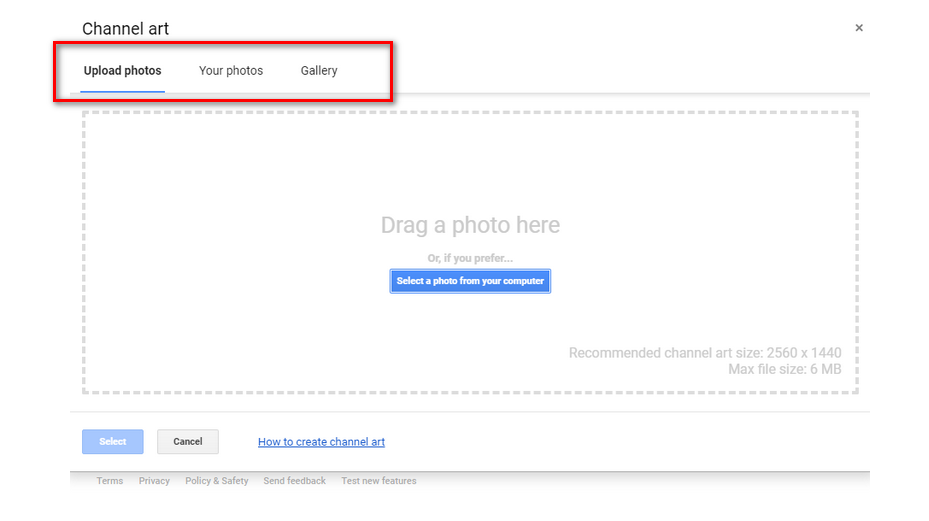
- Upload Photos: You can upload your design image from this option
- Your Photos: You can use the existed images from this option as channel art
- Gallery: You can choose the YouTube readymade templates from this option.
To create a channel icon, follow these steps:
How to create Channel Icon?
The channel icon is the place to add more branding logos or personal pics. The channel icon shows over your channel art banner.
- Click on the “Change channel icon” button.
- Select a photo from your computer or upload one from the web.
- Check the device preview and save the changes.
Your channel icon should be a square image of at least 880 x 880 pixels. It should be clear and easy to see and represent your channel well.
Your channel icon should be 800 x 800 pixels and in one of the following formats: PNG, JPG, GIF, or BMP. To upload an image, click on the pen icon in the channel icon area and then upload the image. The image will be fixed in the specified box.
Pro tips to improve your Channel
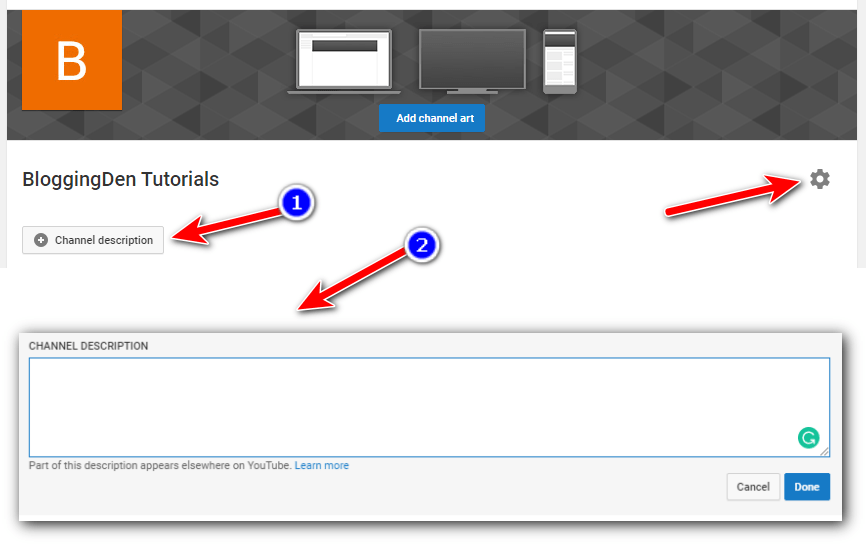
1. Description and its optimization
YouTube provides a special space for you to write about your channel and videos within 5000 characters. It can be personal or brand-related, and you have a little room to be creative here.
The channel description is displayed on the channel page, indexed by search engines, and can be recommended in YouTube’s recommended channel categories. We recommend adding some relevant keywords and a CTA at the beginning of the description.
2. Add Links
These are channel links. The channel links represent your online identity, not just on your video platform. You can add your blog URL, social profiles, and many more.
- Go to your channel homepage and click the gear icon next to your subscribe button.
- Toggle “Customize the layout of your channel” in the channel settings lightbox.
- Under the settings menu on your channel cover art, click the “Edit Links” option.
- In the “About” section of your channel, add your blog URL, social URLs, and other links.
- Click on the “DONE” button to save your changes.
3. Create a Channel trailer and Email:
A channel trailer is an effective way to promote your channel. It gives your subscribers a clear idea of the content you will post.
You can create a short video introducing yourself and your content. These trailers are only shown to non-subscribers.
If you are using your YouTube channel for business, you should provide contact information so advertisers can reach you.
To add your contact information, go to the “About” section on the homepage. Then, enter your email address in the “Details” section. Your YouTube channel is now ready to upload videos to make money. Let’s move on to the next step.
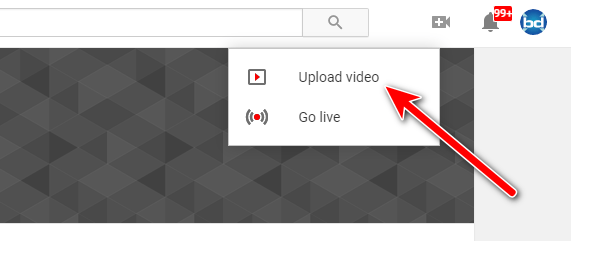
Step 4: Upload a Video to YouTube account
You can upload videos once you have created a YouTube account and channel. If you still need to create videos, create one on a trending topic. To do this, you will need video editing software.
Hundreds of video editing software options are available, but I recommend Wondershare Filmore, Camtasia, and FastStone Capture as the three most popular premium software.
Use one of these software programs to create or prepare a new HD video. After creating the raw video, go to the YouTube dashboard and click the “Upload Video” button.
Here are some additional tips for creating a successful YouTube video:
- Choose a topic that is relevant to your target audience and that you are passionate about.
- Create high-quality videos that are well-edited and engaging.
- Promote your videos on social media and other channels.
- Interact with your viewers and respond to their comments.
- After clicking “Select files to upload” on the next screen, you will need to specify the location of the video source on your computer.
- The YouTube algorithm cannot read the video or image, so you must enter the video details carefully in this step. You must enter the video data and geographical location details for better performance in Google search engines.
- The specified video will start uploading, and the speed will depend on your internet connection speed and the number of edited fragments in the video timeline.
- The video size is also a significant factor, and larger videos’ uploading times will be longer.
- YouTube prefers HD (High Definition) videos, so uploading HD videos with the highest possible resolution is best.
- YouTube supports the following video formats: MOV, MPEG4, MP4, AVI, WMV, MPEG-PS, FLV, 3GPP, WebM, DNxHR, ProRes, CineForm, and HEVC (h265).
- Your uploaded videos must be in one of these formats, or the uploading feature will be stopped.
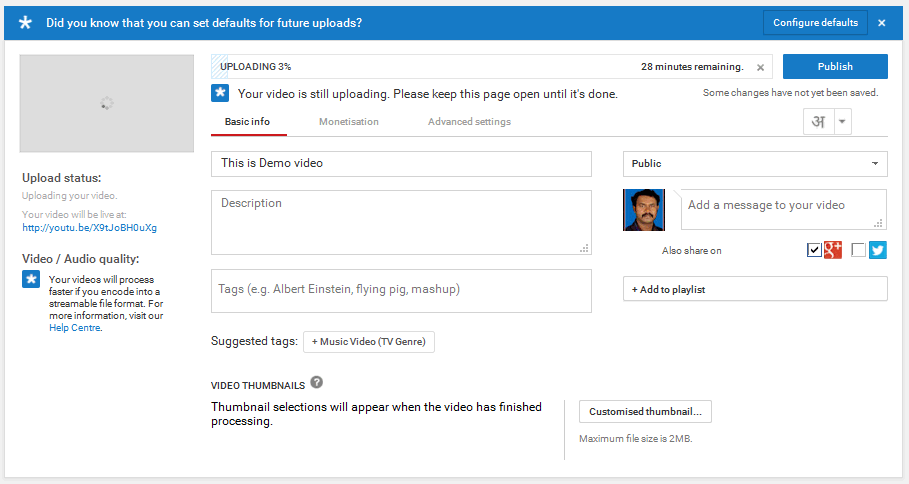
a. Basic Info
You must fill in the title, description, and tags when uploading a video. The title is the most important part of YouTube Video SEO. The title should be at most 60 characters.
Here are some tips for writing a good video title:
- Make it relevant to your video content.
- Keep it short and to the point.
- Use keywords that people are likely to search for.
- Use capital letters and punctuation to make it more readable.
- Avoid using spam or misleading language.
Title:
YouTube video titles are the first thing that viewers see when they are browsing for videos. A good title can help your video stand out and attract more views.
When writing a YouTube video title, it is important to use clear and concise language that accurately reflects the content of your video. You should also use relevant keywords that people are likely to search for.
Here are some tips for writing effective YouTube video titles:
- Keep your titles short and to the point.
- Use keywords that people are likely to search for.
- Use strong verbs and action words.
- Avoid using all caps or excessive punctuation.
- Use a question or a call to action in your title.
You can also use tools like TubeBuddy or VidIQ to help you write effective YouTube video titles.
Here are some additional tips for writing YouTube video titles:
- Use numbers in your titles. Numbers are attention-grabbing and can help your video stand out from the crowd.
- Use powerful words. Power words are words that evoke emotion or excitement. They can help your title grab attention and make viewers want to click on your video.
- Use humor in your titles. Humor can be a great way for people to click on your video. However, ensure your humor is relevant to your content and won’t offend anyone.
- Test different titles. Once you have written a few titles for your video, test them to see which performs best. You can use a tool like TubeBuddy to track the performance of your titles.
Meta Description:
The meta description is the second part of the search engine update. It is a brief description of your video that appears in search results. It should be clear, concise, and relevant to your video. It should also include your target keywords. The meta description is limited to 5000 characters.
To write a good meta description, follow these tips:
- Use your target keywords throughout the description.
- Keep it clear and concise.
- Make it relevant to your video.
- Use outbound links to your website or other relevant content.
- Develop the text as you would a blog post.
- Maintain a minimum of 800 words.
YouTube cannot read the content of videos and images, but it can read descriptive text. It is why it is important to write a good meta description. Google spiders and bots also use descriptive text to index your video. A good meta description can help your video rank higher in search results.
So, when writing your meta description, make it SEO-friendly and relevant to your video.
Tags:
- You can add YouTube tags to your videos to help viewers find your content.
- Tags are important for SEO or search engine optimization. When people search for videos on YouTube, your tags can help your video appear in the search results.
- When choosing tags for your videos, using relevant keywords that people will likely search for is important. You should also avoid using too many tags, as this can hurt your video’s ranking.
- A good rule of thumb is to use 5–10 relevant tags for each video. You can also use a tool like TubeBuddy to help you find the right tags for your videos.
Here are some additional tips for using YouTube tags:
- Use long-tail keywords instead of short, generic keywords. For example, instead of “video,” you could use the keyword “how to make a video.”
- Use synonyms for your keywords. For example, if you are making a video about how to play the guitar, you could use the tags “guitar,” “playing guitar,” and “guitar lessons.”
- Update your tags regularly. As your video gets older, add new tags or remove tags that are no longer relevant.
b. Monetization
Monetization is a method of earning money. To enable ads on your videos, you must activate this option. It is the YouTube Partner Program. To enable this feature, you must meet certain requirements.
Your channel must have 1,000 subscribers and 4,000 hours of watchtime. The Monetization tab will be visible when your channel is approved for Monetization, allowing you to display Google ads on your videos.
🔥🔥Latest update on Youtube Monetization eligibility 🔥🔥
YouTube has updated its monetization guidelines for the YouTube Partner Program (YPP). Previously, creators needed 1,000 subscribers and 4,000 watch hours in the past 12 months to be eligible.
However, the new guidelines allow creators with at least 500 subscribers and at least three public videos in the last 90 days with a minimum of 3,000 watch hours or 3 million short views to apply for the program.
This change is intended to make it easier for smaller creators to earn money from their videos. It also reflects the growing popularity of short-form content on YouTube.
To apply for the YouTube Partnership Program, creators must first meet the eligibility requirements. They can then apply to YouTube Studio. If their application is approved, they can monetize their videos with ads.
The new monetization guidelines are a positive change for smaller creators. It will allow them to earn money from their videos sooner and make it easier to grow their channels.
c. More options: Configure your video settings
The “Advanced Settings” tab on the Video Uploading page allows you to add and modify additional information about your video.

The following are the sections that you need to fill out when uploading a video to YouTube:
- Comments
- Licensing
- Ownership details
- Age restriction
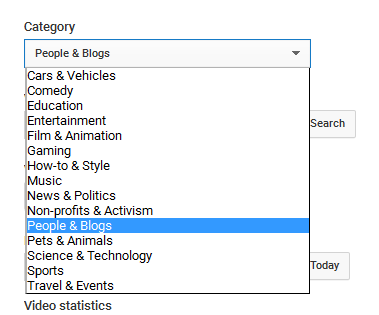
- Category
- Video location
- Content Declaration
The Video category section has 15 different categories to choose from. Based on YouTube video content statistics from two years ago, Comedy, Music, Entertainment/Pop Culture, and “How to” are the four most popular categories.
You can add a video upload location by pointing to your place on the map.

It is the part that connects to Google Maps.
- Select English from the Language option.
- Choose the date you recorded the video from the calendar.
Step 5: YouTube Privacy Settings
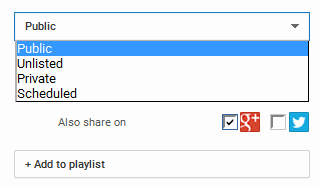
You can make your video Public or Private in the Privacy settings. In Private mode, the video is not visible to anyone. You should choose Public mode if you want others to see your video.
When a video is set to public, Google’s AI can read all the information added to it, such as the title, description, and tags.
There are three privacy settings for videos and playlists on YouTube:
- Public: These videos and playlists can be seen and shared by anyone.
- Private: These videos and playlists can only be seen by you and the people you choose to share them with.
- Unlisted: These videos and playlists can be seen and shared by anyone with the link, but they will not appear in search results.

You can customize the privacy settings to control who can view this content. In Public mode, you can share the video on social media by clicking the social media icons below the privacy settings.
Add Custom Thumbnail to Your Video
To add a custom thumbnail to your video, follow these steps:
- Go to Creator Studio and click on Video Manager.
- Select the video you want to add a thumbnail to and click Edit.
- On the left side of the preview screen, click on Custom Thumbnail.
- Add an image from your computer and click Save Changes.
You can also use the YouTube Studio app to add a thumbnail to a video.
Conclusion
Creating a YouTube account is a quick and easy process. You can be up and running in minutes by following the steps in this blog post. Once you have created your account, you can start uploading videos, subscribing to channels, and watching YouTube’s great content.
Here are some final tips for creating a successful YouTube channel:
- Create high-quality content that people will want to watch.
- Promote your videos on social media and other channels.
- Collaborate with other YouTubers.
- Be patient and consistent.
You can build a successful YouTube channel to entertain, educate, and inspire others with hard work and dedication.
This blog post has been helpful! If you have any questions, please feel free to comment below.
If you plan to work with more video hosting platforms, you can check the Youtube Alternatives.