
You just installed WordPress — congratulations! But the real work begins after installation. A proper WordPress setup checklist ensures your site is secure, fast, SEO-ready, and primed for growth from day one.
Most beginners skip critical configuration steps and end up dealing with hacked websites, slow load times, or poor Google rankings months later.
This 2026 guide covers all 35 essential steps across 8 phases — from initial configuration to your final pre-launch checklist — so you can launch with confidence.
What Is a WordPress Setup Checklist?
A WordPress setup checklist is a structured, step-by-step action plan that every website owner should complete immediately after installing WordPress.
It covers configuration, security hardening, performance tuning, SEO setup, and user experience improvements.
Think of it as the foundation of your house. A weak foundation means structural problems later.
Similarly, skipping your WordPress configuration checklist means SEO problems, security vulnerabilities, and slow performance that will cost you traffic, revenue, and readers.
Why Proper WordPress Setup Matters
| Area | Impact if Ignored |
|---|---|
| SEO | Poor rankings, no Google indexing, unoptimized URLs |
| Security | Hacked site, data theft, blacklisting |
| Performance | Slow load times, high bounce rate, poor Core Web Vitals |
| User Experience | Confusing navigation, broken pages, lost visitors |
Who Should Follow This WordPress Setup Checklist?
This guide is designed for:
- Bloggers launching a new content website
- Affiliate marketers building niche review sites
- Business website owners establishing an online presence
- Portfolio creators showcasing their work
- WooCommerce store owners setting up e-commerce sites
Phase 1: Initial WordPress Configuration
These are the first six steps you must complete the moment WordPress is installed. They take less than 30 minutes and have an outsized impact on your site’s long-term SEO and organization.
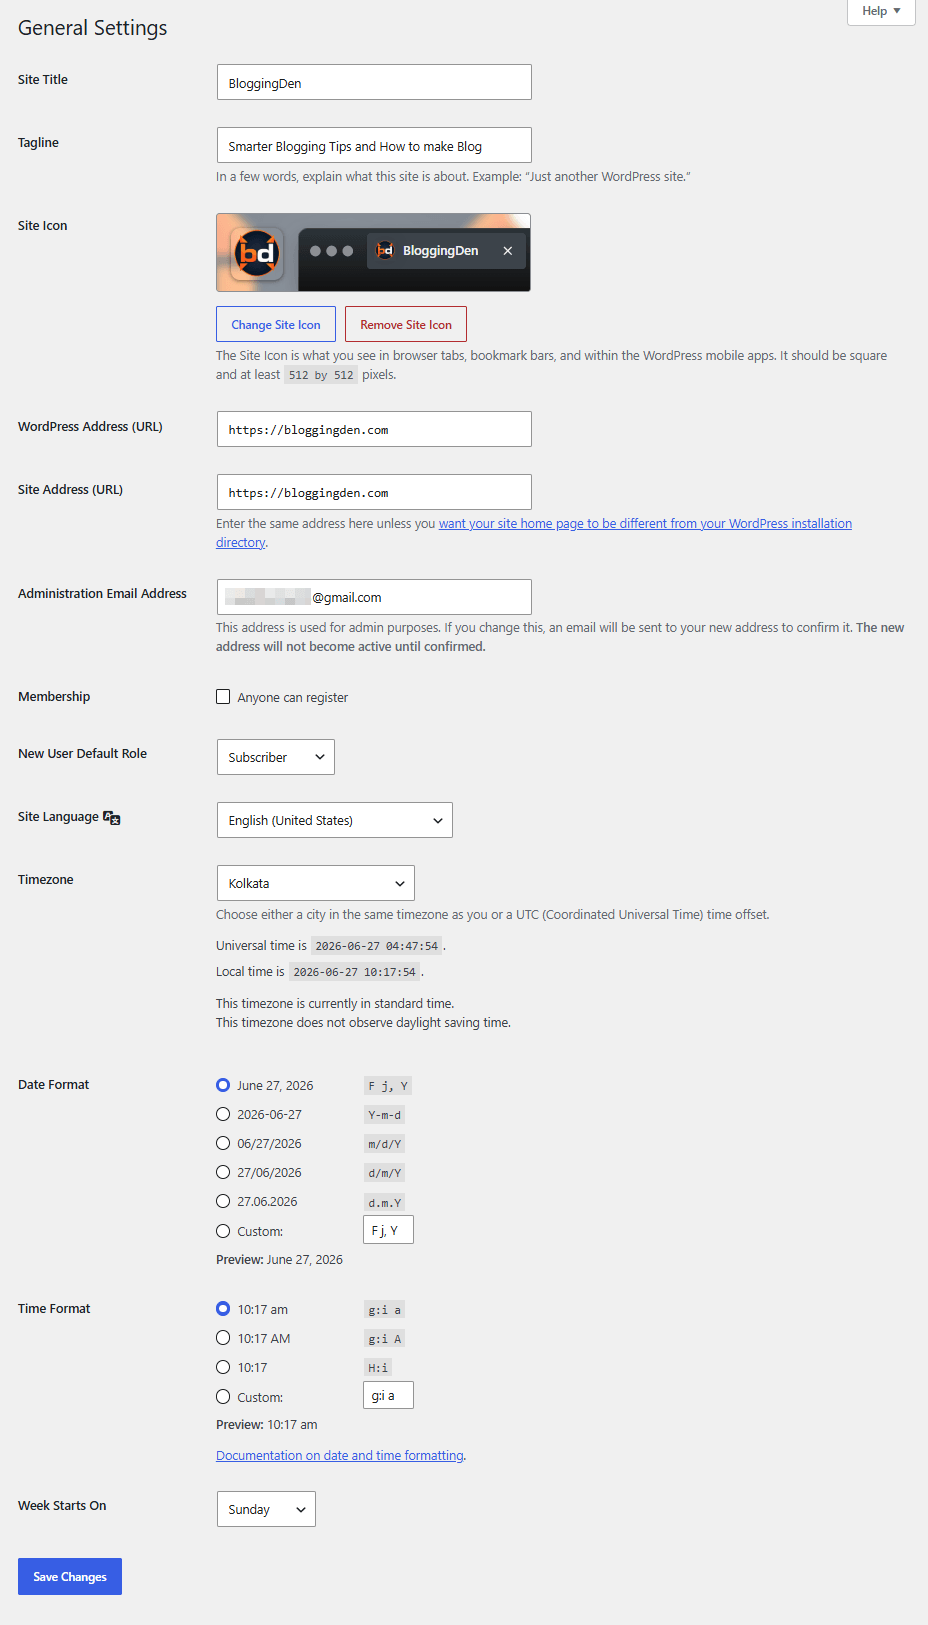
Step 1: Change Your Site Title and Tagline
Navigate to Settings → General and update your Site Title to a short, brand-relevant name. Your tagline should concisely describe what your website is about—avoid vague defaults like “Just another WordPress site.”
Why it matters: Search engines use your site title and tagline in branding signals. A clear tagline also improves click-through rates in search results.
Example: Site Title: “BloggingDen” | Tagline: “Blogging Tips, SEO & WordPress Guides”
Step 2: Set Your Time Zone, Date & Time Format
Go to Settings → General and scroll to the Timezone section. Select the city closest to your target audience (e.g., Asia/Kolkata for Indian audiences). Also configure your preferred date format and time format.
Why it matters: Correct timezone settings ensure scheduled posts publish at the right time, and accurate timestamps build reader trust.
Step 3: Configure WordPress Reading Settings
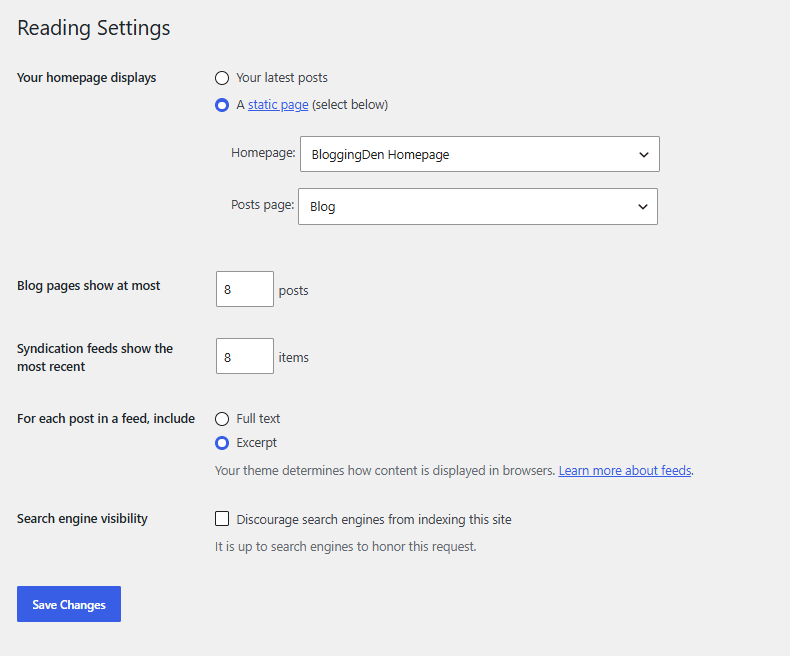
Go to Settings → Reading and:
- Set your Homepage to a static page (if you have one designed)
- Set the Blog posts page to your posts archive
- Uncheck “Discourage search engines from indexing this “site”—this setting is often accidentally left on after development
⚠️ Critical Mistake: Many beginners forget to uncheck this box, causing Google to completely ignore their website for weeks or months.
Step 4: Choose an SEO-Friendly Permalink Structure
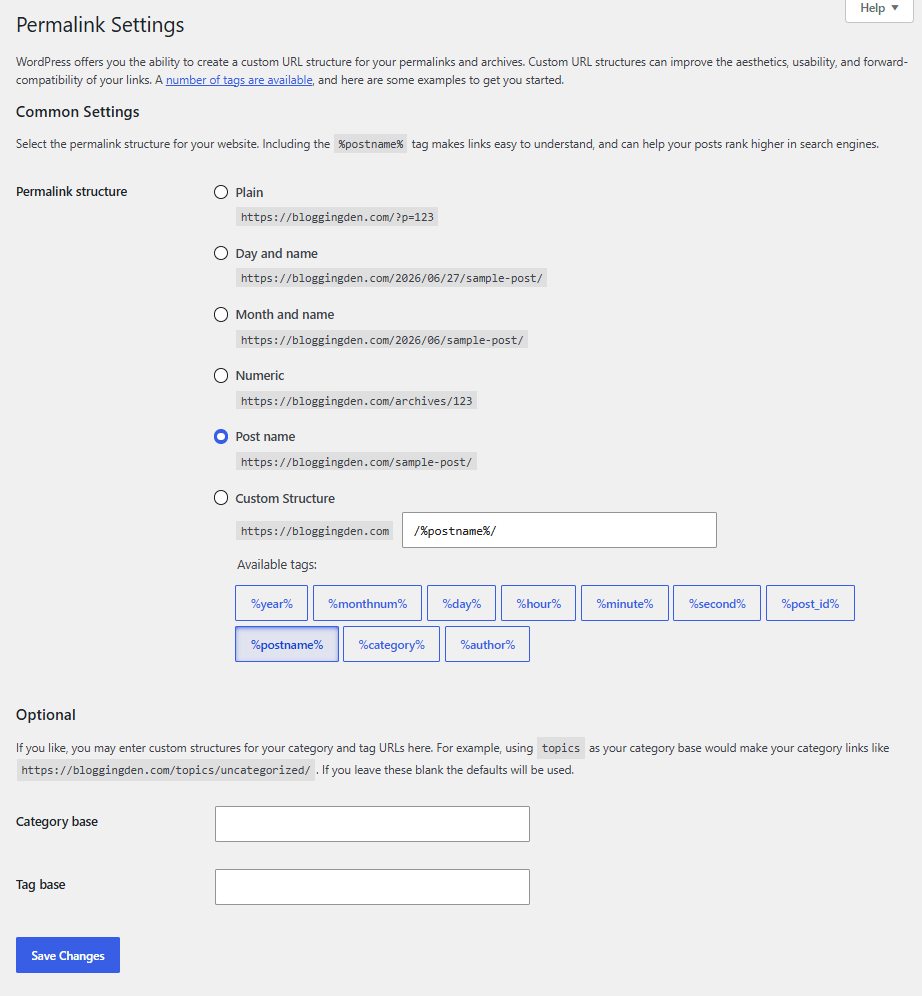
Go to Settings → Permalinks and select “Post name” (/%postname%/). This creates clean, keyword-rich URLs like this yourdomain.com/wordpress-setup-checklist/ instead of yourdomain.com/?p=123.
Why it matters: Your permalink structure is one of the most important on-page SEO factors. A clean URL structure improves rankings, click-through rates, and shareability.
⚠️ Warning: Changing permalinks on an existing live site can break URLs and cause 404 errors. Always configure this before publishing any content.
Step 5: Delete Default Posts, Pages, and Comments
When you install WordPress, it automatically creates several pieces of placeholder content to show you how the platform works. While this is helpful for orientation, none of this content serves any purpose on your live website. In fact, leaving it there makes your site look unprofessional, clutters your dashboard, and adds zero SEO value.
Here is exactly what WordPress installs by default — and how to remove each one:
1. “Hello World!” Post
This is the first default blog post WordPress creates. It has the title “Hello World!” and contains generic filler text. Since this post is publicly visible and indexed by search engines if left live, it can send the wrong signal to both Google and your visitors.
How to delete it:
- Go to your WordPress dashboard.
- Click Posts → All Posts
- Hover over “Hello World!” and click Trash
- Then click Trash at the top of the page and select Empty Trash to permanently remove it
2. “Sample Page”
WordPress also creates a default static page called “Sample Page.” Like the Hello World post, it contains meaningless placeholder text and should never appear on your live site.
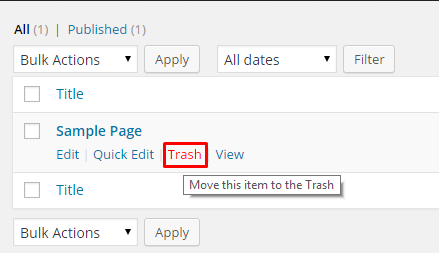
How to delete it:
- Go to Pages → All Pages
- Hover over “Sample Page” and click Trash
- Empty the Trash to permanently delete it
3. Default Sample Comment
There is also a default comment on the “Hello World!” post from the WordPress team. While it seems harmless, leaving it live looks amateur and can confuse visitors who find it in your comment section.
How to delete it:
- Go to Comments in your WordPress dashboard
- Hover over the default comment and click Trash
- Empty the Trash
4. “Hello Dolly” Plugin
This is a classic WordPress plugin that displays random lyrics from the song “Hello, Dolly!” in the top-right corner of your admin dashboard. It has no practical function for website owners and serves purely as a nostalgic Easter egg from WordPress’s early days.
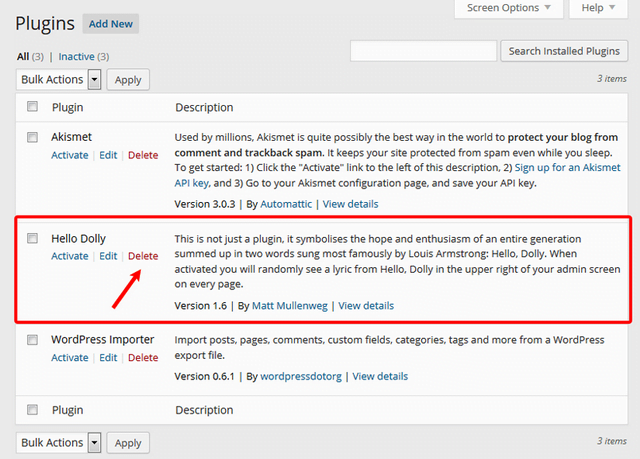
How to delete it:
- Click Delete (not just Deactivate—actually delete it)
- Go to Plugins → Installed Plugins
- Find Hello Dolly! in the list
⚠️ Why This Matters for SEO: Search engines can crawl and index your default content if it is publicly accessible. A “Hello World!” post ranking in Google for your domain looks unprofessional and wastes your crawl budget. Always clean house before publishing real content.
Step 6: Remove Unused Themes and Plugins
One of the most overlooked aspects of a new WordPress installation is the clutter of pre-installed themes and plugins that you never actually chose. Many beginners assume that if a theme or plugin is “inactive,” it is harmless. This is a dangerous misconception—inactive themes and plugins are one of the most common entry points for WordPress hacks.
Why Inactive Themes Are a Security Risk
When WordPress installs, it typically includes 2–3 default themes such as Twenty Twenty-Three, Twenty Twenty-Four, and Twenty Twenty-Five. Even if you are not using them, these themes are
- Receive updates independently—if you forget to update them, outdated code becomes a vulnerability
- Can be exploited even while inactive if they contain security flaws
- Add unnecessary bulk to your hosting account and file system
How to remove unused themes:
- Go to Appearance → Themes
- Click on the theme you want to remove
- In the bottom-right corner of the theme detail panel, click “Delete.”
- Repeat for all themes you are not actively using
💡 Best Practice: Keep one backup theme (ideally a lightweight default WordPress theme like Twenty Twenty-Five) in case your active theme breaks or has a compatibility issue. This acts as a safety net during troubleshooting.
Why Inactive Plugins Are Equally Dangerous
Plugins that are installed but deactivated still exist as files on your server. Hackers can target these files even without the plugin being active. Additionally, inactive plugins:
- Do not receive automatic update notifications as prominently, making it easy to forget them
- Consume disk space on your hosting account
- Slow down WordPress’s admin dashboard because it still has to scan them
How to remove unused plugins:
- Go to Plugins → Installed Plugins
- For plugins you want to remove, first click “Deactivate” (if active)
- Once deactivated, click “Delete.”
- Confirm the deletion when prompted
Pre-Installed Plugins to Evaluate
Depending on your hosting provider, your WordPress installation may come with several pre-installed plugins. Evaluate each one critically:
| Plugin | Keep or Delete? |
|---|---|
| Hello Dolly | ❌ Delete — no practical purpose |
| Akismet Anti-Spam | ✅ Keep — excellent for spam protection |
| WooCommerce (if pre-installed) | ❌ Delete if not running an online store |
| Jetpack (if pre-installed) | ⚠️ Evaluate — powerful but heavy; only keep if needed |
| Hosting-specific plugins | ⚠️ Evaluate—some are useful (caching, staging); others are promotional |
⚠️ Golden Rule: If you have not used a plugin in the last 30 days and have no concrete plan to use it, delete it. A lean WordPress installation is always more secure and faster than a bloated one.
How Many Plugins Should a WordPress Site Have?
There is no strict number, but as a general guideline:
- Beginner blog: 8–12 well-chosen plugins
- Business website: 10–15 plugins
- WooCommerce store: 15–20 plugins (due to e-commerce requirements)
Focus on one plugin per function. Never install two plugins that do the same job — for example, two caching plugins or two SEO plugins. Conflicts between overlapping plugins are a leading cause of WordPress errors.
Phase 2: Secure Your WordPress Website
WordPress security must be configured before you publish a single post. With over 43% of all websites built on WordPress, it is the most targeted platform for hackers. The following 9 steps form a comprehensive WordPress security checklist.
Step 7: Install an SSL Certificate
An SSL certificate encrypts data transmitted between your website and visitors. Most hosting providers (Hostinger, GreenGeeks, SiteGround, and Bluehost) offer free Let’s Encrypt SSL certificates that can be activated from your cPanel or hosting dashboard.
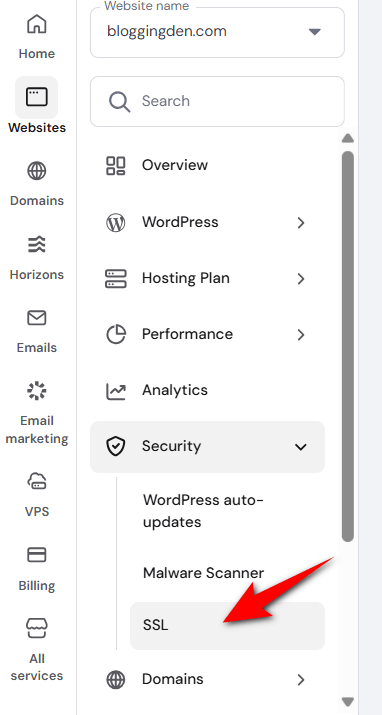
Why it matters: Google marks non-HTTPS sites as “Not Secure,” which destroys user trust and negatively impacts rankings.
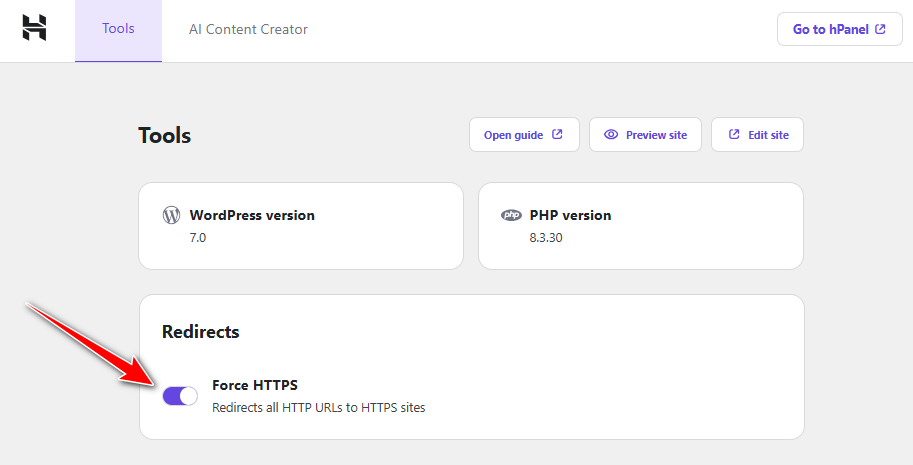
Step 8: Force HTTPS Across Your Website
After activating SSL, you need to force all traffic to HTTPS. You can do this by:
- Adding redirect rules to your
.htaccessfile - Using a plugin like Really Simple SSL (free)
- Configuring it through your hosting control panel
Also update your WordPress Address (URL) and Site Address (URL) in Settings → General to use them.
If you are using Hostinger web hosting, they are providing this Force HTTPs feature in their settings.
Step 9: Change the Default Admin Username
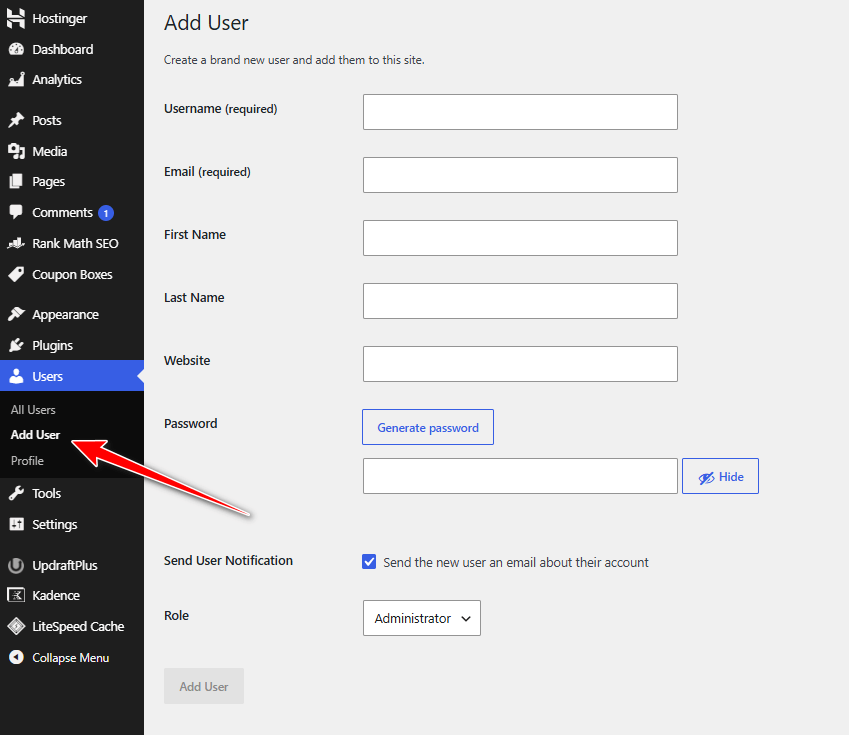
The default “admin” username is the #1 target for brute-force attacks. Here’s how to replace it:
- Go to Users → Add New
- Create a new administrator with a unique username
- Log in with the new account
- Delete the old “admin” user and assign all its content to the new account
Step 10: Use Strong Passwords
Every WordPress account (admin, editor, contributor) should use a strong password that includes uppercase letters, numbers, and special characters. WordPress has a built-in password generator — use it.
Recommended tool: Use a password manager like LastPass or Bitwarden or Google Password Manager to generate and store strong passwords securely.
Step 11: Install a Security Plugin
A dedicated WordPress security plugin adds a firewall, malware scanner, and login protection layer to your site.
| Plugin | Best For | Pricing |
|---|---|---|
| Kadence Security | Comprehensive, automated WordPress protection | Free / Premium comes with Kadence Pro plan from $299/year |
| Wordfence Security | All-around protection | Free / Premium from $119/yr |
| Sucuri Security | Malware scanning & firewall | Free / Premium from $199.99/yr |
| iThemes Security | Beginners | Free / Pro from $99/yr |
| All In One WP Security | Budget-conscious users | Free |
Step 12: Enable Two-Factor Authentication (2FA)
Two-factor authentication adds an extra verification step to your login — even if a hacker gets your password, they cannot access your account without the second factor.
Plugins to use: Wordfence (built-in 2FA), Google Authenticator, or WP 2FA.
Step 13: Limit Login Attempts
By default, WordPress allows unlimited login attempts, making it vulnerable to brute-force attacks. Install Limit Login Attempts Security (free) to block IPs after a set number of failed attempts.
Step 14: Disable XML-RPC (If Not Needed)
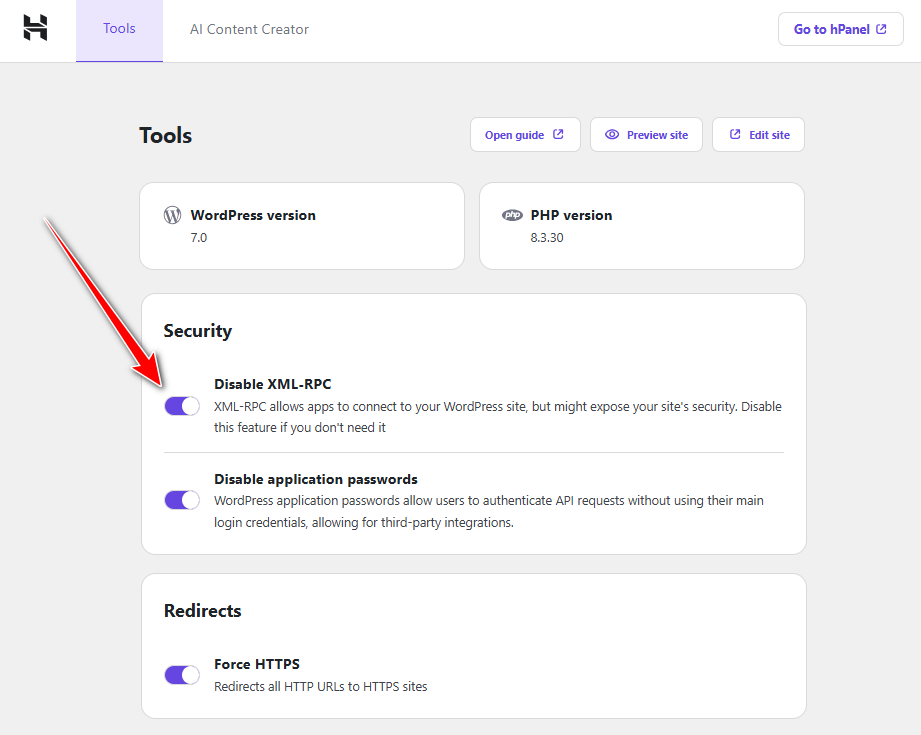
XML-RPC is a WordPress feature that allows remote publishing and communication. If you don’t use mobile apps or remote publishing tools, disable XML-RPC to eliminate a major attack vector. This feature comes with Hostinger service as a default.
You can disable it via:
- Wordfence (firewall rule)
- iThemes Security (toggle in settings)
- Adding a snippet to your
.htaccessfile
Step 15: Schedule Automatic Backups
A backup is your last line of defense. Configure automated, off-site backups using:
- UpdraftPlus (most popular, free) — backup to Google Drive, Dropbox, or Amazon S3
- BlogVault — real-time backups, ideal for WooCommerce
- BackupBuddy — premium, comprehensive solution
Recommended backup frequency:
- Daily backups for active blogs
- Weekly backups for low-traffic websites
- Real-time backups for WooCommerce stores
Phase 3: Optimize WordPress Performance
A fast website ranks higher, converts better, and retains visitors longer. Google’s Core Web Vitals are a confirmed ranking factor in 2026, making performance optimization non-negotiable.
Step 16: Install a Caching Plugin
Caching stores a static version of your pages, dramatically reducing server load and improving load times.
| Plugin | Best For | Pricing |
|---|---|---|
| WP Rocket | All-in-one performance | From $59/yr |
| LiteSpeed Cache | LiteSpeed hosting users | Free |
| WP Super Cache | Budget beginners | Free |
| W3 Total Cache | Advanced users | Free / Pro: $99/yr |
Internal Link Suggestion: See our detailed guide on Best WP Rocket Settings for WordPress Speed for step-by-step configuration.
Step 17: Enable GZIP Compression
GZIP compression reduces the size of files sent from your server to visitors’ browsers by up to 70%. Most caching plugins (WP Rocket and LiteSpeed Cache) enable GZIP automatically.
If you’re using a basic plugin, you can manually enable GZIP by adding code to your .htaccess file or via your hosting’s performance settings.
Step 18: Optimize Images
Unoptimized images are the #1 cause of slow WordPress websites. Install an image optimization plugin before uploading any content:
- ShortPixel — lossy/lossless compression, free up to 100 images/month
- Smush — popular free option
- Imagify — excellent WebP conversion support
- EWWW Image Optimizer — unlimited free compression
Best practice: Always upload images in WebP format when possible. WebP images are 25–35% smaller than JPEG/PNG with equivalent quality.
Step 19: Enable Lazy Loading
Lazy loading delays the loading of off-screen images and videos until a user scrolls to them. This dramatically improves First Contentful Paint (FCP) scores.
WordPress 5.5+ has native lazy loading built in. For advanced control, use WP Rocket (has a dedicated lazy loading setting) or a3 Lazy Load (a free plugin).
Step 20: Use a CDN (Content Delivery Network)
A CDN distributes your website’s static files (images, CSS, JS) across servers worldwide, so visitors load your site from a server near them rather than your origin server.
Recommended CDN options:
- Cloudflare (free tier available) — most popular, includes DDoS protection
- BunnyCDN — affordable, excellent performance
- KeyCDN — pay-as-you-go pricing
Step 21: Clean Your Database Regularly
Over time, WordPress accumulates database bloat — post revisions, spam comments, transients, and orphaned data. Use these plugins to clean your database:
- WP-Optimize (free) — cleans database and compresses images
- Advanced Database Cleaner — granular control
- WP Rocket’s Database Optimization module — if you already have WP Rocket
Schedule database cleaning monthly to keep your site running efficiently.
Phase 4: Essential SEO Setup
SEO setup is where most beginners make the most costly mistakes. Skipping this phase means your content will struggle to rank regardless of its quality. This WordPress SEO checklist covers all critical steps.
Step 22: Install an SEO Plugin
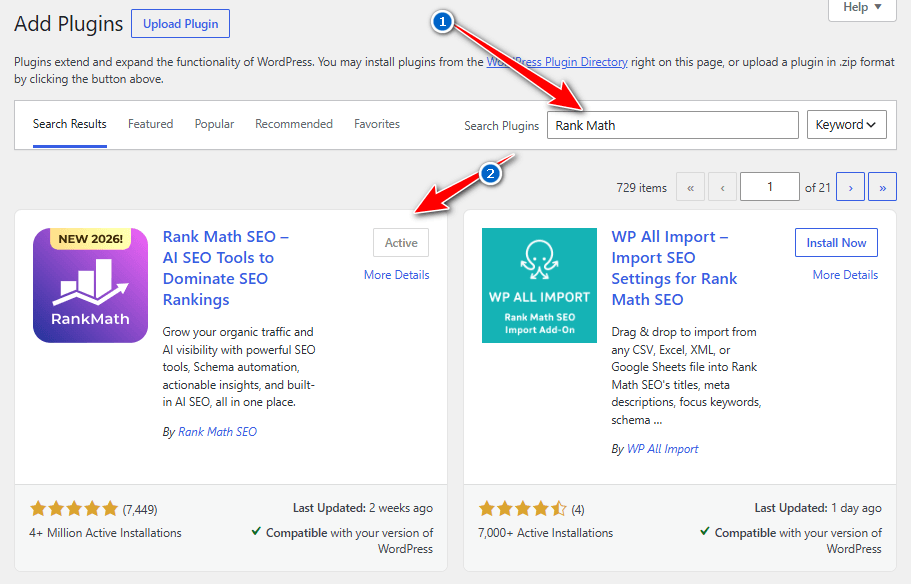
An SEO plugin is the most important plugin on any WordPress website. It manages meta titles, meta descriptions, sitemaps, schema markup, and more.
| Plugin | Best For | Pricing |
|---|---|---|
| Rank Math | Advanced features, free tier | Free / Pro from $6.99/mo |
| Yoast SEO | Beginners, established plugin | Free / Premium from $99/yr |
| All in One SEO (AIO) | Easy setup | Free / Pro from $49.60/yr |
BloggingDen Recommendation: Rank Math is our top pick for 2026. See our Rank Math Free vs Pro comparison for a full breakdown.
Step 23: Generate an XML Sitemap
An XML sitemap tells search engines about all the pages, posts, and content on your website so they can crawl and index it efficiently.
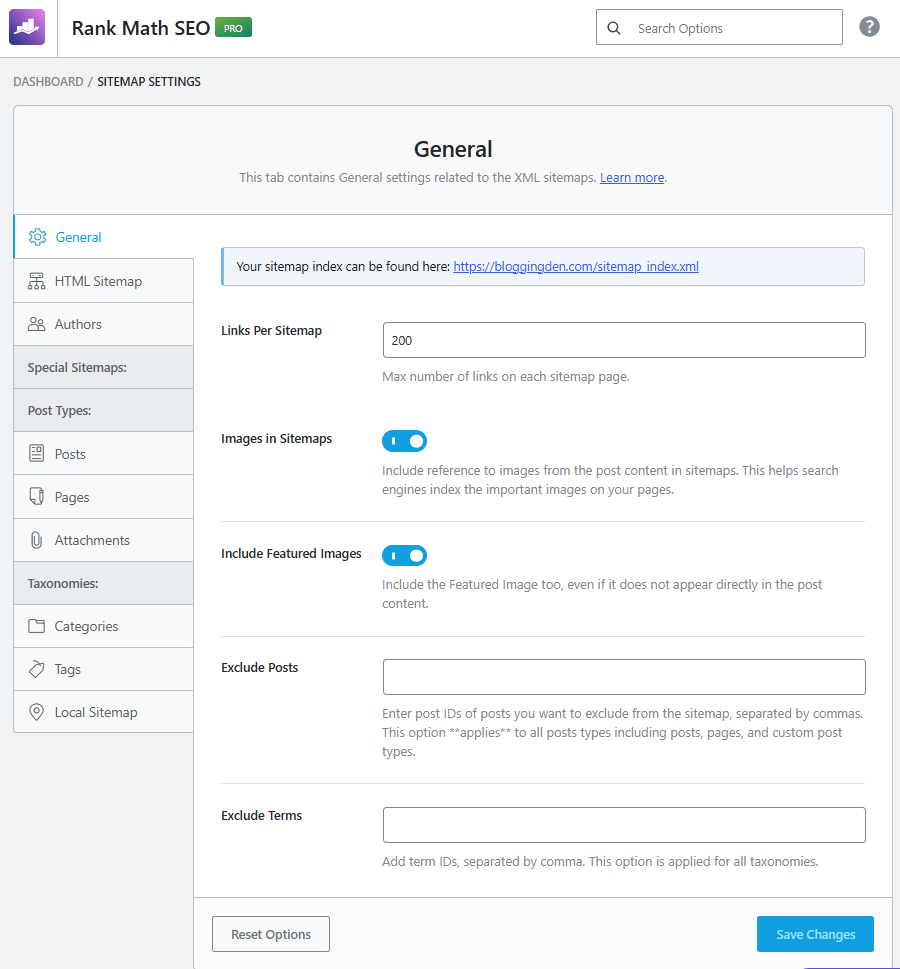
How to create it:
- Rank Math: Automatically generates at
yourdomain.com/sitemap_index.xml - Yoast SEO: Automatically generates at
yourdomain.com/sitemap_index.xml - Google XML Sitemaps: Dedicated sitemap plugin (free)
Step 24: Configure Robots.txt
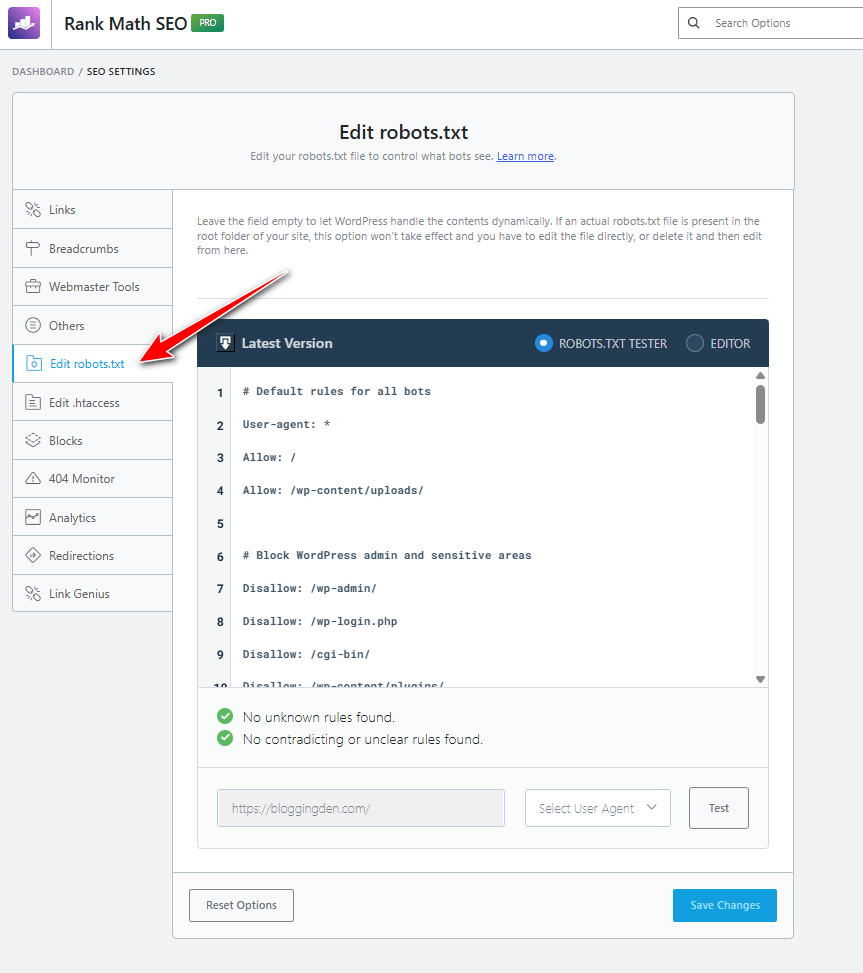
Your robots.txt file tells search engine crawlers which pages to crawl and which to ignore. A misconfiguration robots.txt can accidentally block your entire site from Google.
Basic WordPress robots.txt:
textUser-agent: *
Disallow: /wp-admin/
Allow: /wp-admin/admin-ajax.php
Sitemap: https://yourdomain.com/sitemap_index.xml
You can edit it robots.txt directly from Rank Math → General Settings → Edit Robots.txt or Yoast → Tools → File Editor.
Step 25: Submit Your Website to Google Search Console
Google Search Console (GSC) is a free tool that lets you monitor your website’s performance in Google Search, submit sitemaps, identify crawl errors, and track keyword rankings.
Setup steps:
- Go to search.google.com/search-console
- Add your property (domain or URL prefix)
- Verify ownership (HTML tag, DNS record, or via Google Analytics)
- Submit your XML sitemap
Step 26: Submit Website to Bing Webmaster Tools
Don’t ignore Bing — it powers DuckDuckGo and Yahoo Search and accounts for ~8% of global search volume. Bing Webmaster Tools now lets you import your Google Search Console data automatically.
Go to bing.com/webmasters and follow the same verification and sitemap submission processes.
Step 27: Connect Google Analytics (GA4)
Google Analytics 4 gives you detailed data about your visitors — traffic sources, user behavior, conversion paths, and more.
How to connect GA4 to WordPress:
- Create a GA4 property at analytics.google.com
- Get your Measurement ID (G-XXXXXXXXXX)
- Install via Site Kit by Google (official free plugin), Rank Math (built-in), or MonsterInsights
Step 28: Optimize Your Homepage SEO
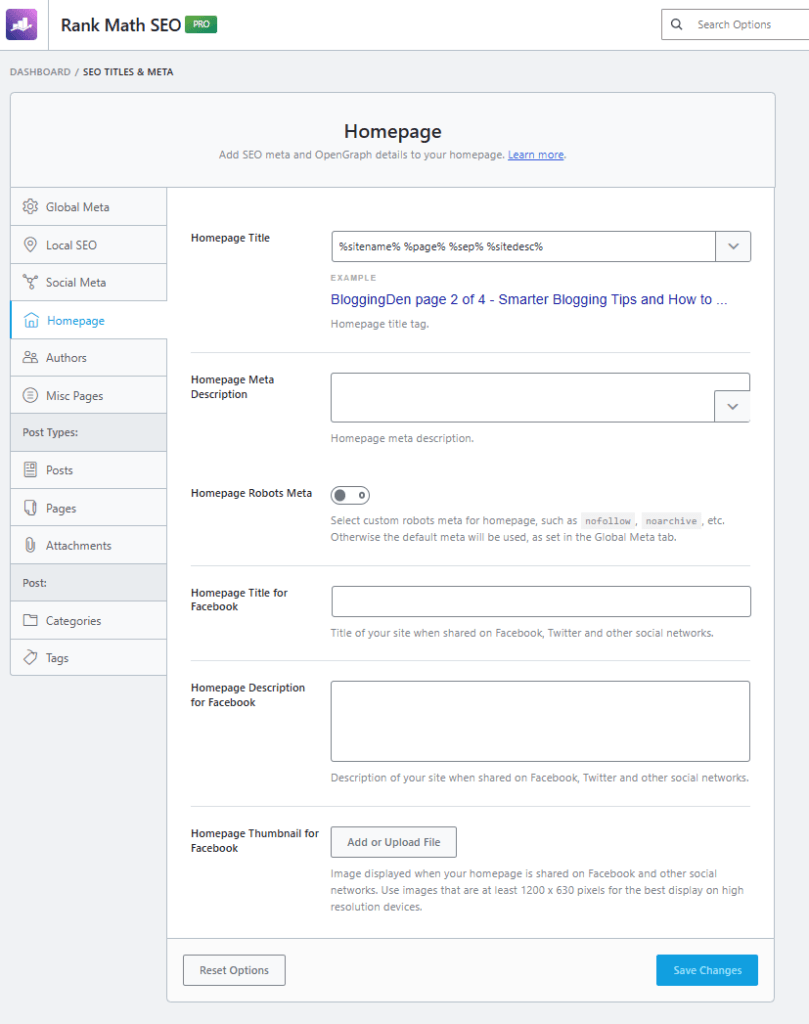
Your homepage is your most important page. Configure these elements via your SEO plugin:
- SEO Title: Include your primary keyword + brand name
- Meta Description: Write a compelling 150–160 character description with your target keyword
- Schema Markup: Add WebSite and Organization schema (more on this below)
- H1 Tag: Ensure your homepage has exactly one H1 tag with your brand/primary keyword
Step 29: Configure Schema Markup
Schema markup (structured data) helps search engines understand your content and display rich results like star ratings, FAQ snippets, and How-To steps in Google.
Recommended schema types for your site:
| Schema Type | Where to Apply |
|---|---|
| Article | All blog posts |
| HowTo | Step-by-step tutorial posts |
| FAQ | FAQ sections (like this post) |
| Organization | Homepage / About page |
| BreadcrumbList | Sitewide navigation |
| SoftwareApplication | Plugin review posts |
Rank Math handles schema markup automatically and allows you to customize schema per post type.
Phase 5: Improve User Experience
A technically perfect website still fails if users can’t navigate it easily. These steps make your site intuitive, professional, and conversion-friendly.
Step 30: Create Navigation Menus
The menu bar helps visitors move around your website easily. It usually appears at the top of the site and includes important links like Home, About, Contact, and Blog.

Simple Steps to Create a Menu:

- Go to Appearance → Menus in your dashboard.
- Click Create a New Menu.
- Give your menu a name, such as Main Menu.
- On the left side, select the pages or categories you want to add.
- Click Add to Menu.
- Drag and drop menu items to arrange them in the correct order.
- Click Save Menu.

Set Menu Locations:
After creating the menu, go to Manage Locations and assign it to the correct place:

- Primary Menu for the main navigation
- Top Menu or Secondary Menu or Footer Menu for links like About Us, Privacy Policy, Terms, and Contact
- Category Menu (optional): Links to your main content categories
A clear navigation menu reduces bounce rate and improves time on site — both positive SEO signals.
Step 31: Configure Widgets
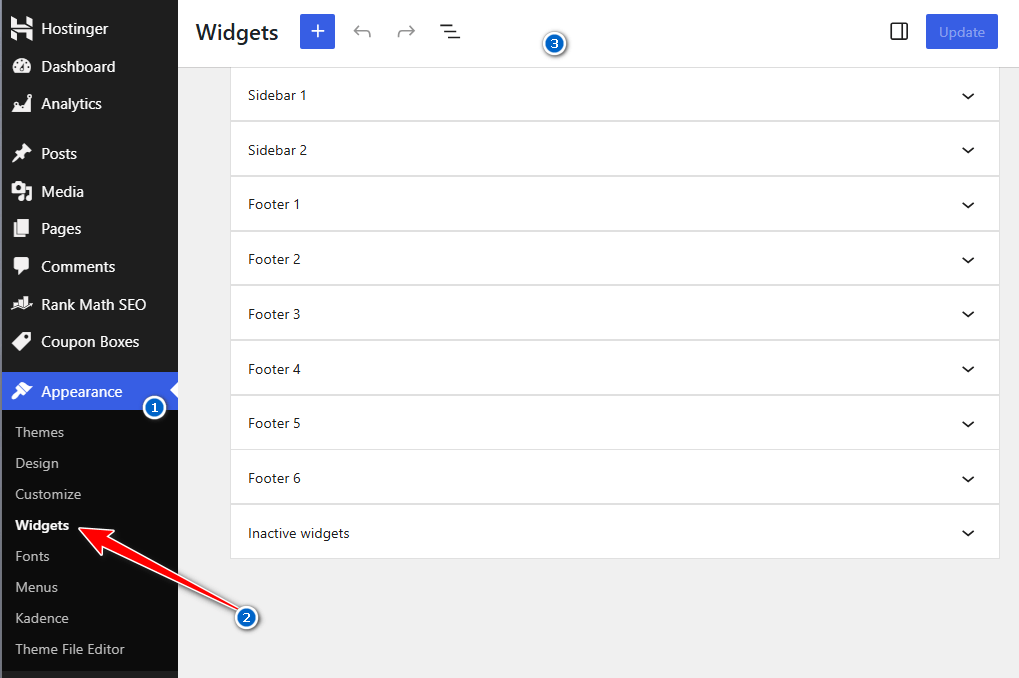
Go to Appearance → Widgets (or customize via your theme builder) and configure sidebar/footer widgets:
- Search widget — helps users find content quickly
- Recent Posts widget — promotes fresh content
- Categories widget — improves site navigation
- About Me widget — builds author authority and trust
- Popular Posts widget — showcases your best content
Step 32: Create Important Pages
Before going live, your WordPress website needs these essential pages:
| Page | Purpose |
|---|---|
| About | Builds trust, introduces your brand/author |
| Contact | Lets visitors reach you; required for AdSense approval |
| Privacy Policy | Legally required for GDPR, CCPA compliance |
| Disclaimer | Required for affiliate marketing disclosure |
| Terms & Conditions | Protects you legally |
Pro Tip: Free privacy policy generators like Termly or GetTerms.io can auto-generate these pages in minutes.
Step 33: Add Search Functionality
Make sure your website has a working search bar. Most WordPress themes include a search widget, but for better results, consider:
- SearchWP — powerful site search plugin
- Relevanssi — improves WordPress’s default search accuracy
- Simply adding the Search block to your header via the Block Editor (Gutenberg)
Step 34: Configure Comment Settings
Go to Settings → Discussion and configure:
- Moderation: Enable “Comment must be manually approved” to prevent spam
- Disable pingbacks and trackbacks—they are largely spam vectors in 2026
- Anti-spam: Install Akismet Anti-Spam (free for personal blogs) to automatically filter spam comments
- Avatars: Enable Gravatar display for a more professional look
Phase 6: Install Must-Have WordPress Plugins
Installing too many plugins is a common mistake. Aim for quality over quantity—each plugin adds overhead to your website. Here is a curated list organized by category:
Essential Plugin Stack
| Category | Plugin | Free/Paid |
|---|---|---|
| SEO | Rank Math SEO | Free / Pro |
| Security | Wordfence Security | Free / Premium |
| Backup | UpdraftPlus | Free / Premium |
| Caching | WP Rocket or LiteSpeed Cache | Paid / Free |
| Image Optimization | ShortPixel or Smush | Free / Paid |
| Forms | WPForms Lite | Free / Pro |
| Anti-Spam | Akismet Anti-Spam | Free |
| Affiliate Links | ThirstyAffiliates | Free / Pro |
| Analytics | Site Kit by Google | Free |
| Database Cleanup | WP-Optimize | Free / Premium |
Affiliate Blogger Tip: If you run an affiliate marketing website, ThirstyAffiliates or Pretty Links are essential for managing, cloaking, and tracking affiliate links professionally.
Phase 7: Content Preparation
Before publishing any articles, set up the structural framework that organizes your content and supports your internal linking strategy.
Create Categories
Categories are the top-level taxonomy of your blog. Plan your categories around your main content pillars before creating any posts:
Categories help you organize your blog posts into clear sections so readers can find content easily. They also make your website look more structured and professional.
Simple Steps to Create Categories
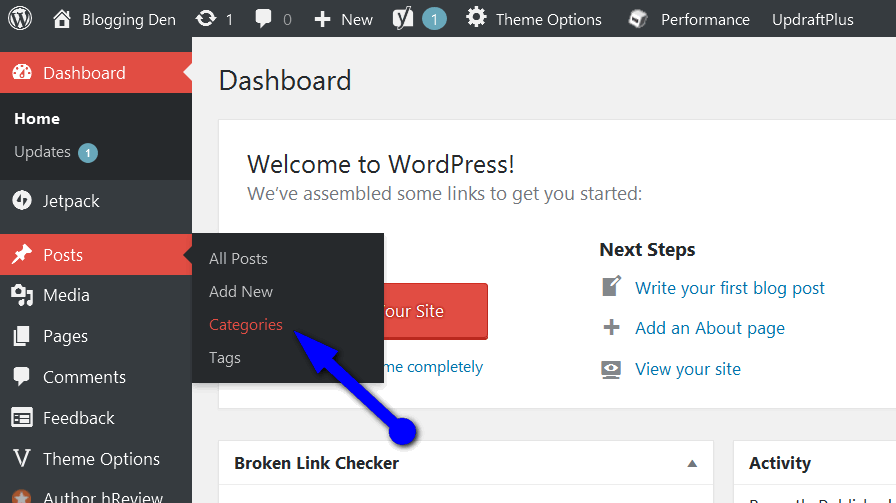
- Go to Posts → Categories in your WordPress dashboard.
- Enter the Category Name.
- Add a Slug if needed. This is the SEO-friendly URL version of the category name.
- Write a short Description to explain what the category is about.
- Choose a Parent Category if you want to create a subcategory.
- Create 4–8 broad category names relevant to your niche
- Go to Settings → Writing and change the Default Post Category from “Uncategorized” to your primary category
- Click Add New Category.
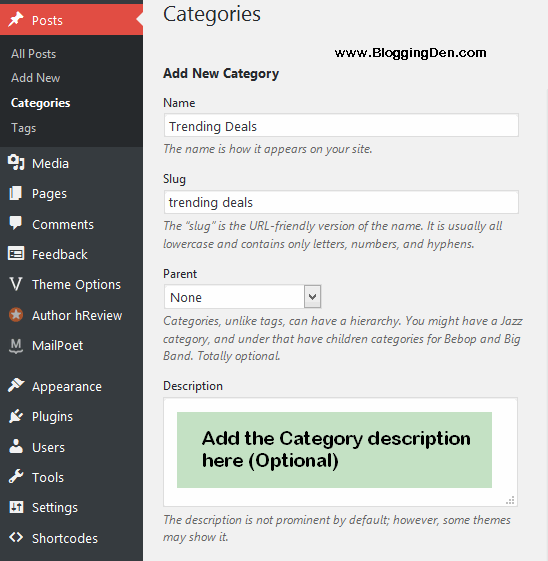
You can repeat these steps to create as many categories as your blog needs. For example, a blogging site may use categories like “SEO,” “WordPress,” “Blogging Tips,” and “Affiliate Marketing.”
Example (for BloggingDen): WordPress, SEO, Blogging Tips, Affiliate Marketing, Make Money Online
Create Tags
Tags are a secondary taxonomy that add granular detail to your posts. Create tags for specific topics, tools, and techniques. Use them consistently — avoid creating a new tag for every post.
Write Your First Blog Post
With your site structure ready, publish your first cornerstone post around your main topic. This should be a helpful, well-organized article that clearly matches your niche and gives readers a strong first impression.
What to include
- An SEO-friendly H1 title with your primary keyword.
- H2 and H3 headings to break the content into easy sections.
- Internal links to important pages like About and Contact.
- A strong meta description written through your SEO plugin.
- A featured image that is optimized and compressed for speed.
Example post URL: You can use a clean URL like https://bloggingden.com/your-first-blog-post/
If you are writing for a specific topic, keep the URL short, simple, and keyword-focused so it is easier for readers and search engines to understand.
You can find more detail on my guide here: How to write a new post
Set Featured Images
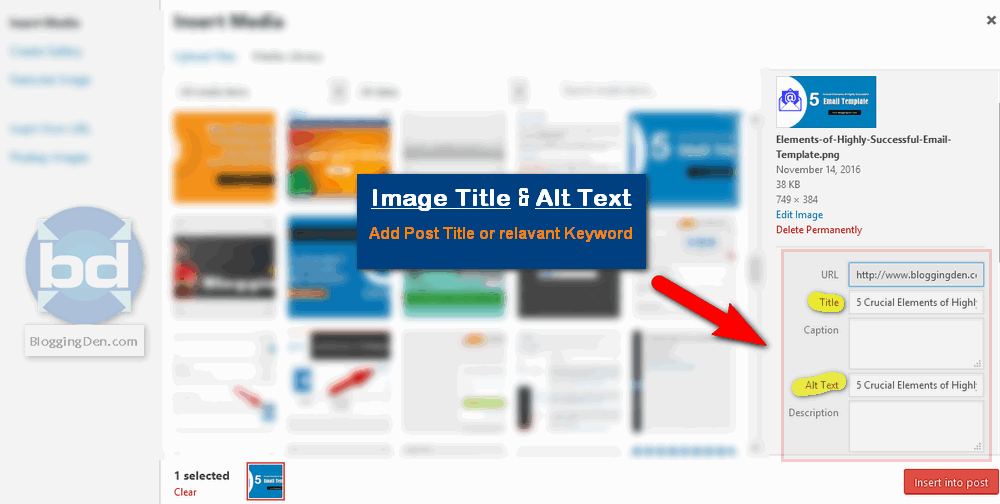
Every post and page should have a featured image that is:
- Sized correctly for your theme (check your theme’s recommended dimensions)
- Compressed before upload (use ShortPixel or Smush or TinyPNG)
- Alt text filled in with a relevant keyword phrase
- In WebP format for best performance
Internal Linking Strategy
Internal linking distributes PageRank (link equity) across your site and helps search engines understand your content hierarchy.
Best practices:
- Link new posts to 3–5 existing relevant posts
- Link older high-authority posts to new content
- Use keyword-rich anchor text (not “click here”)
- Create content clusters—a pillar page linked to multiple supporting articles
Phase 8: Final Pre-Launch Checklist
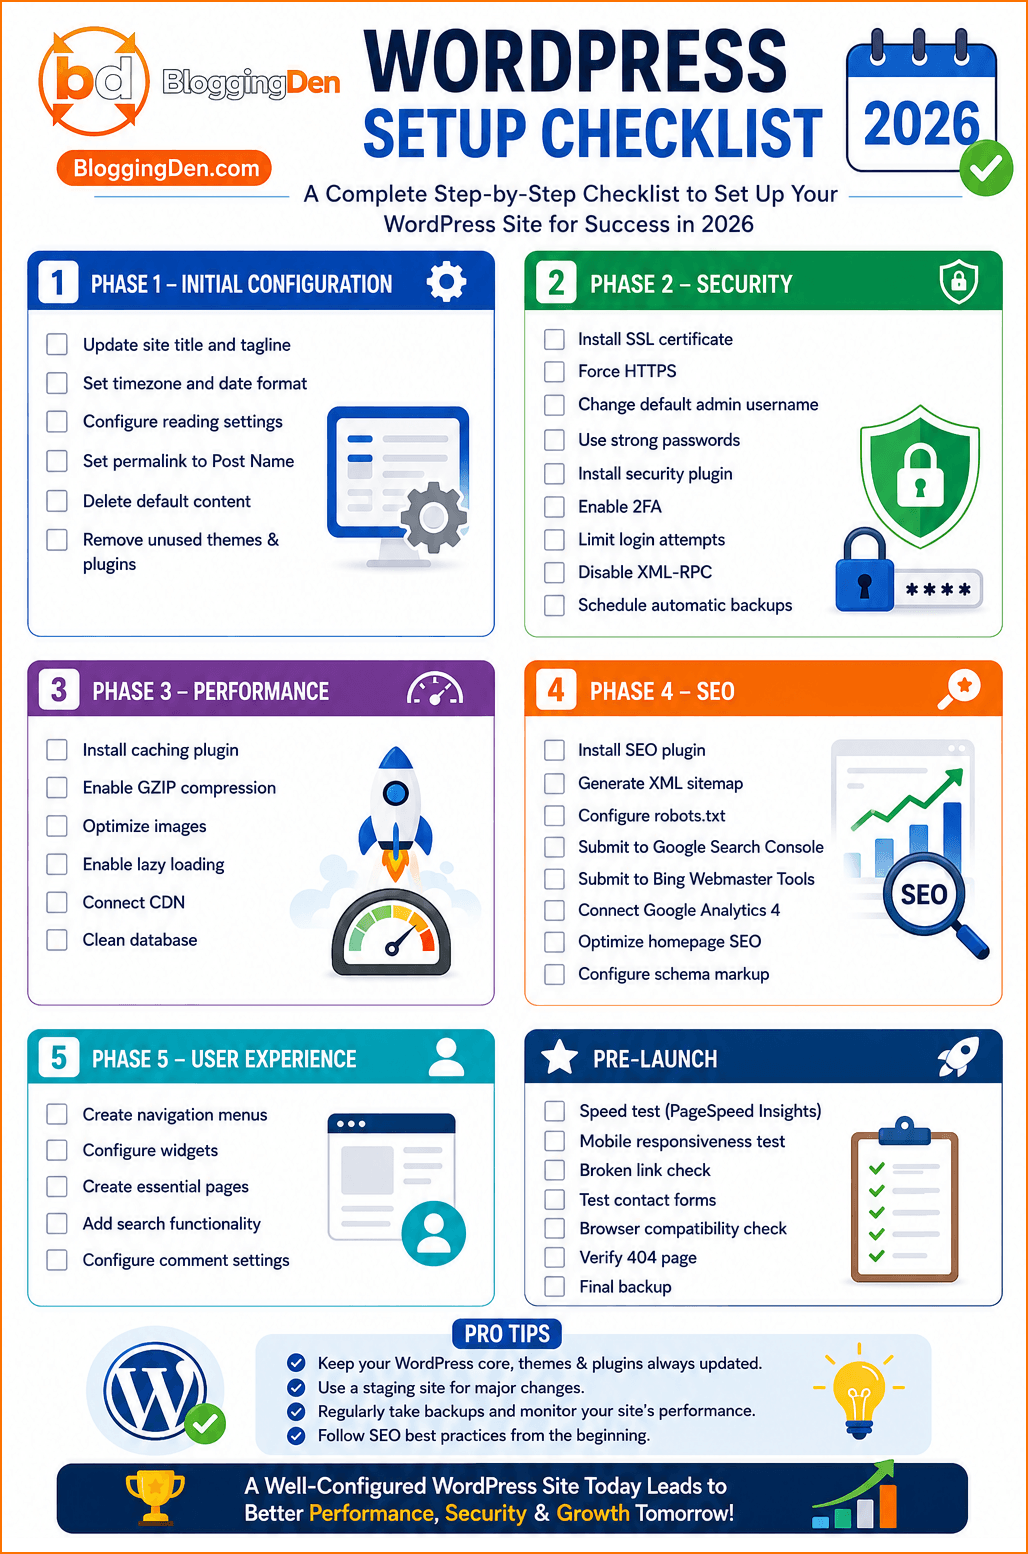
Before making your site live or announcing it to the world, run through this final WordPress launch checklist:
Pre-Launch Testing
- Test Website Speed: Run your URL through PageSpeed Insights and GTmetrix. Aim for a PageSpeed score of 90+ on mobile
- Mobile Responsiveness Check: View your site on multiple devices and screen sizes; use Google’s Mobile-Friendly Test
- Check Broken Links: Use Broken Link Checker plugin or Ahrefs’ free broken link checker
- Test Contact Forms: Submit a test message through every contact form to verify they work and deliver to the correct email address
- Browser Compatibility Test: Check your site in Chrome, Firefox, Safari, and Edge
- Check 404 Pages: Verify your 404 page is styled and includes navigation to help lost visitors
- Verify SEO Settings: Confirm your SEO plugin is active, sitemap is generated, and the “discourage search engines” option is unchecked
- Final Backup: Take a full backup before making your site public.
Common WordPress Setup Mistakes to Avoid
Even experienced bloggers make these mistakes. Here are the most critical ones to watch for:
- Using the default permalink structure —
?p=123URLs kill your SEO immediately and are painful to change later - Installing too many plugins—Every plugin is a potential performance drag and security risk; audit regularly
- Ignoring backups—Server failures, hacking incidents, and plugin conflicts happen without warning; backups are non-negotiable
- Weak or reused passwords — Especially for the admin account, which is the highest-value target for attackers
- Not enabling SSL — Google penalizes non-HTTPS sites; modern browsers actively warn users away from them
- Leaving “Discourage search engines” checked—This single checkbox can prevent Google from ever indexing your site
- Forgetting to set up Google Search Console—Without it, you’re flying blind with no visibility into your search performance
Frequently Asked Questions
How long does WordPress setup take?
Following this complete WordPress setup checklist typically takes 2–4 hours for a beginner. Experienced WordPress users can complete it in under an hour. The most time-consuming phases are security configuration and SEO setup.
What should I do immediately after installing WordPress?
The first five things to do after installing WordPress are (1) update your permalink structure to “Post name,” (2) delete default content, (3) install an SSL certificate, (4) change the default admin username, and (5) install an SEO plugin.
Which plugins are essential for every WordPress site?
Every WordPress website needs at minimum an SEO plugin (Rank Math or Yoast), a security plugin (Wordfence), a backup plugin (UpdraftPlus), a caching plugin (WP Rocket or LiteSpeed Cache), and an image optimization plugin (ShortPixel or Smush).
Do I need an SEO plugin?
Yes, absolutely. An SEO plugin is not optional in 2026. It controls your meta titles, meta descriptions, XML sitemap, robots.txt, and schema markup — all critical ranking factors that WordPress does not manage by default.
How often should I back up my WordPress website?
For active blogs publishing multiple posts per week, daily backups are recommended. For low-traffic websites, weekly backups suffice. WooCommerce stores with transactions should use real-time backups.
Can I change my permalink structure after my site is live?
You can change your permalink structure, but doing so on an established website creates 301 redirect requirements for every URL. If you have existing content and backlinks, changing permalinks without proper redirects will cause significant traffic and SEO losses. Always set your preferred structure before publishing.
Is WordPress secure by default?
WordPress core is regularly updated and reasonably secure. However, the default installation lacks a firewall, brute-force protection, 2FA, and malware scanning — all of which need to be added via plugins or hosting-level security configurations as described in Phase 2 above.
Final Thoughts on WordPress Setup Checklist 2026
Following a complete WordPress setup checklist is the single most important thing you can do as a new website owner. The steps covered in this guide — from configuration and security hardening to SEO setup and performance optimization — form the professional foundation that separates successful blogs from abandoned ones.
Bookmark this page and work through each phase systematically. Return to it when you launch new WordPress sites, and share it with fellow bloggers who are just getting started.
Recommended Internal Links for Further Reading
- How to Start a WordPress Blog — A step-by-step beginner guide
- Best WP Rocket Settings for WordPress Speed — Full performance guide
- Basic Recommended WordPress Settings — Quick settings reference
- Rank Math Free vs Pro — Which SEO plugin version do you need?
- On-Page SEO Checklist 2026 — Post-level SEO optimization