Starting a brand-new blog in 2024 is easier than ever. With the right strategy and commitment, you can launch and grow a successful blog that allows you to share your passion, find your tribe, and even generate income.
In this comprehensive guide, I’ll walk you through every step of building a profitable blog from scratch this year, even if you have no blogging experience.

You’ll learn how to:
- Choose the perfect niche and blog name to attract your ideal audience.
- Set up your blog with the right CMS platform, hosting, and domain.
- Create an eye-catching site design that reflects your personal brand.
- Optimize and produce engaging, valuable blog content regularly.
- Promote your blog through social media, SEO, email lists, and other essential marketing channels.
- Implement monetization strategies like affiliate marketing, advertising, products, and more.
- Analyze site metrics to gain insights and continuously improve.
Whether you want to blog as a creative outlet, for influence and impact, or to replace your 9 to 5, I’ll share everything you need to know to start a successful, profitable blog from the ground up.
Let’s get started!
Blogging Basics to know
What is blogging?

Blogging is the process of creating and sharing content online in the form of written blog posts, videos, podcasts, and more. It involves choosing a topic or niche, creating regular content, and publishing it on a blog platform. Unlike static websites, blogs are dynamic and allow interaction through comments. Blogging allows creators to share knowledge, opinions, stories, and expertise with an audience.
Why Blogging?
Blogging has exploded in popularity for many reasons, including:
- Self-expression: It allows you to share your voice with the world.
- Making an impact: You can build an audience and community around important causes and issues.
- Authority building: Consistent, high-quality blogging builds you up as an expert in your niche.
- Income opportunity: blogs can generate income through advertising, affiliate marketing, digital products, and more.
- Flexibility: You can blog part-time around other work or full-time as your main career.
- Low barrier to entry: It’s easy and inexpensive to start a blog these days.
Blogging as a Career
With the rise of social media and the creator economy, blogging as a full-time career is more viable than ever. The top reasons it’s an attractive profession are:
- Be your own boss and set your schedule.
- Work from anywhere with an internet connection.
- Creative and entrepreneurial outlet.
- Continuously learn and expand your skills.
- Express your passions and make an impact.
- Monetization and passive income potential.
For many, blogging represents freedom, flexibility, and the chance to build something meaningful. With hard work and persistence, it can become a fulfilling and sustainable career.
How to choose or decide on areas of interest (or) niche?
On a daily basis, the internet hosts more than 100 million blogs. Choosing a topic for your blog should be your first step. Here, I’m offering a useful list for selecting your niche ideas and their varieties.
You can write about anything you want, share memories or tips, upload photos of your loved ones, write about travel, share recipes, write about a single product, earn money through affiliate marketing, rent out blog space, sell goods, or discuss your favorite TV shows.

First, try to find out which area you’re passionate about and whether it’s niche topics or specific topics.
- Personal Niche: You can write about whatever you want. You can upload pictures of your family or friends. You can write long-term tips or memories like a diary.
- Travel niche: I really like the idea of sharing your travel and journey pictures with your family and friends. You can share your travel experiences with them. Many bloggers enjoy traveling around the world and earning money from it.
- Cooking ideas: Sharing your recipes and food photos is a great way to share them. This is a great place to discover new recipes. In this way, the admin makes many international friends online.
- Niche-Specific Blog: The blog can be focused on one of the products or on many of the topics you might want to start writing about. “Best backpacking knives” is one example.
- Entertainment Niche: You can write gossip, celebrity pictures, and your favorite TV shows. This type of blog growth is very fast.
- Make money Niche: In this way, you can make legal money online in a very popular way. To make money online, you need to solve problems, provide value to your visitors, and have clear monetization methods such as affiliate marketing, advertisement placements, and selling blog space.
Creating Your Own Blog from Scratch: A Step-by-Step Guide
To start your online presence, choose the perfect name for your brand, and then choose the perfect hosting as per your requirements. So, let’s get started to learn how to make a blog and how to become a blogger in 2024.
- Choose Domain Name
- Choose Blogging Platform
- Set up Your Blog
- Start Writing Content & Publish
- Setup Console and Analytics
- Start Promotion
- Make Money by Blogging
1. Choose a domain name
Before registering a domain name, you need to choose the perfect name or keyword for your website.

A domain name is a name for your website. You use this name to identify your website on the Internet. For instance, BloggingDen.com is my domain name. The domain name of Google is Google.com, etc.
In other words, you need to choose the perfect name or keyword for your domain name.
Register the domain name online with a domain registration service. Choosing a keyword for your domain name requires you to know a few things.
Remember these points before selecting a domain name.
Before starting the blogging adventure, You need to decide with a lot of care in selecting a Domain name. One should remember a few things before registering the domain name.
- Understand Your Niche: You need to have a complete idea of your topic. First, you should decide on your domain name with relevant keywords. For example, the keywords related to blogging would be “blogging,” “blog, blogo, and bloggy. If you are planning to start tech blogs it would be Tech, Techno, Techy, Geek, Nerd, etc.
- Avoid Numbers and Special characters: Do not use numbers and special characters in the website name. If you are using numbers and special characters, there is no additional value to the SEO aspect. For online brand reputation, try to avoid numbers on the website URL.
- Should be Meaningful and descriptive: Choose a creative and meaningful name. It helps you to promote your brand and business in the right way. The chosen name for online registration should be significant. The meaning of the name should be known to you.
- Should be easy to pronounce: The name of your domain should be short, meaningful, and easy to pronounce. Do not go for long names as your domain names.
You can use the Domains-Finder tool to find thousands of effective names for your domain name.
To know the unique keywords for your new name registration, use these tools, and pick one keyword to register.
2. Choose a Blogging Platform
Anyone can start a blog on free blogging platforms including blogger.com, wordpress.com, and tumblr.com, along with Ghost, Medium, and MovableType.
There is a small difference between blogs and websites. If you want to make a career out of blogging, the free platform is not a good option. because it has plenty of limitations for moving your blog as per your business requirements. Simply put, your blog is not under your control.

The final solution to overcome this limitation is to host your blog on a self-hosted platform. The platform gives you complete control over your blog’s content. Here, there are no limitations to your blogging journey.
Everything is under your control, like blog content (images and videos). Finally, your blog looks professional.
Choosing the best platform to begin a blog is significant. These are the software or services that help you publish your quality articles on the Web in the form of a blog.
Simply put, it is a kind of content management system (CMS). Before starting a blog, you need to choose an easy-to-use blogging platform for publishing.
- On a blog, new posts appear first, but on a website, the order of posts is not important.
- Blog posts have a date and the name of the person who wrote them.
- Each blog post belongs to a specific topic or category.
- Blogs are easy to find on search engines, but websites need extra work to be found.
Which blogging platform is good?
There are many free websites for making blogs, but using them is not good for making money. Many websites use a platform called WordPress because it can be customized.
Some new bloggers use free websites like WordPress.com, Blogger, Tumblr, and Medium to start their blogs, but these are not good options for making money because they do not allow you to place ads.
So here is the best option: move away from free blog sites.
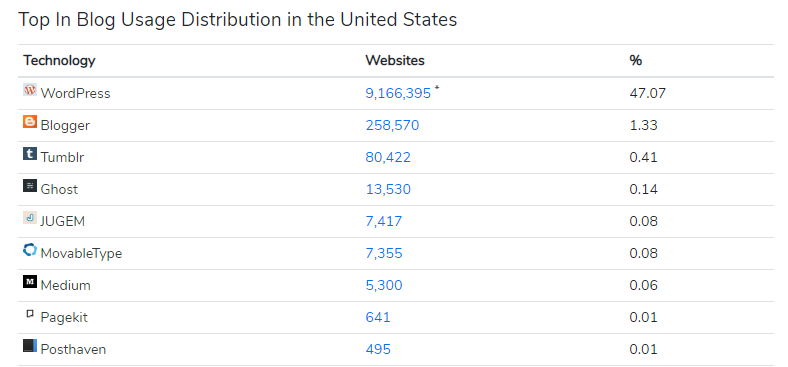
- A self-hosted WordPress blog is a great option for starting a new online journey.
- WordPress is one of the most popular platforms and it has two versions: WordPress.com and WordPress.org (self-hosted).
- I suggest using a self-hosted WordPress blog for improved results and ease of use as no coding skills are required.
- Self-hosted platforms allow you to have your own custom domain name and more control over your blog.
- If you’re committed to blogging, self-hosted platforms like WordPress.org are a great choice, but you will need to pay for your own web hosting and domain name.
Why self-hosted WordPress to start a new blog?
Starting a new blog on a self-hosted WordPress platform makes sense for a few reasons.
- Control: You have more control over your blog with self-hosted WordPress blogs since you can alter the look, feel, and functionality of your website.
- Flexibility: You can run your own custom domain name and install custom plugins and themes with self-hosted WordPress blogs. This gives you more flexibility to create a unique website.
- SEO: It’s easier for readers to find your blog when it performs well in search engine results on self-hosted WordPress blogs.
- Monetization: Self-hosted WordPress blogs offer more monetization options, such as Google Adsense, affiliate marketing, sponsored posts, etc.
- Professionalism: Self-hosted WordPress blogs can look more professional and establish a more serious image for your business or blog.
- No Limitations: Self-hosted WordPress blogs have no limitations in terms of space, design, and functionality, unlike free-hosted platforms like WordPress.com.
- Cost: While self-hosted WordPress blogs do require an investment in web hosting and a domain name, the costs are relatively low and can be easily recouped through monetization options.
How much will it cost to run my blog on a self-hosted WordPress platform?
To launch your blog, you need two things mainly. They are Domain name and Web hosting.

Domain name: As I mentioned in the above points, you have to choose one name for your blog and register it with any domain registrant, like Godaddy, BigRock, or Namecheap. You need to register a domain name to start a blog, and this costs $10 per year. I will tell you the secret of how to get a free domain. It saves you nearly $10 for the first year. You can try my new tool, Domains-Finder.

Web hosting: Web hosting is a service where your content is stored on a web server. It costs $1.99 per month. In total, it costs around $48 to $70 per year. This host comes with a 30-day money-back guarantee. If you are not feeling good about blogging, you can cancel your account at any time to get your money back. You can try Hostinger.
3. Setup Your Blog
Nowadays, plenty of Web hosting services are running on the internet. But most of the services are not secure and provide weak customer support. Here are the basic steps.
They are Choosing a Perfect Web Host, Installing WordPress, setting up a Blog, and Configuring the Theme and Plugins.

a. How Buy Hostinger WordPress Hosting?
Hostinger has plans tailored to your needs, from basic shared hosting to premium options. Whether you are creating a new website or migrating an existing one, Hostinger is your ideal choice for web hosting and domain management. Hostinger is the best web hosting service to ensure that WordPress is installed, and you can manage your hosting effortlessly.
First, you’ll need to register for a Hostinger hosting plan. Their low-cost shared hosting works excellently for most WordPress sites.
Step 1: Visit Hostinger
First, you need to visit the hostinger discount link from here. You will get a massive discount of more than 75%. Once redirected to the hostinger discounts page, hit the Claim Deal button.

Step 2: Choose the plan
Now, choose the perfect plan as per your needs and click on “Add to cart”. Hostinger offers three different shared hosting plans for newbies and advanced users.

They are
- Single: This plan costs $1.99 monthly and includes hosting a single website with 50 GB of SSD storage.
- Premium: This plan starts at $2.99 monthly and includes hosting up to 100 websites with 100 GB of SSD storage.
- Business: This plan starts at $3.99 per month and includes hosting up to 100 websites with 5x performance and 100 GB of SSD storage.
All plans include free SSL certificates, email hosting, CDN services, and unlimited bandwidth and traffic.
You can choose any of the hosting plans provided. However, it is advisable to select a business plan for more than one year to avail of additional benefits like more features and to avoid high renewal charges.
Step 3: Fill your Details
Now, you will be redirected to the main page with the options
1. Choose a period:
Choose the yearly planner. If you pick more months, the monthly price will be low. Pick 12 months or 24 months.

2. Create your account:
You can create your account via Google, Facebook, or email.

3. Select Payment:
Select your preferred payment method from the following options: credit card, PayPal, Google Pay, Alipay, or Coingate. To complete the payment process, you can choose any of these methods. Google Pay is a good option for Indian users.

You must also fill out the form with basic details like name, phone number, address, and Coupon code.

Once you complete the above details then you need to click on Submit Secure Payment to complete the payment process.
Once you complete the above details, click Submit Secure Payment to complete the payment process.
Once your new hosting account is ready (usually in minutes), you’ll receive a welcome email from Hostinger with login details to start the WordPress install process.
Furthermore, Hostinger offers various plans, including premium shared hosting plans, which come with the added benefit of WordPress backup to ensure the security of your website. So whether you’re setting up a new WordPress website or transitioning from another hosting service, Hostinger is one of the best options for creating your website quickly and confidently.
Register Your Domain: Connecting Your Domain to Your WordPress Site
The next step is registering a new domain name for your WordPress site. You can write a domain during Hostinger signup or through your hosting dashboard.
Here is how to check for domain availability and complete your registration:
In your Hostinger account, click ‘Claim Domain‘ from your Account Actions section and enter your desired domain name. (or)

Choose the TLD extension (.com, .net, .org, etc). Hostinger offers extensions starting at $9.99 a year.

Select domain privacy protection if desired. It hides your contact info from the public view.
Complete domain registration by entering your contact details for the Whois records.
No payment is needed now—no additional Domain charges. Hostinger offers a free domain for one year for new hosting choosers.
Once registered, your new domain will automatically be assigned to your Hostinger account. Now, you can install WordPress using this domain.
You can explore the process of connecting your domain to your WordPress installation on Hostinger.
b. How to Install WordPress on Hostinger with Auto Installer?
To begin, simply login to your Hostinger account, where you’ll have easy access to your website and hosting settings. If you want to install WordPress, you’re just a few clicks away from making it a reality. The platform’s shared web hosting options ensure you can quickly install a WordPress site that suits your needs.
Hostinger makes installing WordPress fast and easy with their auto-installer tool. Just click, and WordPress is configured on your account in seconds.
To install WordPress quickly, look for a web hosting provider that offers a one-click installation. Some hosting providers, such as Hostinger, provide this service.
If you are sure to use the CMS, we suggest looking for WordPress rather than shared hosting.
Hostinger’s WordPress hosting plans are all optimized for this content management system and allow you to install it with just a few clicks.
Here’s how to use hostinger’s Auto-Installer:
Step 4: go to hPanel
- To manage your new WordPress-powered website, log in to your hosting account and select Websites from the main menu.
- Then, click on the Manage button next to your website’s domain name.

Step 5: Choose Auto Installer
On your hPanel Dashboard, find the Auto Installer button in the Website section.

Step 6: Choose the installation application
Then, choose the WordPress section by clicking on the Select button.

Step 7: Fill the details
Now, fill out the install WordPress form.
- Add the title in the Website title section.
- Enter the Administrator Username, Password, and Email for the WordPress login. The login information for the web hosting does not need to be the same as the login information for the other accounts. To prevent security breaches, make sure to choose a strong password.

A strong password is at least 12 characters long and includes a mix of upper and lowercase letters, numbers, and symbols. It is also essential to avoid using personal information, such as your name, birthday, or address, in your passwords.
- Choose the language and Application version.
- Select Always update to the latest available version option.
- Once the form is filled, hit the Install button.
- To access your WordPress dashboard, click on the three dots next to your WordPress URL in the Hostinger Installed Applications list and then select Manage.
- Click the Edit Website button on the Website Dashboard to access the WordPress administration dashboard.
After confirming your selections, click the “Install” or “Submit” button to begin the installation process. Hostinger’s Auto installer will handle the technical aspects of setting up WordPress on your chosen domain.
Once the installation is complete, you’ll receive a confirmation message. It will include the URL to access your newly created WordPress website and the login details for your WordPress admin panel.
By following these steps, you’ll have successfully accessed the Hostinger control panel (hPanel) and initiated the installation of WordPress. With WordPress now installed, you can configure it, customize your website, and publish content to share with the world.
c. Install a suitable WordPress theme
The look of the website and user retention depends on the visual appearance of that site. Choosing a WordPress theme is easy.
There are tons of free and premium themes available in the WordPress repository.
You can use any free theme initially. While choosing the WordPress template, if you do not have a graphic designer or programmer to your service, I recommend the Kadence theme for this.

If you’re looking to design a stylish, modern blog from scratch, I recommend checking out Kadence WP.
Their premium themes and plugins allow you to create a custom WordPress site without needing to know the code.
As you begin designing your new blog, I highly recommend using the Kadence theme. With its search engine-optimized code, customizable layouts, and built-in performance features, Kadence is the perfect theme to give your fresh blog a boost in 2024.
If you want to save time on design while optimizing your site for SEO success from the start, investing in the robust Kadence theme is an easy win. Their templates, settings, and integrations make it effortless to rank your blog.
Don’t waste time trying to DIY a design that keeps up with the latest SEO best practices. Let the cutting-edge Kadence theme do the heavy lifting, giving your new blog a head start on driving qualified organic traffic.
Kadence offers beautiful ready-made Ai starter templates, hundreds of block templates, and pre-made layouts to choose from. You can easily customize colors, fonts, and designs with their intuitive editing tools. All these come in one bundle pack to make your website more attractive for more visitors.
- Kadence Theme
- Kadence Blocks plugin
- Kadence Starter templates
- Kadence Conversions plugin and
- Kadence Lifetime full review
Some of my favorite features are the animation effects, transparent headers, and advanced typography controls.
With Kadence, you can achieve a unique, professional site design in no time. And their outstanding customer support means you’ll have help if you get stuck.
How to install a WordPress theme?
You need to log in to the blog’s backend. Select the Themes from Appearance.
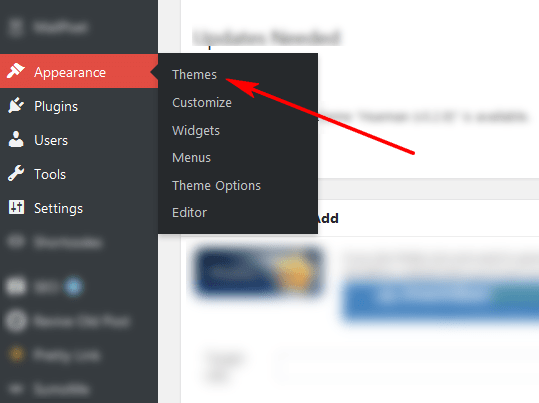
Now Select Add New.
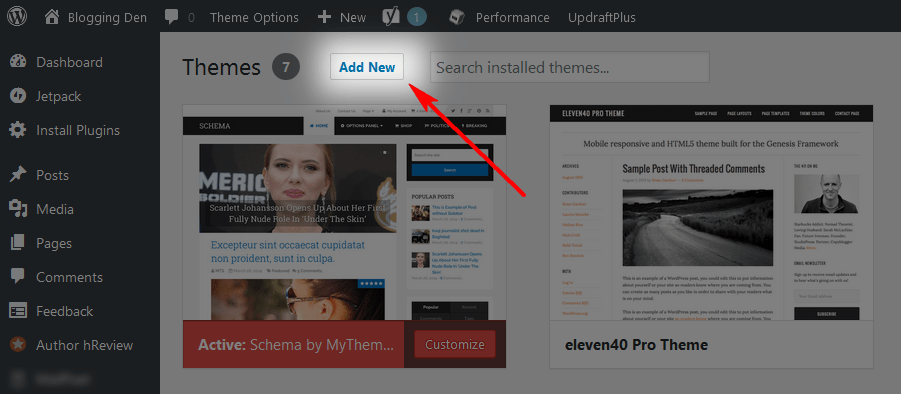
Choose the theme you would like to use by using the Feature, Popular, Latest, Favourite, and Feature Filter options.
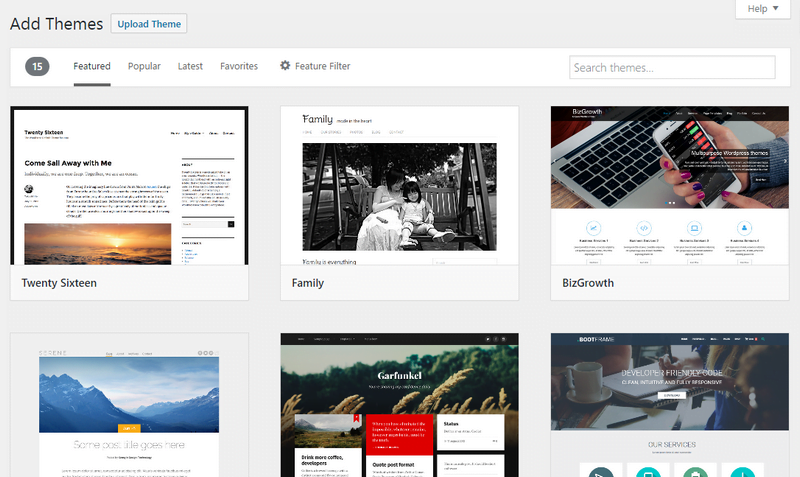
Here, I searched for the Kadence theme that best suited my needs, and then I clicked on the Preview link to preview the theme or Install Now to upload the theme.

The CMS will initiate your theme installation and show the success message.
Now click on Activate. Your selected theme is uploaded and activated as your chosen theme in your blog.
Now your theme is activated, and it shows more options like Customize, Widgets, Menus, and much more.

Now your Blog design is ready with an attractive look.
In the free version, there is limited customization. The Kadence Pro version gives a great customization facility with a fast-loading feature.
If you are planning to redesign with a brand new WordPress theme, you can read my Kadence theme review. This theme fulfills your requirements.
How to add a Logo?
The Logo is the basic element for your blog branding. For more visibility online, you have to create a new logo.
If you are new to this, here is the list of free logo creation tools. You can create a new logo as per your taste and requirements.
To create a new logo, you can use the free logo creator tools, or hire a professional to create a logo for you.
After receiving your logo design, you have to upload it to your blog.
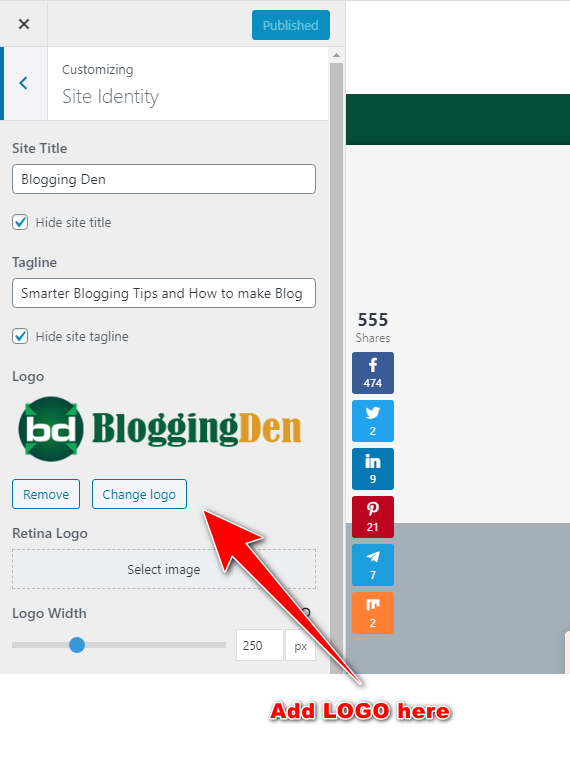
The logo should be in specified dimensions as per theme specifications, and it should be in PNG format.
To upload this logo, you have to go to Appearance > Customize > Site Identity > Logo (in the Kadence theme).
d. Install and setup WordPress plugins
These plugins are handy for all works with attractive options to the visitors by handing over from the blog.
The plugins have been playing a vital role in the visibility of your blog.
There are about 60,102 free plugins available in the plugins directory.
These are helpful for SEO and site optimization purposes on the web.
Along with these plugins, there are other plugins also available on the specified website.
Adding Plugins to your blog is very easy. After that, follow the instructions in the given steps.
How to Set Up a WordPress Plugin on a New WordPress Blog?
We have a step-by-step guide on how to set up a WordPress plugin. In short form, I am giving these smart steps.
Just go to the “Plugins” option from the left side column

Then, Search for your Plugin in the “Search” box and you will get the Plugin. Plugins > Add New > Search
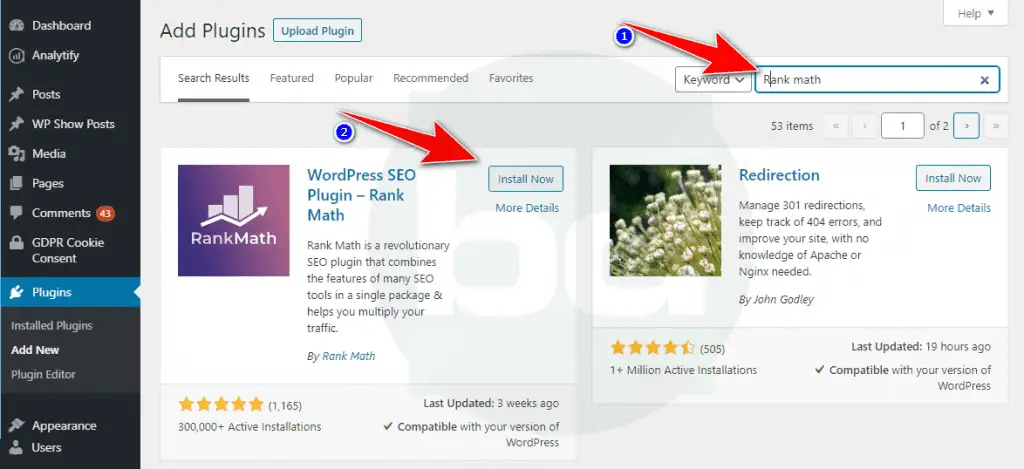
For example, type Rank Math (The plugin for a better SEO setup) in a search bar, Install the plugin, activate it, and you’re done!
After activation, the page will be redirected to the plugin settings page from the left side column and configured as per your needs.
The Rank Math SEO plugin has been used on my blog for a few months. I wrote a complete review of the Rank Math SEO plugin. You can read and change your blog.
For every different niche or theme, different plugins will help you in building additional features that are required for the website.
WordPress plugins are necessary for every kind of website. These plugins give visibility and a professional look to your website.
d. Create categories and Menus
Now your blog is 80% ready. Before publishing your new content, you need to create categories and a menu. Here are the necessary steps to create these elements for your blog.
How to Create Categories?
To create new categories, go to the Posts > Categories section from the left side column. This will help you organize your content.
You can create parent categories and child categories. The child categories will be added to the subcategories. The creation of categories is a straightforward process.
Let us check the steps to create new categories.
Step 1: Go to the Categories tab
To do this go to the Posts > Categories section from the left side column.

Step 2: Add a New Category
On the next screen, go to the left side and click on the “Add New Category” option. This option helps you to create a new kind of article.
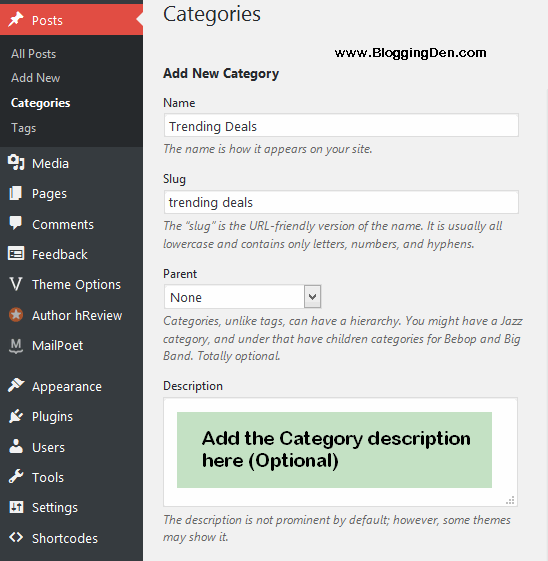
- Enter the category name, the slug, description, and parent for the new category and click “Add new category”.
- Repeat the same steps given above for new category creation. That’s it.
e. How to Create a Menu Bar?
The menu bar is essential for navigating the information contained within the blog. There is a simple and easy way to use a drag-and-drop menu interface.
To create a menu bar, go to Appearance > Menus. It allows you to create drop-down menus in WordPress.
It helps you to present the site structure to your users. So, the navigation menu is essential, and it is placed close to the header.
Create a menu bar in a step-by-step
To create a menu bar, go to Appearance > Menus. It brings you to edit the menu screen.

The Edit menu’s screen has two columns. The left column has your Pages, Custom Links, Tags, and Category tabs. On the right-side columns, there is an adjustable menu item interface with drag and drop.
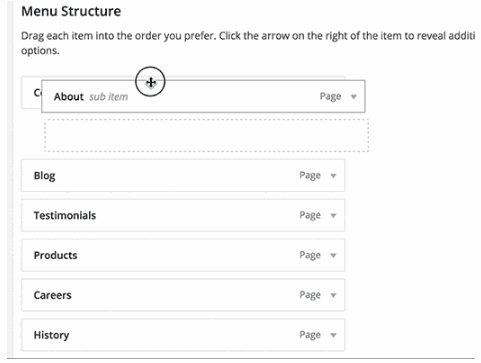
Choose the page or category and put the tick mark on the desired page. Then, click on “Add to the menu,” and the page will be added to the right-side interface.
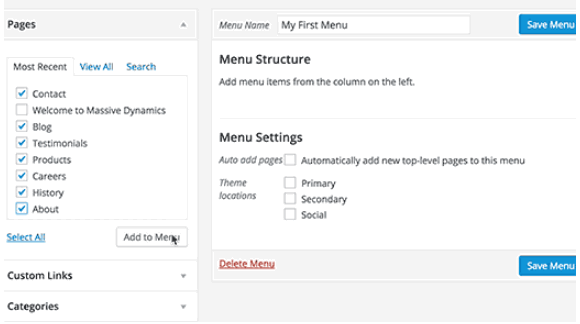
Finally, click on the Save menu to save the above setting.
Publish the article and save it to your blog, then go to Manage Locations and select another menu to appear in the top menu bar.
You can change the menu items you added to be arranged in the order you added them. Just drag and drop a menu item to adjust its position in the menu.
Now your blog is ready to publish your new article.
4. Start Writing and Publish Your First Post
This is an important point to keep in mind before you begin writing a new article or piece of content.
People visit your blog to read the content but do not click on the advertisements.
To become a successful blogger, you have to produce good content on a daily basis.
Obviously, the content should not be any way to fascinate an audience. To Google, companies, and advertisers, the content of your blog must be fresh, useful, and informative.
But there is one more feature that needs to have that content and be relevant over time.

Add pre-launch content
Pre-launch content includes static pages (About Us, Contact Us, Privacy Policy, and Terms of Service pages), as well as other parts of your blog.
- About us: This is the common traditional page, and it helps you to inform people about your blog—why do you run a blog and what information are you sharing? It could be for business, personal, or entertainment purposes, depending on the information you provided.
- Contact us: This page can help your visitors communicate with you at any time. Here you must add the contact form, social links, address, and email address. Most of the visitors and advertisers will communicate with you via this page. So, simply create this page.
- Privacy policy: A third-party service generates the static and permanent content of the privacy policy. To create this, the third-party service (Privacy Policy Generator) generates the static and permanent content for this page.
- Sidebar content: The sidebar is the smaller column to the right or left of the main body. It depends on the theme that you have selected. The content of the sidebar, such as the most recent posts, the most popular posts, and the ads, should be made for each page or post separately.
- SEO meta tags: SEO meta tags are SEO titles and SEO descriptions. These two should be prepared for every individual post and page for better search engine visibility. It should be prepared separately.
- Add post-launch content: This is the regular updating of the latest content for your blog. A blog post is the entry content, and a cornerstone post is relevant evergreen content.
How to write Your first article?
Writing is an art. Everyone has their own style of expressing their views.
Of course, writing articles for magazines is not an easy task. Writing an article is a common thing.
But the writing of SEO-friendly articles needs some practice.
If you follow the below tips, you will become an expert within a few days.

Article structure
Before getting into this, you have to know the basic structure of an article. In an article, you have to include an introduction, a body, and a conclusion.
- Introduction: In this part, you have to write a few words about the post’s content or topic.
- Body: This is the major part of the article. It includes a list, a case study, images, video content, and some elements.
- Conclusion: This is the final part of the article. The summarization of the article should be included here. Simply, it is an article summing up the area.
Follow SEO Tips:
- Before you begin writing an article, choose an appropriate keyword and topic. Google Trends can help you choose trending topics.
- Your article should be written for readers. An article that is readable becomes viral.
- Don’t use more than 20 words per sentence.
- Your sentences should be in the active voice. It is better to avoid the passive voice.
- For better understanding, add statistics.
- Avoid long paragraphs.
- Every paragraph should contain two to three sentences.
- Where necessary, use bullets, bold, italics, and underlines.
- Use short and appropriate side headings.
- After you finish your article, make sure it is error-free, readable, and search-engine friendly.
On-Page SEO

On-Page SEO is playing a very crucial role in search engines. After finishing writing your article, before publishing or posting it on your blog, you have to concentrate on these few points.
After writing your article, you should add the primary keyword in the Meta tags, the first and last paragraphs, and the blog post URL, and sprinkle related and LSI keywords throughout the article. If possible, use simple sentences. Here are the points in a detailed way.
- Do proper keyword research before you start writing an article and its optimization.
- Add the primary keyword in the Meta tags (Title, meta description)
- Add primary keywords first and last paragraphs once (within 100 words)
- Add the primary keyword in the permalink (blog post link / URL).
- Collect some LSI keywords and related keywords according to the target keyword and sprinkle them throughout the article. If it is possible, write simple sentences by using those keywords without disturbing their readability.
- Add the target keyword within the image ALT text.
These are the basic points to optimize the on-page SEO of your article. If you need more details, here is my complete On-Page SEO Checklist 2024.
Publish your first article
To start posting content on your WordPress blog, you need to learn about Post-Creation and Image Uploading. To do this, you need to know the essential points about post-creation and image uploading. Once you learn these basics, you can dive into WordPress. Now you will be able to customize all aspects of the WordPress blog. Writing great content is an art. In the process of boosting SEO ranking, and getting traffic, and leads, you need great content for your blog.
How do I create a new WordPress post?
The creation of a new post or page in WordPress is very simple. Using WordPress, you can create new web content, either articles or other content. This is good and one of the main features that will allow you to use WordPress.
To start the WordPress post creation process, go to Posts >Add New and paste the title and body content from your document.
On this page, you will find two important things:
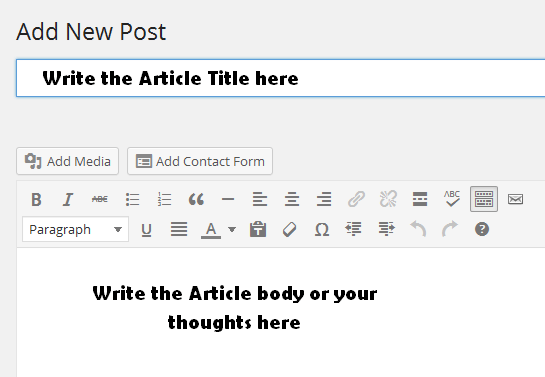
- Post Title: This is the top thing on the page. You must add the content title here.
- Post Content: This is the actual place to add textual information, images, and videos. You can see this area in full coding mode (HTML mode) or Visual mode (Text mode).
You should check the post’s textual information, images, and videos, and save the post in draft mode.
Follow the SEO plugin instructions
To start with SEO, you need to install an SEO plugin. I used the Yoast SEO plugin and migrated to WordPress SEO by Rank Math last year.
It is free with limited features. I have used this plugin for more than 5 years. The results are good. This is one of the awesome plugins.
It comes with all the premium features which are offered by the Yoast SEO plugin as free options in the Rank Math.
There are four sections in the Rank math SEO plugin: Basic SEO, Additional, The Readability, and Content Readability. So it’s better to install and configure the Rank Math SEO plugin. If you are new to this, you can follow this Rank math SEO settings guide for your blog.
This plugin provides the instructions for better on-page SEO from the Post editor section. which is located at the end of the screen. In this widget, you will get the four sections in the General tab. They are Basic SEO, Additional, Readability, and Content Readability.

In each section, there is a set of instructions with red or green indicators. The green indicator means you implemented that instruction perfectly. A red indicator means you have to follow the instructions to complete the on-page SEO.
Add suitable images and videos
To add images or other multimedia to the text, go to the editing box, click on the “Add Media” option, and follow the instructions.
If you add images or videos, the text stays engaging, and the user can understand the content quickly. In the WordPress blog, this is very easy. To start this, open the page/post where you intend to add the media file.
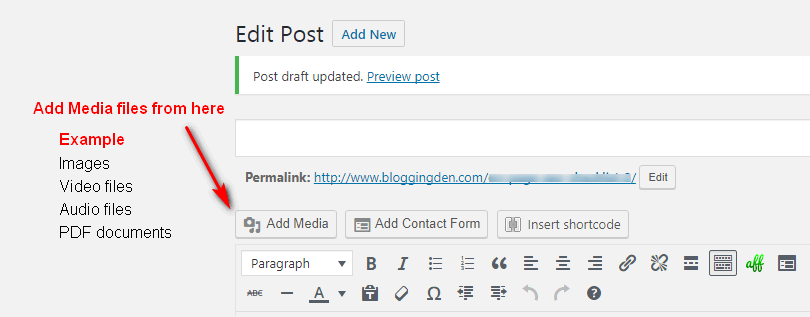
To upload a file, go to Insert Media > Upload Files and choose the file from your computer.
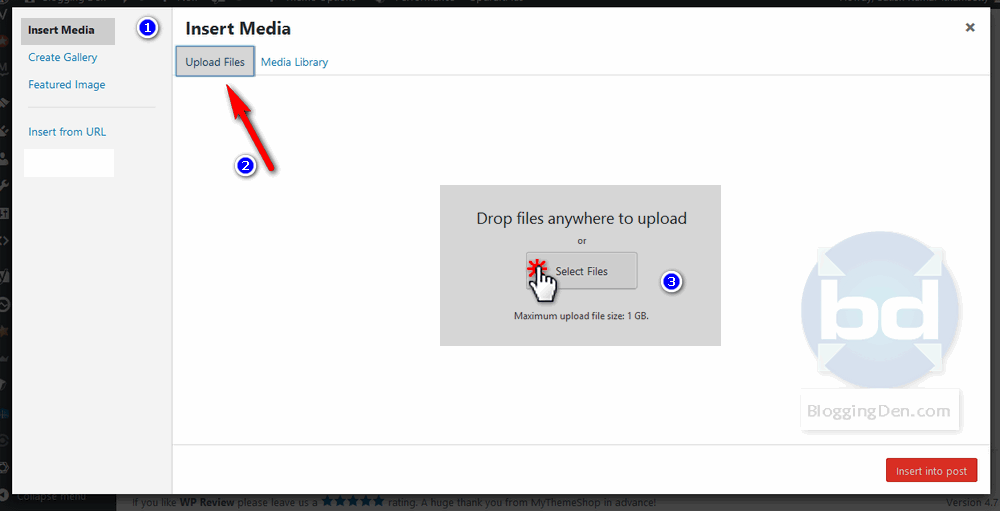
Once the file is chosen, click on Upload and finally click on Insert into Post. Once you upload the file, you can use the image or video within the article.
Before putting the image up, you need to do smart image SEO. This is simple. Just fill in the title and alt text with your primary keyword. Here I am using post titles in my blog images because post titles are already optimized on an On-Page SEO basis. So, it has the primary keyword.
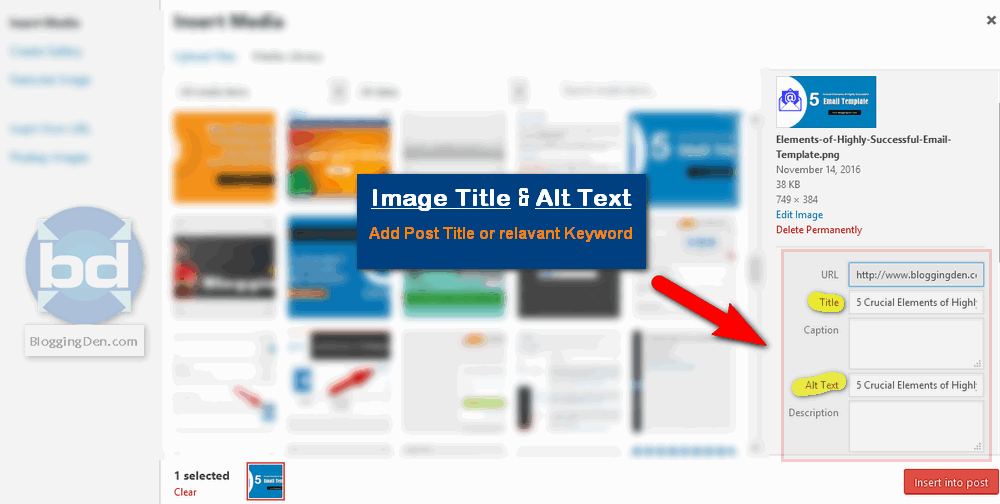
If you change the basic and specific elements in the right way, the image will be put in your post automatically.
After making this adjustment in the proper way (mentioned above), now place the media file within your content by clicking the “Insert into post.” The image/media file will be added automatically.
Finally, update the post/page by clicking Save as a draft. Click the preview to see the newly added image placement.
Concentrate on basic SEO before posting
Before hitting the Publish button, you have to update these three.
- Header tags: Header tags are very important to complete basic SEO. To do this, you have to add the title in the Rank Math SEO plugin (or) Yoast SEO widget’s SEO title box. This is the basic snippet, which is visible on the search engine results page.
- Categorization: Categorization is also a very important area to avoid duplicate content within your blog. Choose the appropriate category after article optimization.
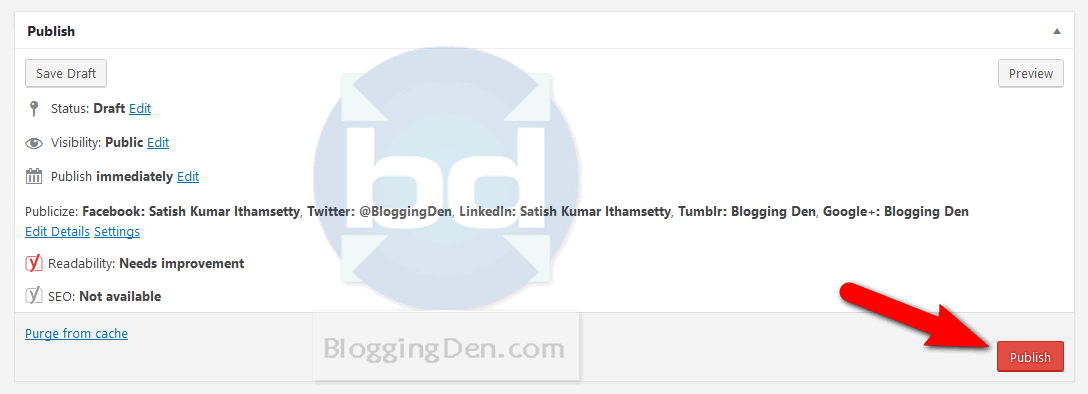
- Permalinks: The permalinks are the web page addresses. These are different from posts and sub-pages. Adding the post’s target keyword gives excellent results. After you’ve checked your work, click the “Publish” button to let other people see it.
5. Configure Google Search Console and Analytics
Congratulations. You have submitted the first article on your blog successfully.
Now it is time to inform the search engines and to observe the visitors’ behaviors on your blog.
So, you have to go to the Google search console and Google Analytics for this process.

What is the Google Search Console?
Google Search Console is a powerful tool that allows website owners to monitor and manage their site’s performance in Google Search. It provides valuable insights, helps identify issues, and assists in optimizing your website for better visibility. Let’s dive into how you can verify your site ownership and get started with Google Search Console:
- Sign in to the Search Console:
- Visit the Google Search Console website.
- Sign in using your Google account (the same one associated with your website).
- Add your property:
- Click on “Add Property.”
- Enter your website URL (e.g.,
https://bloggingden.com).
- Choose a verification method:
- Google offers several methods to verify ownership. Select one that suits you:
- HTML File Upload: Upload a specific HTML file to your website.
- HTML Tag: Add a meta tag to your website’s
<head>section. - DNS Record: Create a DNS TXT record.
- Google Analytics: Use your existing Google Analytics account.
- Google offers several methods to verify ownership. Select one that suits you:
- Complete the verification process.
- Follow the instructions provided for your chosen method.
- Once verified, you’ll have access to your site’s data and tools within the Google Search Console.
- Multiple Verification Methods (Optional):
- You can add multiple verification methods in case one fails (e.g., if a template change affects an existing method).
- Visit the Settings page for your property and click “Ownership verification.”
- Child Properties (Auto-Verification):
- After verifying the main property (e.g.,
bloggingden.com), any child properties (likem.bloggingden.comor specific paths) will be auto-verified using the same method.
- After verifying the main property (e.g.,
- Verification Duration:
- Verification lasts as long as the Search Console confirms the validity of your verification token.
- Periodic checks ensure ongoing verification.
- If not fixed, permissions expire after a grace period.
Remember, data starts accumulating for your property as soon as it’s added to the search console, even before verification.
What is Google Analytics?

Google provides Google Analytics, a potent web analytics tool. It allows you to track and analyze user behavior on your website or mobile app. By integrating Google Analytics, you gain valuable insights into your audience, their interactions, and the effectiveness of your content and marketing efforts.
Here’s how to integrate Google Analytics with your website:
- Create a Google Analytics 4 property:
- Visit the Google Analytics website.
- Sign in using your Google account.
- Click on “Admin” in the lower-left corner.
- Under the “Property” column, click “Create Property.”
- Choose “Web” for a website or “App” for a mobile app.
- Follow the setup instructions to create your property.
- Add a data stream (for websites):
- If you’re setting up a website property, click on your newly created property.
- Go to the “Data Streams” tab.
- Click “Add Stream.”
- Enter your website details (URL, stream name, etc.).
- Follow the instructions to add the data stream.
- Get Your Google Analytics Code:
- After creating the property, you’ll receive a unique tracking code (also known as the “UA code” or “measurement ID”).
- This code needs to be added to your website’s HTML. Place it just before the closing
</head>tag on every page you want to track.
- Integrate with APIs (optional):
- Google Analytics provides APIs that allow you to automate complex reporting and configuration tasks.
- If you’re a developer, explore the Google Analytics APIs to build custom solutions.
- Explore Google Analytics 4:
- Google Analytics 4 (GA4) is the next generation of analytics.
- It collects event-based data from both websites and apps.
- Learn more about GA4 and how to use it to enhance your insights.
Remember, Google Analytics helps you understand your audience, track conversions, and optimize your website or app.
6. Start Promotion
This is the biggest game in the digital marketing industry. The two sources of traffic in digital marketing are search engine traffic and social traffic.
They are organic traffic (search engine traffic) and social traffic (traffic from Facebook, Twitter, Pinterest, etc.). Of course, this is the biggest source of massive traffic.
Other than this, we have to concentrate on a few things to reach the exact target audience with your content/product.
What happens is, when you are involved in other work and if blogging is not your full-time job, irregular blogging will never give you a regular income.

So, you can follow these wonderful steps to promote your blog posts and drive massive traffic for your posts.
Promoting a newly published blog post is crucial to ensuring it reaches the right audience and gains traction. Here’s a comprehensive checklist to help you effectively promote your blog post:
- Optimize Your Blog Post:
- Ensure your blog post is well-structured, contains relevant keywords, and provides value to readers.
- Add internal links to other relevant posts on your website.
- Share on social media:
- Manually share your blog post across various social media platforms.
- Use relevant hashtags to increase visibility.
- Include eye-catching images or videos, especially on visual platforms like Instagram.
- Leverage email marketing:
- Send an email to your subscriber list, notifying them about the new post.
- Craft an engaging subject line to encourage interest.
- Submit to the Q&A Sites and Comment Sections:
- Participate in relevant Q&A platforms (e.g., Quora) and share your blog post where it adds value.
- Engage with blog comment sections by sharing your post if it’s relevant to the discussion.
- Create Pinterest pins:
- Design visually appealing pins for your blog post.
- Pin them to relevant boards on Pinterest.
- Collaborate with influencers:
- Reach out to influencers or bloggers in your niche.
- Ask them to share your blog post with their audience.
- Repurpose Content:
- Convert your blog post into other formats (e.g., infographics, podcasts, videos).
- Share these across different channels.
- Run Paid Promotions:
- Consider boosting your post on social media or using paid advertising to reach a wider audience.
- Update Old Blog Posts:
- Link to your new post from relevant older articles.
- Refresh and republish older content with a link to the new post.
- Engage in Blogging Communities:
- Join blogging Facebook groups or forums.
- Share your post and engage with other bloggers.
Remember, consistent promotion is key. To increase the visibility of your blog post, share it more than once and keep promoting it!
7. Make Money with a Blog

Launching a blog is just the first step. Once you’ve set everything up, started publishing quality content, and begun promoting your site, you can shift focus to monetization.
But don’t expect to immediately start earning money from your new blog. Generating real income takes time and dedication even after you implement monetization strategies.
It could take several months of consistent blogging before you build a large enough audience to profit from your site.
There are no shortcuts when it comes to successful blogging. I’ve learned from years of experience that a legal blogging business built the right way is one of the best paths to financial freedom online.
If you’re a new blogger, don’t get discouraged. With the right mindset and commitment, you can absolutely achieve your income goals. Test different monetization systems to see which works best for your blog and audience. Carefully analyze your results so you can optimize what’s working and switch up what’s not.
The key is persistence, patience, and constantly providing value to readers. By sticking to blogging best practices month after month, you’ll eventually reach profitability and the financial freedom you seek. It’s a marathon, not a sprint. Stay positive and keep putting in the hard work.
a. Google Adsense
Google AdSense is a popular way for website owners and bloggers to monetize their content by displaying relevant ads. Here’s a step-by-step guide on how to make money with Google AdSense:

- Create a Google AdSense account:
- If you don’t already have one, sign up for a Google account (if you use Gmail or any other Google service, you already have an account).
- Visit the Google AdSense website and set up your AdSense account.
- Provide your phone number and postal address associated with your bank account for payments.
- Connect your site to AdSense:
- Add a piece of code (an AdSense snippet) to your website. This code allows Google to display ads tailored to your site’s layout.
- Google will automatically show relevant ads alongside your content.
- Choose ad placements:
- Decide where to place ads on your blog. Common placements include:
- Within Content: Insert ads between paragraphs or within articles.
- Sidebar: Display ads in the sidebar.
- Header and Footer: Place ads at the top or bottom of your pages.
- Auto Ads: Use Google’s Auto Ads feature to automatically place ads where they perform best.
- Decide where to place ads on your blog. Common placements include:
- Optimize your ad revenue:
- Experiment with different ad formats (text, display, and responsive) to see what works best for your audience.
- Regularly check your AdSense dashboard for insights on ad performance.
- Consider using AdSense Custom Search to monetize search results on your site.
- Quality Matters:
- Ensure your content is high-quality and relevant to your audience.
- Google screens ads to ensure they match your content and provide value to users.
- Control and customize:
- Use AdSense settings to block specific ads or categories you don’t want to display.
- Customize ad styles to blend seamlessly with your site’s design.
- Track your earnings:
- Monitor your AdSense earnings through your account dashboard.
- Payments are made monthly once you reach the payment threshold.
Remember, patience and consistency are key. As your blog grows and attracts more visitors, your AdSense earnings can increase.
The key advantages of AdSense are that it’s easy to set up, ads are targeted to your content, and payments are reliable. The downside is that the earnings potential is limited compared to other monetization options.
No matter what monetization approach you choose, focus on providing valuable content and growing your audience first. A popular site with engaged visitors is essential for earning significant income from ads or other monetization strategies.
b. Affiliate Marketing
Affiliate marketing is a monetization model where you earn commissions by promoting other companies’ products on your website.
Here are some tips on how to leverage affiliate marketing to make money with a new blog in 2024:
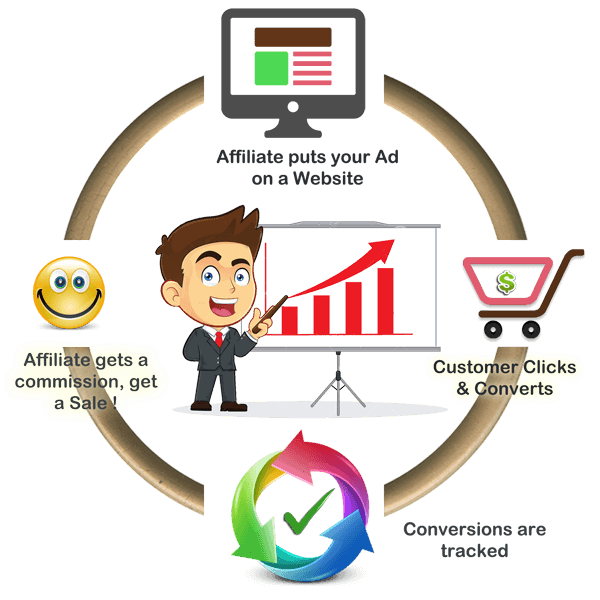
Here’s a simple guide to get you started:
- Understand Affiliate Marketing:
- Definition: Affiliate marketing involves promoting other companies’ products or services.
- How It Works: You share a unique affiliate link. When someone clicks and makes a purchase through that link, you earn a commission.
- Choose your niche:
- Focus on a specific topic or niche for your blog (e.g., fitness, cooking, tech).
- Your affiliate products should align with your niche.
- Sign up for affiliate programs:
- Join affiliate networks or individual programs (e.g., Amazon Associates, ShareASale, and ClickBank).
- Get your unique affiliate links.
- Create quality content:
- Write blog posts related to your niche.
- Integrate affiliate links naturally within your content.
- Promote Your Blog Posts:
- Share your posts on social media.
- Email your subscribers about new content.
- Track your performance:
- Use tools like Google Analytics or affiliate dashboards to monitor clicks and conversions.
- Be Transparent:
- Disclose that your links are affiliate links.
- Honesty builds trust with your audience.
Remember, consistency and patience pay off. As your blog grows, so will your affiliate income!
To promote any product, you need an account with an affiliate marketing company. This company will give you special links, banners, and other tools to help you promote the product. If the visitor clicks on those links and makes a purchase, you get a commission from the affiliate company.
- If the visitor or customer completes their purchases on the sales page, you will get some commission. This commission depends on the Affiliate company.
- This commission is different from product to product. It may be from $1 to $10,000 and it depends on which product you promote.
Becoming an affiliate with an affiliate network is a good way to make money with your blog.
c. By selling Ad Place
Selling ad space on your blog can be a great way to monetize your content. Here are some steps to get started:
- Build your audience:
- Before selling ad space, focus on growing your blog’s audience. Engage readers with valuable content to make your blog attractive to potential advertisers.
- Higher traffic and more engaged followers improve your chances of attracting advertisers.
- Design your blog professionally.
- Invest in a polished design. A professional-looking blog is more appealing to high-profile advertisers.
- Consider using premium design tools or custom templates.
- Allocate Ad Spaces:
- Create designated areas for ads within your blog layout.
- Third-party advertisements can be included even if your platform (such as Squarespace) does not have any built-in ad space.
- Pay-Per-Click (PPC) Advertising:
- Implement PPC ads from third-party networks.
- Set up space on your web page for these ads.
- When visitors click on relevant ads, you make money.
- Directly sell ad space:
- Offer ad space directly to companies:
- Benefits: You control pricing and keep all the advertising spend.
- Procedure: Get in touch with possible sponsors, work out the details, and post their advertisements on your site.
- Offer ad space directly to companies:
- Types of ad placements:
- Consider selling ad space in:
- Sidebar: Display ads alongside your content.
- Header: Place ads at the top of your pages.
- Footer: Add ads at the bottom of your site.
- In Blog Posts: Put advertisements in your writing.
- Consider selling ad space in:
Remember, building relationships with advertisers and maintaining transparency are essential. You have to offer the advertisers by providing value by creating the “Advertise here” page on your blog. To advertise on your blog, you must have 1000+ daily visitors and a good ranking.
d. Selling Services
To sell services, you need to have more experience giving customers value. You can sell things and provide services with this method.

This can be accomplished by creating a new page, naming it “Services,” and adding information about the services you offer, such as WordPress optimization, web design, web promotion, SEO services, and much more.
Monetizing your blog by selling services is a great way to generate income directly from your audience.
- First, identify the skills, knowledge, or expertise you can provide that align with your blog’s niche. For example, if you run a productivity blog, you could offer consulting or coaching services to help readers improve workflows and efficiency.
- On a fitness blog, provide customized workout or nutrition plans. On a photography site, sell post-processing services for images.
- On a travel blog, offer tour packages or guided experiences. Create service packages at various price points and describe the value readers will gain.
- Promote these offerings organically through blog posts and dedicated landing pages.
- Also market them through email newsletters, webinars, social media, and other channels.
- Selling services allows you to build deeper connections with your audience.
And it leverages your blog content to establish yourself as the expert they wish to hire. Just ensure you can deliver top-notch service that provides real value.
You can start educating people by conducting online classes or webinars on digital marketing topics like blogging, SEO, affiliate marketing, drop-shipping, domination, and many more advanced topics by using your blog.
e. By Writing Sponsored / Review Posts
Sponsored and review posts are effective ways to monetize your blog content. With sponsored posts, brands pay you to create blog posts that mention or promote their products or services.
The key is seamlessly integrating the sponsorship into an interesting post that your audience will value.
Product reviews are one of the most lucrative types of sponsored content. You provide an in-depth, honest review of a product relevant to your niche.

Readers find these posts useful when deciding what to buy. Brands get exposure and affiliate sales through your recommendations.
When writing review posts:
- Disclose the sponsorship publicly. Be transparent and say that it’s a paid promotion.
- Give your objective opinion and unbiased impressions; don’t just praise the product.
- Go in-depth on features, benefits, pros and cons, and who the product is best for.
- Back up your review with graphics, videos, and demos; make it visually engaging.
- Include affiliate links so readers can easily find the product. You’ll earn commissions on the resulting sales.
The key is balancing sponsored content with unsponsored posts, so your blog doesn’t feel overly promotional. But reviews and sponsored posts done right can be a lucrative win-win for your blog and sponsor brands.
Recommended list
- Advanced ai featured web hosting to start a new blog quickly.
- 1-year Free domain name
- Free SSL and CDN
- Free WordPress installation

- Best WordPress themes with professional designs
- Ready to import designs
- Easy to customization
- Fast loading themes
Frequently Asked Questions (FAQs)
What does it mean to start a blog from scratch?
Starting a blog from scratch means creating a blog from the ground up without using existing templates or pre-built websites. It includes selecting a domain name, choosing a blogging platform, and designing and publishing your content.
How much does it cost to start a blog from scratch?
The cost of starting a blog from scratch can vary depending on the blogging platform, hosting provider, and other factors. Generally, you can expect to spend anywhere from $50 to $300 per year for a basic blog setup.
What is the best platform to use for starting a blog from scratch?
The best platform for starting a blog from scratch depends on your specific needs and preferences. Popular options include WordPress, Blogger, and Wix, each offering different features and capabilities.
Do I need to know how to code to start a blog from scratch?
No, you do not need to know how to code to start a blog from scratch. Most blogging platforms offer drag-and-drop website builders and other user-friendly tools that allow you to create a website without any coding knowledge.
How do I choose a domain name for my blog?
When choosing a domain name for your blog, consider a name that is easy to remember, unique, and reflective of your blog’s content. You may also want to choose a name relevant to your niche or target audience.
Can I make money from my blog?
You can make money from your blog through various monetization methods, such as affiliate marketing, sponsored content, and advertising. However, building a successful blog that generates income requires time and effort.
Final words on How to start a new Blog from Scratch in 2024
Starting a blog from scratch can be daunting, but with the proper guidance and tools, it can also be a rewarding and profitable venture. This guide covers everything you need to know to start a successful blog in 2024.
Here’s a recap of what we’ve covered:
- Choose a niche that you’re passionate about and has a market demand.
- Select a domain name that’s easy to remember and reflects your brand.
- Sign up for web hosting and install WordPress.
- Customize your blog’s design and layout to create a visually appealing website.
- Create high-quality content that provides value to your readers.
- Promote your blog through social media, email marketing, and other channels.
- Monetize your blog through various methods, such as advertising, sponsored content, affiliate marketing, and digital product sales.
Starting a blog is a long-term commitment that requires time, effort, and patience. However, the rewards can be significant if you’re willing to put in the work. With the tips and tools in this guide, you have everything you need to start a successful blog and make money online in 2024.
Thank you ❤️ for sharing this article.


This comprehensive guide by Satish Ithamsetty is an absolute gem for anyone venturing into the world of blogging in 2024. Satish’s step-by-step approach simplifies what can often seem like a daunting task, making it accessible to beginners and seasoned bloggers alike. From choosing the right niche to mastering SEO techniques, this guide covers it all with clarity and expertise. Thank you, Satish, for sharing your valuable insights and empowering aspiring bloggers to embark on their journey with confidence!