Kadence Theme used Gutenberg to create Kadence Blocks, a page builder. It has the same attributes as its parent theme: speed, power, and user-friendliness. If you want to learn more about the features of the Kadence WordPress plugin, this review is for you.
With the launch of the new WordPress editor Gutenberg, page builders, and custom plugins have adapted to take advantage of building with blocks. One of the most robust and design-focused options for block creation is Kadence Blocks.
Table of Contents
Kadence Blocks, developed by the Kadence Themes team, offers you a sizable selection of unique blocks and time-saving templates to create expert websites.
| ✅ Type | WordPress Gutenberg Blocks plugin |
| 💰 Pricing | Free! Paid plans start from $89/year to a $799 one-time fee |
| ✂️ Discount | A flat 10% discount on the Kadence Blocks Pro yearly plans |
| 🏷️ Coupon Code | BLOGGINGDEN |
| 📖 Features | Fast loading, 30+ blocks, wireframes, design library, easy-to-use, etc. |
| ⏰ Free Trial | No! 30 days a money-back policy for paid plans |
In this Kadence Blocks review, we’ll dive into the key features and benefits of using this block editor plugin:
- A huge selection of pre-designed block layouts and templates
- Create custom reusable blocks with complete design control.
- Options for customizing any Gutenberg block
- It works great with Kadence themes but is also compatible with any theme.
- Constantly improving with new blocks and features added
- Can significantly improve your page-building workflow.
Kadence Blocks bring the power of blocks toward their full potential. Keep reading this review to see why it has become a go-to plugin for block creators.
If you’re considering Kadence Blocks as your go-to page builder or Gutenberg editor for your WordPress website, this review post is the perfect guide.
What are Kadence Blocks? A Brief Overview
The company behind Kadence Theme, Kadence WP, created Kadence Blocks, a Gutenberg editor plugin.
Established in 2013, it has become one of the most widely used Gutenberg blocks, with over 300,000 active users and a 4.9 out of 5 rating in the WordPress repository.
Kadence Blocks Review Overview
Reviewed by: Satish Ithamsetty

Kadence Blocks provides a streamlined toolkit for building WordPress sites with blocks. The free plugin supplies essential blocks to cover the basics when constructing blogs and simple sites. The Pro version unlocks advanced specialty blocks, options, and features for additional possibilities to create more dynamic websites.
⭐⭐⭐⭐⭐
- Overall rating: 4.9/5
- Pricing: Starts at $89.
Pros
Cons
Kadence is a business that has been operating in the WordPress market since 2016. Kadence Blocks is a page builder plugin that they provide. This plugin is available in free and pro versions and can be installed with a single line of code.
Kadence Blocks has been a huge time saver for many users, providing them with advanced options like image filters and controls that are not available in the default Gutenberg editor.
The plugin has an over-the-best rating of 5 in the WordPress repository and is a popular choice for those who want to create an advanced page builder experience.
Kadence Blocks allows you to design any website, ranging from a simple blog to an eCommerce site with numerous pages.
Unlike other WordPress Gutenberg blocks on the market, Kadence Blocks offers modern design widgets and layouts, superior customization options, and ease of use.
Some of the key features of Kadence WordPress blocks include:
- Intelligent loading
- Over 1500 SVG icons
- Scrolling animations
- Premium design library
- Complete control over typography, layouts, widgets, and more
The best part is that Kadence Blocks is a freemium plugin, which means you can download it for free on their official website. The free version of this plugin already comes with over 20 Gutenberg widgets by default, making it a great tool for building a blog without writing any code.
Kadence Blocks works with most of the WordPress themes that support the native Gutenberg editor to create blog posts, but you can use Gutenberg as a page designer for your WordPress site.
Kadence Blocks works with most WordPress themes that are working with popular Gutenberg blocks.
However, if you want to unlock the full potential of the plugin, upgrading to the pro version is highly recommended. In this review, we’ll first go over the features of Kadence Blocks Free before breaking down its premium add-ons.
One of the standout features of Kadence Blocks is its starter template plugin, which offers users a wide range of templates that they can use as a starting point for their website design.
The plugin also provides users with the ability to use it on an unlimited number of websites, making it a cost-effective option for those who want to get access to advanced options like tablet or mobile settings.

The controls and advanced options offered by Kadence Blocks allow users to create unique and customizable designs without needing to learn how to code. For those who want more options, the pro version of the plugin is available and provides even more advanced features.
Overall, Kadence Gutenberg Blocks is a powerful and versatile plugin that can help users create stunning designs for their websites.
Kadence Blocks Free Plugin Features
Let’s take a look at the key features included in the free version of the Kadence Blocks plugin.
a. 25+ WordPress Gutenberg Blocks

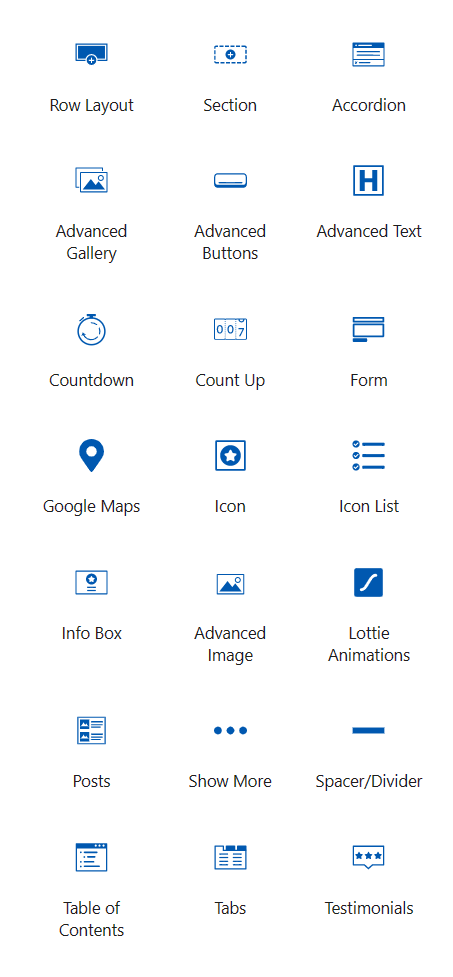
Here’s a quick summary of the Gutenberg Blocks by Kadence WordPress plugin and what it can do:
- Lottie Animations: Import Lottie Animations to your site and control the playback speed and other features.
- Advanced Image: Offers advanced image control options, including spacing, shadows, backgrounds, captions, and filters.
- Google Maps: Embed Google Maps in your post or page content with ease.
- Spacer/Divider: Allows you to add spaces or lines (dividers) with custom colors, width, and height to your content area.
- Advanced Button: Create a button with advanced control features, including background colors, font sizing, hover effects, and icons.
- Count Up: Add an animated count-up or count-down widget for a specific value.
- Row Layout: Divide a section into columns, with four types of column options and advanced controls.
- Section: Comes with 10+ layout options, allowing you to import designs from Kadence Starter Templates.
- Icon: Easily search and add icons to your content.
- Advanced Text: Create advanced headings or paragraphs with complete control over font sizes and colors for desktop, tablet, and mobile devices.
- Tabs: Set up horizontal or vertical tabs, each with a blank canvas that can hold another block, along with separate controls for desktop, tablet, and mobile.
- Info Box: Add media and text inside your content, including a menu bar with icons and text or staff grids.
- Accordion: Create beautiful accordions, such as FAQ areas, with individual controls for the whole box, text, fonts, background images, and borders.
- Icon List: Easily set up an icon list anywhere on your website with a block editor.
- Testimonials: Showcase beautiful testimonial sections with a variety of predefined layouts.
- Advanced Gallery: Decorate your website with a stylish WordPress slideshow or carousel gallery that displays photos and text.
- Form: Build custom forms and style them how you want, including custom fields and Google ReCaptcha support.
- Table of Contents: Display navigation (table of contents) for your long post content.
- Posts: Display beautiful post widgets anywhere inside your blog posts or pages.
- Countdown: Display a countdown timer with a sense of urgency for your marketing sales to help increase conversions.
- Show More: Preview a larger portion of content with adjustable preview sizes by device type and the ability to fade out the preview.
b. Performance
Kadence blocks are optimized for performance, meaning they don’t slow down your website, even if you use many blocks on a single page.
- The plugin has been designed to load only the necessary files and assets for each block, so it doesn’t load any unnecessary code, resulting in faster page load times.
- Kadence Blocks are lightweight and don’t require a lot of resources to run, so they don’t impact your website’s server load or memory usage.
- The plugin has been optimized for mobile devices, ensuring your website’s performance doesn’t suffer on smaller screens.
- The plugin is regularly updated, so performance issues are quickly identified and resolved.
- The Kadence Blocks plugin integrates seamlessly with WordPress, ensuring that it doesn’t conflict with other plugins or themes you might use on your website.
- The plugin’s code is well-written and follows WordPress best practices, making it secure and stable.
- It has been tested extensively, ensuring it is compatible with the latest version of WordPress and other popular plugins and themes.
- The plugin’s settings can be customized to optimize performance based on your website’s requirements and hosting environment.
- Kadence Blocks plugin’s premium features, such as the premium design library, are optimized for performance and don’t add unnecessary bloat to your website.
- The Kadence Blocks plugin comes with intelligent loading, which only loads the necessary scripts and stylesheets when a block is used, resulting in faster page load times.
c. Compatibility
Compatibility is not an issue with Kadence Blocks, as it works seamlessly with most WordPress themes that support the native Gutenberg editor. Here are some of the major themes and plugins that are compatible with Kadence Blocks:
- Compatible with popular WordPress themes such as GeneratePress, Astra, and OceanWP.
- Compatible with major page builders, including Elementor, Brizy, Divi, Thrive Architect, and Siteorigin.
- For the best results, using Kadence Blocks with the Kadence Theme is recommended.
- To maximize your experience with Kadence WP products, you can consider checking out the Kadence Lifetime Bundle, which gives you access to all Kadence WP themes and plugins, including Kadence Conversions, with just one click.
d. Design Library
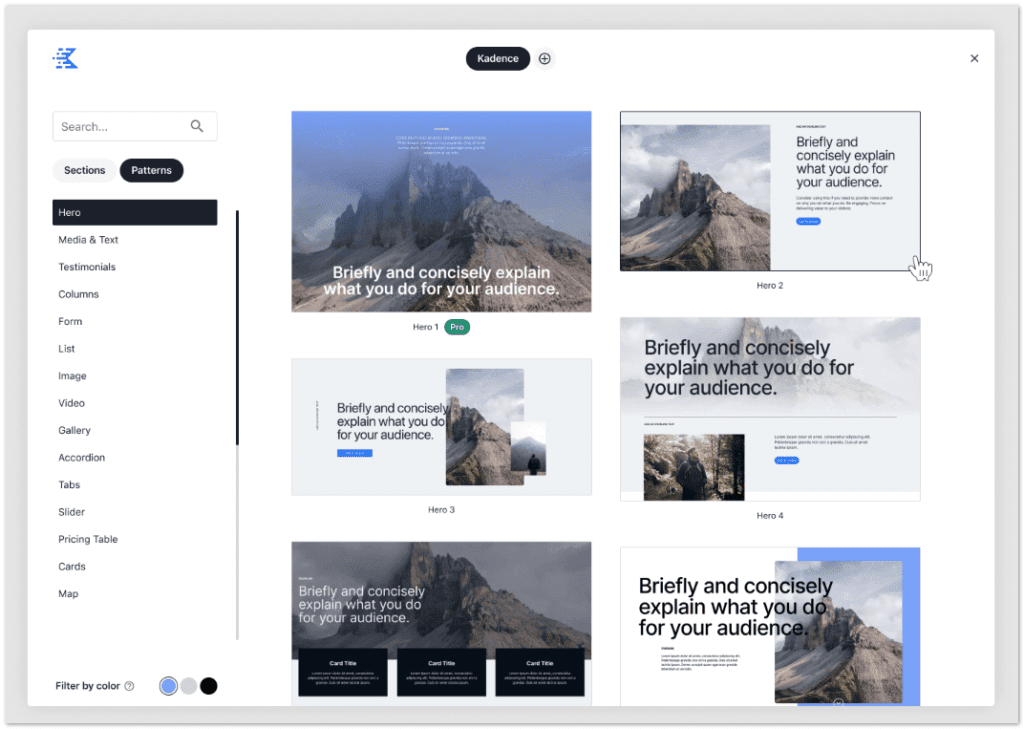
We all know that creating websites from scratch can be time-consuming. But with Gutenberg Blocks by Kadence Blocks, you can quickly launch any WordPress project with a lightning-fast prebuilt library that’s easy to use.
To access the Design Library while editing your page or post, click the Design Library button.

From there, you can choose from a selection of layouts, including
- Sections,
- Starter packs, and
- Wireframes.

There are nearly one hundred pre-built demo layouts, so you’re sure to find something that suits your needs.
In short, the Design Library is a great time-saver, no matter what you’re building. We discussed a few more points in the coming section of this article.
e. WireFrame Blocks
Kadence has released a new tool called Wireframe Blocks to make building websites on WordPress easier and more efficient.

Currently, there are over 50 different wireframe blocks available, including
- Content Wireframe Blocks
- Pricing Table: Wireframe Blocks
- Footer Wireframes Blocks
- Testimonial Wireframe Blocks
- Countdown Wireframe Blocks
- Portfolio Wireframe Blocks
- Form Wireframe Blocks
- Grid Wireframe Blocks
- Table of Contents Wireframe Blocks
- Gallery Wireframe Blocks
- Simple Cards Wireframe Blocks
- Countdown Wireframe Blocks
Even better, all of these widgets can be used with the free version of Kadence Blocks.
f. Integrations
Kadence WordPress Blocks and all other Kadence plugins integrate seamlessly with the following plugins:
- WooCommerce
- LearnDash
- LifterLMS
- Tutor LMS
- Restrict Content Pro
Although there aren’t many integrations available at the moment, these options enable you to build almost any type of website you desire, such as a course website, business blog, forum, or anything else.
In conclusion, Kadence Blocks’ free Gutenberg plugin offers many features and customization options to get started. With that, our review of the Kadence Blocks free plugin concludes. Now, let’s explore what the Pro Addon has to offer.
Kadence Blocks Pro Features
Upgrading to Kadence Blocks Pro will provide you with premium version options that include the following:
- On-scroll animation
- Custom icons and fonts
- Dynamic content
- Custom script support
- 10+ premium blocks
It offers additional blocks to expand the default Gutenberg block library. I’ve been using the free version of the plugin.
Of all the features, my favorites are the premium blocks, animations, and dynamic content.
Premium Widgets (Addons)

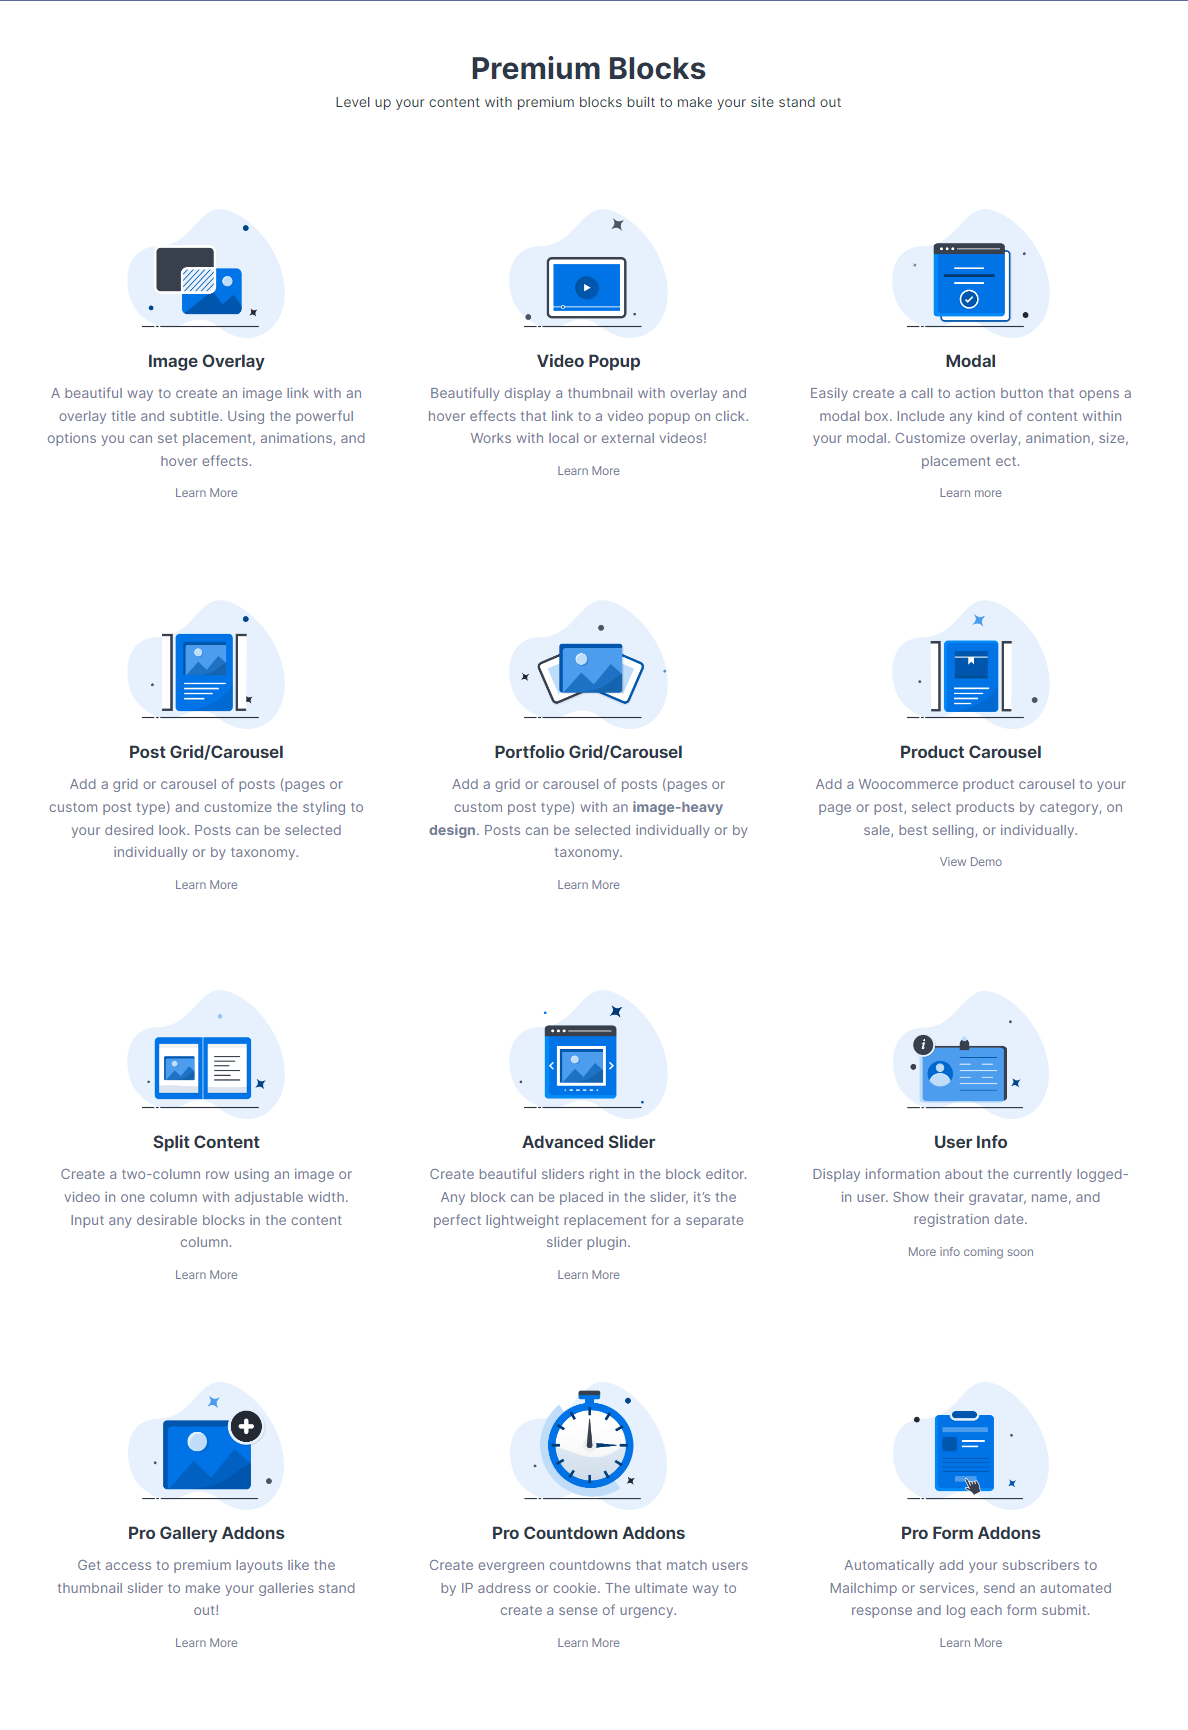
Let’s take a closer look at the amazing features of Kadence Blocks Pro, starting with the premium blocks:
- Image Overlay offers advanced options such as image filters, hover settings, and animate on scroll, providing a cover image with a link.
- Split Content: enables adding an image on one side of a row and text on the other, which is impossible with the default Gutenberg WordPress blocks.
- Post Grid/Carousel: allows customization of everything from the layout design to the excerpt title and footer, making it possible to display blog posts beautifully.
- Modal: a fully editable popup that can be added to any page, letting you place any content within the block section.
- Video Popup: adds an attractive option to display video popups with a thumbnail having overlay and hover effects for local or external videos.
- Advanced Slider: Add overlay layers and animated sliders to your page or post easily.
- Portfolio Grid/Carousel: allows for the addition of beautifully displaying posts in a portfolio (image-focused) style that can be customized to achieve the exact portfolio look you desire.
- User Info: displays information about the currently logged-in users, such as their name, gravatar, and registration date.
- Dynamic List: can display dynamic data crucial for creating content per requirement.
- Dynamic HTML: can add minor HTML codes, such as bolding, italics, or links to the Content that displays dynamically.
Additional Blocks and Design Features

Here are some of the latest additions that I particularly like:
- Animate On Scroll: This feature enables you to add on-scroll animations to specific widgets, blocks, or other areas of your website.
- Custom Icons: With this feature, you can upload your custom icon or even an entire set of icons.
- Dynamic Content: This is a useful element for pulling dynamic content and displaying it on your site.
- Custom Fonts: You can create a perfect website design or landing page by selecting the perfect font combinations and styles.
- Premium Design Library: This feature gives you access to all premium design library items and starter sites.
- Page-Specific Scripts: Add custom tracking scripts or codes to an individual page or post.
Support and Documentation
Kadence Blocks offers a free and paid plugin, with the free version available in the WordPress Repository. For help with the free plugin, you can refer to the WordPress support section.

Kadence also provides free support for customers with active Kadence Pro Blocks licenses at their forum. You can open support tickets and ask questions to get direct help.
In addition to support, Kadence offers a vast library of tutorials and guides for using their products.

The knowledge-based documentation section helps find guides on topics such as using Kadence Blocks and uncovering hidden features.
30-Day Money-back Policy
Your investment in a premium Kadence license is completely secure. All individual premium products and bundle plans come with a refund policy, allowing dissatisfied customers to request a refund within 30 days of the order.
If you are unsatisfied with your purchase of Kadence Blocks Pro, you can submit a support ticket with a refund request through your account within 30 days of the purchase date.
Refunds will be processed within 3-5 business days, and you will receive an email confirmation once the refund has been successfully processed.
Now, let’s discuss the pros and cons of Kadence Blocks and then review its pricing plans.
Kadence Design Library
The Kadence team has released a revolutionary new feature: the Kadence Design Library. This powerful design resource comes with the latest version, 3.0.30, of their popular Kadence Blocks plugin.
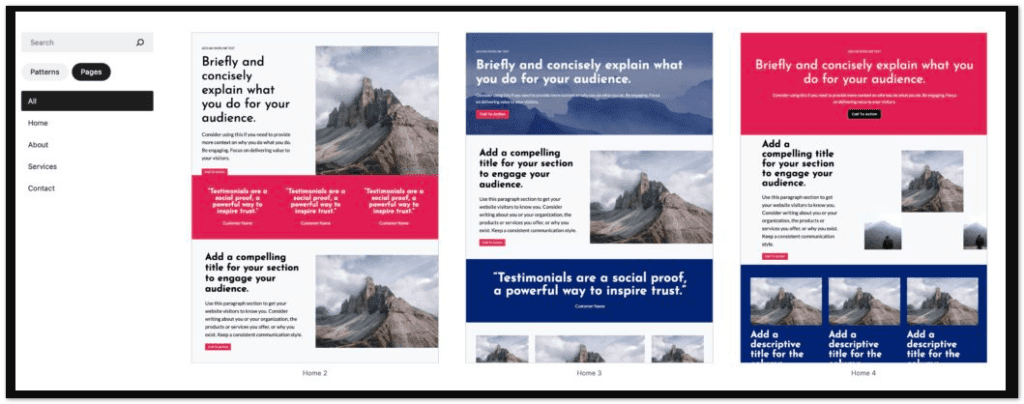
The Kadence Design Library fundamentally improves website design workflows by providing a vast collection of pre-made design patterns. These can be easily customized and integrated into any WordPress site built with Kadence Blocks.

How the Kadence Design Library Works
The Kadence Design Library contains dozens of pre-designed sections, blocks, and full-page layouts that you can use right away. When you activate a design, it will automatically:
- Inherits colors and fonts from your Kadence theme settings.
- Populates images and content with placeholders
This means every design you use is tailored to match your brand. You can tweak the content, images, colors, and settings as needed. But the heavy lifting of creating professional designs is done for you.
Key Benefits
- Saves time: no need to build basic designs like headers and content sections from scratch.
- Consistency: use library templates to maintain a steady design system.
- Quality: Get expertly crafted designs at your fingertips.
- Customization: tailor any design to fit your brand.
- Improved workflow: a faster design process means better productivity.
New Design Options

The Kadence Design Library contains templates for:
- Hero Sections
- Content Cards
- Column Layouts
- Media Galleries
- Stats Counters
- Tabs
- Accordions
- Pricing Tables
- Testimonials
- Call to Action Sections
- Blog Post Loops
- And many more!
There are both free and “pro” design options for Kadence Blocks users.
Fully Customizable
The best part about the Kadence Design Library is that the templates are completely customizable. You can modify:
- Colors
- Fonts
- Content
- Layout
- Padding and Margins
- Effects
- And anything else!
So you’re not stuck with cookie-cutter designs. You can adapt any template to create a unique look aligned with your brand.
Latest features of the Kadence Blocks plugin
Both the free and premium versions of the plugin get regular updates. The team is constantly releasing new and innovative features.
Here are the latest versions:
- Kadence Blocks Free version (3.2.21) released on February 3, 2024
- Kadence Blocks Pro version 2.2.5 was released on February 5, 2024
Some of my favorite latest additions are:
- Advanced Image Block offers a wide range of design controls and advanced options like image filters, animate on scroll, conditional display, and more
- Lottie Block: Easily add Lottie animations to your page or post
- Meta Box support: Allows you to add dynamic content with Meta Box
- Google Maps Block: Easily embed and customize Google Maps on your pages
Kadence Blocks Pro Pricing
Kadence WordPress Blocks has two versions: free and pro. The free version can be downloaded from the official website, but it has limited features.
It would help if you went for the paid version to unlock all premium blocks and features. The Kadence Blocks Pro Addon has four pricing options to choose from.

Kadence Blocks Pro Addon offers four pricing plans:
Good news: Kadence a few days ago launched AI features in their products. The AI special sale is now running. Keep watching the prices, which are given below the table, before you buy.
| Plan | Price | Offer Price (10% OFF) |
|---|---|---|
| Kadence Blocks Pro | $89/Year | $80.10 (-$8.90) |
| Essential Bundle | $149/Year | $134.10 (-$14.90) |
| Full Bundle | $219/Year | $197.10 (-$21.90) |
As a bonus, BloggingDen users can use the coupon code BLOGGINGDEN to claim a 10% discount on all Bundle plans. Check out how to use the Kadence discount coupon for more information.
How to install the Kadence Blocks Free Plugin?
Definitely. Unlike other blocks available on the market, Kadence blocks have a modern design, offer superior customization options, and are easy to use.
Installing and activating the Kadence Blocks plugin on your WordPress website is simple! Just follow the steps below to install both plugins.
- Log in to your WordPress admin area or dashboard.
- Click “Plugins » Add New” in the menu on the left.
- Type “Kadence Blocks” in the “Search Plugins” bar.
- Click on “Install” and then “Activate.”
- Congratulations! You’re done!
After installing and activating Kadence Blocks, by default (free version), you will get 16 blocks that you can use to design your web page in Gutenberg.
You can install a plugin with the Starter Templates plugin.
How to install and activate the Kadence Blocks Pro plugin
- Log in to your Kadence account and navigate to the Downloads section. Download Kadence Blocks Pro.
- Log in to your WordPress Dashboard and click “Plugins » Add New” from the left menu.
- Select “Upload Plugin” at the top, select the zip file you downloaded earlier, and click “Upload.” After that, click “Activate.”
- Wait a few moments, and the plugin will activate on your site.
- You need to activate your license to access all the premium features of Kadence Blocks Pro.
- Go to “Appearance” and then click on “Kadence.”
- In the top right corner, enter your license key (which you can find under your Kadence account » license keys) and license email (the email you used to create an account on the Kadence website).
Congratulations! You have successfully installed and activated both Kadence WordPress plugins.
Real Kadence Blocks Reviews From Users
Let’s check out what other users have to say about the Kadence WordPress Blocks plugin. The customer feedback seems to be positive.

On the WordPress Support forum, Gutenberg Blocks by Kadence Blocks—Page Builder Features has received a rating of 4.8 out of 5 stars with more than 150 reviews

Users of the Kadence plugin appear to be very content with its features. Here are some testimonials from satisfied users:.
Frequently Asked Questions (FAQs) on Kadence Blocks Plugin
What block types do Kadence Blocks offer?
Kadence Blocks comes with over 30 custom block types, including advanced rows and columns, icons, buttons, accordions, tabs, counter boxes, and more. There are also numerous styling options available for default Gutenberg blocks.
Are Kadence Blocks free or paid?
The core Kadence Blocks plugin is free and gives you access to all the basic blocks. There is a paid Kadence Blocks Pro version that provides extra specialty blocks, templates, and design library access.
Does Kadence Blocks work with any theme?
Yes, Kadence Blocks works seamlessly with any WordPress theme. However, it was built specifically to integrate with Kadence themes and includes support for shared theme colors and fonts.
How does the Kadence Design Library work?
The Kadence Design Library provides pre-made section and template designs that you can use across your site. It includes headers, footers, services, pricing tables, and more. When you activate a design it inherits your theme’s colors and fonts.
What kind of support does Kadence Blocks offer?
Kadence Blocks comes with excellent documentation, tutorials, and videos. The Kadence Themes support team also provides top-notch free email support for questions about Kadence Blocks features.
Final words on WordPress Kadence Blocks Review 2024
Kadence Blocks is a fantastic WordPress block editor for those prioritizing website speed.
It’s lightweight and easy to use, and it can replace more complicated page builders.
If you’re interested in switching to Kadence Blocks, check out our Kadence Theme Review as well.
We welcome any feedback or questions you may have about our in-depth review of Kadence Blocks, so please don’t hesitate to leave a comment below.
Kadence Blocks Review 2024

Looking for a comprehensive review of the Kadence Blocks Pro Plugin? Check out our article, which includes an in-depth analysis of these popular WordPress plugin features, pricing, and benefits.
Product SKU: StellarWP Products
Product Brand: Kadence WP
Product Currency: USD
Product Price: 89
Product In-Stock: InStock
5


