How to create a website with Elementor page builder?
With the growing engagement of drag-and-drop page builders, getting started with a blog or a website without any specific programming skills is no longer a miracle for beginners and web design enthusiasts.
If you have an idea of what kind of web project you would like to build and how it should look, then you can go ahead and build your own website without much effort and extra investment. This tutorial helps you with How to Build a WordPress Website with an Elementor add-on.
How is that possible? When it comes to the development of a website by a beginner webmaster, WordPress seems to be the most intuitive yet usable CMS that will help you get started with websites of any difficulty.
WordPress is trusted by more than 30% of the businesses available on the web. The community of WordPress developers and designers doesn’t stop releasing new themes and pieces of functionality that can make our websites more powerful and usable.
One such innovative tool is the focus of our attention today. Elementor drag-and-drop page builder is an innovative and highly usable solution that allows you to create unique web pages without the need to hire freelancers or web design studios.
You can handle everything by yourself, without any exhausting learning curve.
What Is Elementor Page Builder?
Elementor is one of the most advanced and usable front-end drag-and-drop page builders. This is a visual page builder, which allows you to create versatile web designs in the intuitive visual mode. Using the Elementor page builder, you can create new pages and elements from scratch or modify the ready-made options as per your own needs.
- Elementor makes it much easier and quicker to create unique web pages without extra help.
- It provides instant access to the final results of the layout customization.
- This is a front-end editor that features live design and inline editing, which makes the process of layout customization and text editing hassle-free.
Elementor page builder features an exclusive toolset, which allows you to bring literally any kind of changes to the design and forget about the necessity to look for third-party extensions on the web.
For example, it is built with the mobile-first paradigm, which allows you to create 100% responsive designs. There are options to select from different font sizes, padding, margins, reverse column ordering, etc.
There are undo/redo features, which allow you to browse through the entire list of actions (changes) that you made in the page builder, thus making it possible to go back to any of the earlier sessions.
Elementor includes over 50 widgets, all of which can be accessed via the working area. As you create or customize a web page, you select the necessary widget and start bringing all necessary changes in the visual mode.
These include a header, image gallery, image carousel, progress bars, accordion, testimonials, video, text editor, and a whole lot of other widgets.
Elementor page builder features free and premium versions. If you decide to go premium, you can choose from the following plans:
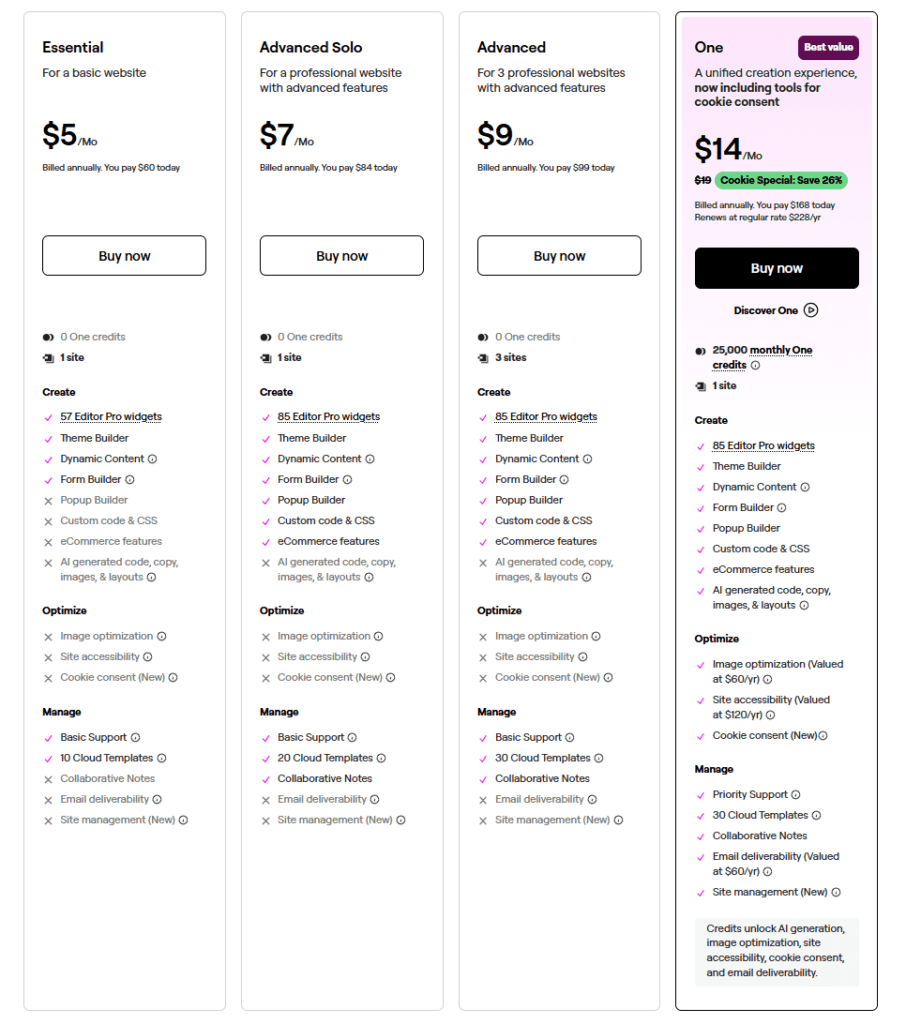
Note: All of the above plans come with 1 year of updates & support; all pro features included
Elementor Pro includes all features from the free version and a rich set of pro tools to speed up the workflow. These include:
- 50+ pro widgets
- 300+ pro-Elementor Templates
- Theme Builder
- WooCommerce Builder
- Advanced marketing tools
- Popup Builder
- 1 year of premium support and updates
The highlighted pro features include the live form builder, which allows you to create and edit versatile web forms in the visual mode. There is also Live Custom CSS included, which will be especially appreciated by skilled programming specialists.

Elementor is an awesome page builder plugin for WordPress users. This is the biggest weapon for web designers who are working with the WordPress platform to design their website. Do not waste your time with more plugins. The plugin saves your precious time. Just use this plugin for great results within a short time. This is using the Elementor Pro plugin to design the pages and posts.
Using the respective feature, one can add custom code to every element of the web design and see it in action on the editor. It is also 100% integrated with WooCommerce, which allows you to build a fully fledged web store in visual mode.
Does the Elementor page builder reduce page loading time?
The Elementor is not a speed-optimizing plugin. it is a page builder. but it does not affect page loading time. The Elementor-designed pages are loading very well.
Fewer plugins—fast page loading is the primary aspect. So after installing this plugin, you can remove similar functioning plugins from your blog like shortcodes plugins, popup plugins, any other page builder, etc.
Another important factor is web hosting. If you are using good web hosting, the page loading speed will be good as per SEO. Here I recommend Hostinger web hosting services.
The possibilities provided by the Elementor page builder are truly impressive. You can choose from the free and premium versions of the plugin based on your personal needs and business requirements.
Step-by-Step Guide for Beginners
There are two ways to add the page builder to your site – via a direct download of the plugin and installation on your site or via the installation of Elementor-based themes. Let’s take a closer look at both of them.
Installation Method 1
To start building a website with the help of the Elementor drag-and-drop page builder, you need to install WordPress on your web host and choose the domain name for your future website.
- As soon as you finish, you can go ahead and download the visual page builder from the Elementor homepage for free.
- As soon as you download the .zip file to your computer, navigate to the admin panel of your site, and click Plugins > Add New > Upload Plugin.
- Choose the Elementor .zip file and click Install Now.
- As soon as the plugin is installed, you will see the respective notification. Click Activate.
That’s it! The Elementor plugin has been added to your site. Now, you can go ahead and start creating new pages and modifying their look and feel in the visual mode.
Installation Method 2
The Elementor page builder is compatible with all WordPress themes that are available in the community.
What’s more, you can build a website with the help of a ready-made WordPress theme that is integrated with the Elementor page builder.
- In the TemplateMonster digital marketplace, you can find a growing collection of 100+ WordPress themes featuring Elementor Page Builder and JetElements modules.
- These are specific sets of extensions that are intended to be compatible with the Elementor page builder.
- These include Advanced Carousel, Forms, Posts, Animation Effects, Banners, Posts, WooCommerce features, etc.
- In order to find the necessary type of ready-made themes, navigate to the WordPress templates category (for instance, School WordPress Themes).
You will see sets of filters in the left sidebar. Navigate to Features and click Elementor Page Builder.
The smart filter will update the page and reveal a list of WordPress themes that are integrated with the plugin.
How to use Elementor Page Builder?
In this guide, we will take a closer look at how to create a WordPress site with the help of the free Base theme from SitePoint. The Elementor for WordPress users is a great choice for building amazing designs without any coding knowledge.
Step 1: Start work with Elementor
To get started, make sure that you have your WordPress installation ready, as well as the Elementor plugin added to the dashboard. As soon as you are ready, you can go ahead and create your first page via Pages > Add New. Enter the page title, select a template, and set it as Page Builder Full-width; save and click “Edit with Elementor.”

Step 2: Add New Sections / Template
Next, you will be taken to the page opened in the visual page editor.
So, when you open the Elementor page builder, you will see the editing screen of your site. There will be two options in front of you—Add New Section or Add Template (it’s recommended to work with a ready-made template in order to see how different elements look and feel from the inside).
On the left side, there will be the Elementor panel containing all widgets that you can drag and drop to any area of the page.
There is also a live search, which lets you find the specific elements as you simply enter a keyword.

Step 3: Import the predesigned Template
By choosing the Add New Section, you will build a web page from scratch, whereas the Add Template option will upload a pre-designed theme to the dashboard, thus letting you customize a ready-made design.
You can preview any template before making the final decision. As soon as you find the theme that you like, go ahead and click Insert.

Every Elementor page is made up of sections, columns, and widgets. Sections divide the pages into horizontal rows and columns into vertical, and widgets are used inside columns.
Sizes, locations, texts, colors, and other elements of the page and its content are intended to be tweaked in the visual mode.
Every section and widget can be duplicated, relocated, or simply removed with a single click.
Step 4: Adjust the settings

Clicking on any section, you will see the column and section settings tabs.
When you need to manage the overall look and feel of the whole section, choose the respective tab and you will see the Layout, Style, and Advanced tabs in the left sidebar.
In the Layout tab, you can manage the content width, content gap, content position, structure, etc. within the section.
You can also stretch the section so that the layout of the section is stretched out completely to the width of the screen.
Step 5: Add Images in the background
In the Style tab, you can set the background, border, and typography for each specific section.

- You can add an image to the background of a section, set a color background, or keep it bland.
- You can set the positioning of the image background or choose whether it will scroll while you browse the page.
- There is also the possibility to set the background overlay, which can be a color or another image.
Step 6: Adjust background settings
In the Style tab, you can also set the border for every section and choose from a set of border shadows and border types.
- Choosing the Column tab in the section settings, you will see the content settings tag in the left sidebar. This is where you can set up the background and typography for each section.
- The background settings menu includes the possibility to choose the background type, color, image, border type, border radius, and box shadow. In order to add a new column to the section, click the “plus” tab.
- If you want to remove any, click the “red cross” in the column settings tab.
- Now, as we’ve reviewed the tools and features from the Layout and Style tabs, let’s go ahead and consider what stands behind the Advanced tab.
- Managing settings in this tab is the best time-saver for everyone who has little to no CSS skills yet wants to build a smart and competitive site. In the Advanced tab, you can set the padding within each section and the margin outside of it.
Additionally, you can add the entrance animation to every section of the page.
Step 7: Animation settings (optional)

These are the animation settings that the users will see when they scroll down to the section.
You can choose from several Fading effects or choose the Zooming feature.
You can set the animation duration as slow, normal, or fast, which will determine the speed at which section animation effects will appear in front of the page visitors.
If you are good at CSS, you can add custom CSS classes in the respective fields in the Advanced Settings tab.
Both the column and section edit fields contain the Responsive tab, which allows you to manage the way the content will appear on the screen of different sizes.
Step 8: Take a look at the History panel
Elementor page builder includes the possibility to undo the changes that you applied in the settings panel or simply get back to the previously saved revisions.
- To do this, navigate to the bottom panel and find the History arrow icon.
- With a click on it, you can switch back and forth between your revisions.

In the History tab, you can switch between Actions and Revisions. Actions reveal all steps that you took while building a website.
Revisions show all versions that you saved after every change.

Elementor is an awesome page builder plugin for WordPress users. This is the biggest weapon for web designers who are working with the WordPress platform to design their websites. Do not waste your time with more plugins. The plugin saves your precious time. Just use this plugin for great results within a short time. This is using the Elementor Pro plugin to design the pages and posts.
Frequently Asked Questions (FAQs)
Can you use Elementor with WordPress?
Of course, you can use Elementor with WordPress! Elementor is a free WordPress page builder plugin, which means you can create any look you want. Just like other page builder plugins, Elementor allows you to create advanced online pages from scratch. But Elementor has many more features than other page builders. For example, you can make elegant slideshows, create stunning image galleries, build contact forms, and much more. You can also use Elementor to design complete eCommerce websites where you can sell anything you want.
Is DIVI better than Elementor?
Both Divi and Elementor are page builders for WordPress. You need to know that they are both good page builders, but they differ in some of the features provided. Elementor is known to be more advanced. Hence, for someone who is looking for a highly advanced backend, Elementor would be a better choice. Divi, on the other hand, is known to be simpler than Elementor. However, both of the page builders are known to be very good. It would be best to try creating a page using both, and you can always decide which works best for you.
Is Elementor good for SEO?
The Elementor plugin has an SEO-friendly page builder with many options to add canonical links, images, structured data, semantic markups, hreflang, and much more to your pages. You can add social profile links, Schema.org microdata, and related posts to your pages with ease. Elementor also supports the Yoast SEO plugin to optimize your page SEO.
Does Elementor slow down your site?
One of its biggest advantages is that it allows for customizing the pages beyond their templates. It provides a drag-and-drop interface to build your pages. It may seem faster loading than premium themes, but that isn’t necessarily the case. Any additional plugin will slow down your site. So it would help if you considered that aspect while choosing Elementor. If your site is slow, then it’s best to remove unused plugins. You should also make sure that your hosting is up to the job. Poor hosting means your site is slow. If you are not a coder, you could remove the plugin and use a premium theme.
Which is better, Elementor or Gutenberg?
Both are great plugins/page builders. The best answer to this question depends on your experience level and the type of site. Gutenberg is the new default editor for WordPress. It is easy to get started with and has many under-the-hood improvements that make it faster and easier to manage and use.
Final Words
That’s pretty much it. The guide covers the basics that you need to know in order to start the creation of a new website using the Elementor page builder.
The visual interface is pretty much simple and intuitive. If this is the first site that you build on your own, it’s strongly recommended to choose a ready-made template as a basis for your website.
Building pages on your own will be the next step after you master how different settings of the page builder are managed.
Good luck with your first website built code-free.