WordPress is a popular website platform that relies heavily on images to convey messages and engage visitors. However, large image files can significantly slow a website’s loading time, leading to a poor user experience and reduced search engine rankings. Optimizing images for WordPress to boost performance and enhance user experience is essential to avoid these issues.
Search engines like Google use image recognition to determine the relevance of a page. Search engines rely on the expertise of webmasters to develop the best image optimization techniques. Optimizing images for search engine result pages requires both technical and non-technical skills.
Using images on the sites is normal and even recommended because, most times cause users to read more and explore the site. We can also use images to improve the positions of some pages in the search engine’s organic search results and to receive traffic to services such as Google Images.
In this article, we will show you how to optimize images for the web for faster web performance without losing quality.
Table of Contents
Key Takeaways
- Optimizing images for WordPress is crucial for improving site speed and user experience.
- Best practices include choosing the right image format, using compression techniques, and utilizing image optimization plugins.
- Image compression is essential for reducing image size, significantly impacting load time and overall performance.
Why is optimize images for WordPress Site?
Image optimization is a crucial aspect of maintaining a high-performing WordPress website. By reducing the file size of your images through compression techniques, you can significantly improve your site speed, which is essential for providing a positive user experience.
When your WordPress site takes less time to load, visitors will likely abandon it. This traffic loss can ultimately lead to reduced revenue and overall success. By optimizing your images, you can boost your website’s performance, which is essential for keeping visitors engaged and satisfied.
Image optimization is a crucial aspect of improving your WordPress website’s performance and user experience. In today’s digital landscape, where visual content plays a significant role in engaging users, it’s essential to ensure that your images are visually appealing and optimized for speed and efficiency.
This article helped you learn how to optimize your images in WordPress. Let’s delve into the reasons why image optimization holds immense importance for your WordPress site:
1. Page Loading Speed Enhancement
- Optimized images contribute to faster loading times, reducing bounce rates and keeping users engaged.
- Google considers page speed a ranking factor, influencing your site’s SEO performance.
- Faster loading pages lead to better user satisfaction and a higher likelihood of conversions.
2. Bandwidth and Server Resource Conservation
- Well-optimized images consume less bandwidth, making your site more accessible to users with varying internet speeds.
- Reduced server load due to smaller image sizes helps prevent crashes during traffic spikes and ensures a smooth user experience.
3. Mobile Responsiveness
- Optimized images are crucial for responsive design, ensuring your site looks and performs well on various devices.
- Mobile users benefit from faster loading pages on their devices, a substantial portion of web traffic.
4. Improved SEO and Search Rankings
- Search engines factor in page loading speed, user experience, and mobile-friendliness when ranking websites.
- Optimized images contribute to a positive user experience, indirectly improving your site’s search engine rankings.
5. User Engagement and Retention
- High-quality images grab users’ attention and enhance engagement with your content.
- Faster loading leads to lower bounce rates, encouraging visitors to explore your site further.
6. Social Media Sharing
- Optimized images load quickly when shared on social media platforms, ensuring your content gets noticed and shared more frequently.
- Enhanced user experience increases the likelihood of shares and engagement on social media.
7. Accessibility Compliance
Optimized images with appropriate alt text enhance accessibility for visually impaired users, making your site more inclusive.
8. Storage Efficiency
Smaller image file sizes save storage space on your server, reducing hosting costs and allowing you to accommodate more content.
9. Future-Proofing Your Site
As technology advances, optimized images remain relevant and adaptable to newer devices and screen resolutions.
10. Content Delivery Networks (CDNs)
- CDNs deliver cached content, including images, from servers geographically closer to users, further improving loading times.
- Optimized images are essential for seamless integration with CDNs, maximizing their benefits.
Incorporating image optimization into your WordPress site’s development process is a strategic move that enhances performance, user experience, and SEO.
By reducing loading times, conserving resources, and improving mobile responsiveness, you can create a seamless and engaging browsing experience for your visitors.
Remember, every byte saved on image optimization contributes to a faster, more accessible, and more successful website.
Best Practices for Optimizing Images in WordPress
WordPress has a built-in function to optimize images for search engines. It is done by uploading the image to WordPress, checking its size, and optimizing it. However, there are certain things that you can do to optimize your images for better ranking in Google.
Optimizing your images is critical in improving your WordPress site’s speed and overall performance. By following these best practices, you can ensure that your images are optimized effectively.
Here are a few simple and easy-to-implement suggestions for improving Image SEO to generate more traffic from Google images.
1. Proper Image Name and description
It would help to remember a few things when using proper image names and descriptions for better image SEO on WordPress.
- The first thing is to make sure that your image name is unique and descriptive. It will help Google index and rank your images higher in search engine results pages (SERPs). For example, if you have an image called “boat_1.jpg”, ensure the filename includes “boat” so people will know which photo they want.
- It will help people understand the image and why they might want to use it on their website or blog. For example, if you have an image of a boat, include information about the boat’s size, colour, and any other features that might be relevant.
- Finally, make sure that you include a good description for each of your images. It will give people a better understanding of the image and help them differentiate it from other images on your WordPress site.
When you upload an image to your WordPress site, you need to include the following information in the file’s name and description:
- The filename (without the .jpg extension)
- The dimensions of the image in pixels
- The file type (JPEG, PNG, GIF, or BMP)
- The URL of the image
- If you are using a plugin that provides image management features, ensure the plugin also includes this information. Otherwise, you can enter it manually.
Always use a name for the image that is meaningful and relevant. Avoid using generic names such as Picture 2.jpg or IMG003.jpg since these names do not benefit Search Engine Optimization.
The file named optimize-images.jpg helps you gain a ranking in Google Images when someone searches for the phrase “Optimizing Images.”
2. Always write a good Alt Text
Regarding blogging, there are two types of text: ALT text and HTML. When people want to be able to read your blog on a mobile device, they need the text in their native language. Generally, they can only do this by downloading images from your blog (or, more likely, an entire website). Since these images are huge files that take up a lot of space, most bloggers choose not to use them because of this.
A website owner is responsible for making sure text links on their site work properly. We all know that content links include images as well as text. However, if you use an ALT tag for image SEO on a WordPress blog, the alt attribute shouldn’t be used for the image alone. You can also use it as a link to your site’s page where the image is located.
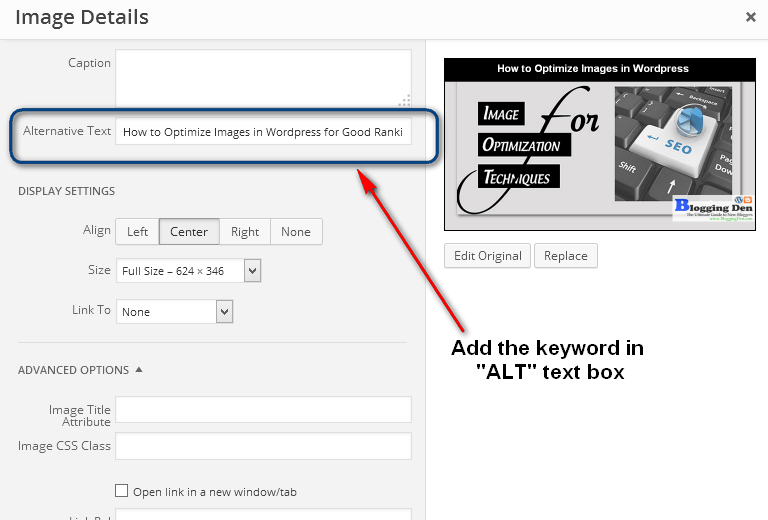
Having an “alt” attribute is always fundamental. Matt Cutts explained the importance of it in a video he made a while back.
3. Use proper descriptions and titles
There are many ways to increase the ranking of your images. However, creating high-quality descriptions and titles is one of the most effective ways. The descriptions and titles serve as a content summary, which will give people a better understanding of what your images are about. They also help improve image search results and aid in determining what people are looking for.
The title and description of your image are the two most important things you should consider while creating an image SEO strategy. The title is a brief description of the picture you want displayed in search engine results, while the description is a detailed explanation of your picture. The importance of descriptions and titles in image SEO cannot be overstated.
Description tags are one of the most effective ways to do this, while titles are another effective way to describe your content and draw your readers in. You can use descriptions and titles on your site, but you have to know when and how to use them.
WordPress’ user interface is easy to use since you can add a title and a description to an image you upload. By providing descriptive information, you can help Google understand what the image is about.
4. Coherence image in the context
There are a few ways to use Coherence image in the context for better Image SEO in WordPress.
- The first way is to include a link back to the source of the image on your website. It will help improve your website’s overall ranking in search engines because Google considers quality content as one factor affecting a website’s ranking.
- Another way to use the Coherence image in the context of better Image SEO on WordPress is to use it as part of your blog’s header or footer. It will help increase click-through rates (CTRs) and engagement rates because people will be more likely to visit your site if they see high-quality images on every page.
- Finally, you can use Coherence images in your posts and pages to create an engaging and visually appealing experience for your readers. It will help them stay longer on your site and make more purchases from your store, which is ultimately what you want!
Just as the name of the image and ALT text, Google also uses the page content to determine its image. So connect images and content for the best results in the SERPs.
There are a few ways to use Coherence image in the context for better Image SEO in WordPress.
- You can add the background image to any post or page. It will help improve the visibility of the image and make it easier for search engines to index it.
- You can use the Coherence plugin to create custom thumbnails and indexes for your images. It will help improve their ranking in search engine results pages (SERPs).
- You can also use Coherence as part of your content strategy to create high-quality visual assets that can be used on your website, blog, or social media profiles.
- Choose the Right Image Format
The choice of image format can significantly impact the size and quality of your images. JPEG and PNG are the two most commonly used formats for WordPress websites. JPEG is suitable for photographs and images with many colours, while PNG is ideal for images with transparent backgrounds or text, as it provides higher image quality. It’s important to consider the type of image and its intended usage before deciding on the format.
5. Use Compression Techniques
Compression techniques can reduce the file size of your images without compromising on quality. There are two types of compression techniques: lossless and lossy. Lossless compression preserves all image data, while lossy compression discards some data to achieve a smaller file size. Utilizing proper compression techniques can significantly impact your site’s load times.
6. Optimize Images Quality
There are a few things that you can do to improve image loading speed for better image SEO in WordPress.
- Make sure that your images are high-quality and optimized for SEO. It means they should be large enough to be visible on a page, have proper file sizes, and be captioned. It means you should avoid using low-resolution images that will result in poor image quality when displayed on websites or blogs.
- Make sure that your images are used correctly in your posts. Images should not be used as the sole source of content on a page but instead should be used to supplement the text and provide visual context. Images are properly tagged with keywords and other metadata so search engines can easily find them. This metadata includes the filename, file size, dimensions, and the keyword(s) you want to target.
- Use alt and title tags to help index and find your images on search engines.
- Finally, ensure your images are hosted on a secure server where search engines can access them without being affected by viruses or other malware.
Image quality is essential; constantly try to use clear images, colourful and visually rich, to get better rankings and the SERP’s Google.
7. Use Optimization Plugins for images
Image optimization wordpress plugins can simplify and automate optimizing your images. These plugins utilize advanced compression techniques to reduce the file size of images while maintaining their quality. Popular plugins for image optimization include Imagify, Smush, and ShortPixel.
By following these best practices, you can ensure optimal image optimization for your WordPress site, improving site speed, user experience, and overall performance.
8. Size and format of the images
The size and format of the images you use on your WordPress site can significantly impact your website’s image SEO.
Make sure that all of your images are in a resolution that is high enough for Google to display them properly but low enough so that they won’t take up too much space on your website.
You also want to ensure that the images are in the correct format for Google to index them correctly. You can use the Google Image Search tool to see which formats are supported by Google and which will result in the best search engine results.
There is no one-size-fits-all answer to this question, as the size and format of images for better image SEO will vary depending on the theme or plugin you are using. The Smush plugin is an excellent image compression for WordPress blogs.
However, some general guidelines that may help include:
- Images should be sized at a resolution of at least 300 dpi.
- Images should be placed in the correct directory (usually wp-content/uploads) and named according to the file extension (JPG, JPEG, PNG). I recommend using the “.PNG” format for easy loading. It is because this format can have good quality and acceptable size.
- Avoid using transparent or semitransparent PNGs, as they can cause issues with search engine indexing.
- Use captions when necessary to provide additional information about an image.
You can use tools like Smush. it or the “save for web” in Photoshop to optimize the image size.
Tip: Use the TinyPNG service to help compress your PNGs from big to small and easy-to-load size.
Understanding Image Compression and Its Importance
Image compression reduces an image file’s size without significantly compromising its quality. It is a crucial aspect of image optimization and directly impacts site load time and overall performance.
- Large image files can slow down your website, contributing to a bad user experience. When an image is properly compressed, its file size is reduced, resulting in faster load times. It can drastically improve your site’s speed and performance, making it more user-friendly and accessible to your audience.
- There are various techniques to compress images, including lossless and lossy compression. Lossless compression preserves the quality of an image while reducing its file size, while lossy compression involves sacrificing some image quality to achieve a more significant reduction in file size.
- Utilizing image compression techniques and tools effectively is essential for optimizing the site and ensuring visitors have a pleasant user experience.
Choosing the Right Image Format for WordPress
When uploading images to your WordPress site, choosing the right format to balance image quality and file size is essential. This section discusses two of the most popular formats for web images, PNG and JPEG, and offers tips on which to use and when.
a. PNG Image Format
PNG (Portable Network Graphics) image format is a lossless compression format that supports transparency and high image quality, making it ideal for graphics and logos. PNGs are often larger in file size than JPEGs, making them slower to load. It is recommended to use PNGs for images that require a transparent background or when your image has text or graphical elements with sharp lines or edges.
b. JPEG Image Format
JPEG (Joint Photographic Experts Group) image format is a lossy compression format that supports high-quality images with smaller file sizes, making them quicker to load. The JPEG format works well for photographic images with smooth colour gradients and fewer sharp edges. However, JPEGs do not support transparency and may lose image quality if compressed too much.
When choosing between PNG and JPEG formats, consider the type of image you want to upload, whether it requires a transparent background, the level of detail in your image, and the image’s overall file size. A good rule of thumb is to use PNGs for graphics and logos and JPEGs for photographs.
Best Image Optimization Plugins for WordPress
When optimizing images in WordPress, using image optimization WordPress plugins can significantly reduce image size without compromising quality. Several plugins are available for WordPress, each with unique features and benefits. The plugins are an alternative; if you optimize your images before uploading them, you wouldn’t need to use an image optimization plugin. Here are some popular best WordPress plugins to consider:
| Smush | Unlimited image compression | Lossy compression, bulk smushing, WebP image optimization | Compresses and optimizes images without losing quality, supports all major image formats, offers a free plan with unlimited image compression |
| ShortPixel | 100 image compressions per month | Unlimited image compression, WebP image optimization, lazy loading | Compresses and optimizes images without losing quality, supports all major image formats, offers a free plan with 100 image compressions per month ShortPixel lets you convert PNG to JPG automatically, create WebP versions of your images, and optimize PDF files. |
| EWWW Image Optimizer plugin | No file size limit | Bulk smushing, lazy loading, WebP image optimization | Compresses and optimizes images without losing quality, uses lossless compression, offers a free plan with no file size limit. There are also options for both lossy and lossless compression. The major benefit is that EWWW has no limits on file sizes or the number of images uploaded. |
| WP Compress | Unlimited image compression | Lazy loading, WebP image optimization | Compresses and optimizes images without losing quality, uses a variety of compression techniques, offers a free plan with unlimited image compression |
| Imagify | 200 images per month | Unlimited image compression, WebP image optimization, lazy loading | Compresses and optimizes images without losing quality, uses lossless compression, offers a free plan with 200 image compressions per month. Imagify is compatible with WooCommerce, NextGen Gallery, and other popular plugins, making it ideal for sites with a lot of images that need to be compressed. Imagify is an image compression plugin for WordPress that has the best-looking Settings module on this list. |
The best free WordPress image optimization plugin is EWWW Image Optimizer. If you want to optimize, this method helps you save disk space on your WordPress hosting account, and it guarantees the fastest image with the best quality since you manually review each image. Overall, all of these WordPress image optimizer options are great in their ways and will help speed up your WordPress site.
Optimizing Images with an Image Optimization Plugin
After installing your preferred image optimization plugin, optimizing images becomes automated. The plugin will compress and resize images upon upload, ensuring that images are optimized without compromising quality.
However, some plugins may require additional configuration to optimize existing images in your WordPress media library.
The plugin can help you compress images in bulk or optimize new files as you upload them to WordPress. It’s important to note that while Image compression plugins can significantly reduce image size, they may not be suitable for all types of websites.
Manual optimization techniques may be necessary to ensure the best quality and performance if you have a website with many high-resolution images or complex graphics.
Techniques to Optimize Images Before Uploading to WordPress
Optimizing images for the web before uploading them to WordPress can significantly reduce the file size, improve site speed, and enhance user experience. Here are some techniques to improve image loading speed before uploading them:
a. Resize Images
One common technique is resizing images to the size they will be displayed on the website. It reduces the file size and eliminates the need for WordPress to resize the images on your site.
b. Compress Images
Another effective technique is to compress images without compromising on quality. You can use an image compression tool such as Adobe Photoshop or online tools like TinyPNG or Compressor.io to reduce image size while maintaining quality.
Tip: Aim to keep the image file size under 100KB or as low as possible without compromising quality
c. Use Descriptive File Names
Provide descriptive filenames for your images that accurately reflect their content. It helps search engines understand the image and assists visually impaired users who rely on screen readers to access your content.
d. Optimize Image Format
Choosing the right image format can also significantly impact the file size. For instance, JPEG is more suitable for photographs and complex images, while PNG is better for graphics and images with fewer colours.
Remember that JPEG images tend to compress images and lose quality, while PNG images are larger but retain quality. The ideal image format will depend on the image content and context.
Pro Tip: Use JPEG format for complex images and PNG format for transparent images and simple graphics.
By implementing these techniques, you can significantly reduce image file size and optimize your images for WordPress, improving site speed and boosting user experience.
Optimizing Images After Uploading in WordPress
Once you have uploaded your images to WordPress, you can still use several techniques to optimize them.
- One of the most popular ways to optimize images after uploading is by using Image compression plugins for WordPress. These plugins can automatically compress and resize your images without losing quality.
- One highly recommended plugin is the new image optimizer. This plugin can improve SEO on the fly as you upload them and optimize your existing images. You must connect it to your WordPress site and configure the settings. Once done, the plugin will automatically optimize your wordpress images in the background, ensuring they are as small as possible without affecting their quality.
- Another way to make images more visible after uploading is by manually resizing them. You can use editing software like Adobe Photoshop or GIMP to resize your images to a lower resolution. It will reduce the file size and make the image load faster.
- Additionally, you can use compression techniques like lossy or lossless compression to further reduce file size. Lossy compression removes some image data, while lossless compression compresses the data without losing any information.
However, it is important to note that too much compression can lead to decreased image quality. Therefore, finding the right balance between file size and image quality is crucial.
The Role of Lazy Loading in Image Optimization
Lazy loading is an effective technique to optimize images for WordPress. It delays the loading of images until they become visible on the user’s screen. By doing so, lazy loading reduces the initial page load time, leading to faster page render and improved user experience.
- Lazy loading works by splitting the page into smaller sections, where only the visible section loads images. As the user scrolls down, new images within the visible section load and the process repeats.
- This technique helps to conserve bandwidth and reduce the number of HTTP requests, leading to faster loading times.
In addition to improving site speed, lazy loading is also beneficial for SEO optimization. Search engines prioritize fast-loading websites and reward them with better search rankings.
Using the lazy load technique, you can boost your website’s performance and improve its visibility on search engines.
Balancing Image Quality and File Size in WordPress
Optimizing images for your WordPress site involves finding the right balance between image quality and file size. Consider using compression techniques and selecting the appropriate image format to achieve this balance.
There are two types of compression techniques: lossless and lossy compression. Lossless compression reduces the file size without affecting image quality, whereas lossy compression reduces file size by discarding some image data, resulting in a slight loss in quality.
Lossless compression is the better option if maintaining the highest possible image quality is crucial. However, if reducing file size is the priority, lossy compression is suitable.
When deciding on an image format, consider the image itself and its intended use. The PNG format is more suitable for images with transparent backgrounds, such as logos. However, the JPEG format is a better option if the image has many colours and a wide range of tonal values.
You should use an image compression plugin to balance image quality and file size effectively. These plugins allow you to compress images without compromising their quality. Some popular options include ShortPixel, Smush, and Imagify.
The Impact of Image Optimization on WordPress Site Speed
Image optimization is crucial for improving your WordPress site’s speed and performance. The size and quality of your images can significantly affect your site’s load time, user experience, and search engine rankings.
By optimizing your images, you can reduce their size without compromising their quality, resulting in faster page load times and smoother user experience.
In addition to reducing image size, lazy loading can improve site speed by only loading images when needed rather than all at once. If your WordPress theme supports this feature, enabling lazy loading is a simple and effective way to boost site performance.
When optimizing your images, finding the right balance between image quality and file size is important. Using lossless compression techniques can maintain image quality while reducing file size, while lossy compression can further decrease file size at the cost of slight degradation in quality.
Optimizing your images is crucial in enhancing your WordPress site’s speed and user experience. Following the best practices and utilizing image optimization tools can improve your site’s performance, keep visitors happy, and boost your search engine rankings.
Frequently Asked Questions (FAQs)
How can I optimize images for WordPress to improve site speed?
Optimizing images for your WordPress website is crucial for boosting site speed and enhancing user experience. Here are some tips to optimize your images effectively:
Why is image optimization important for my WordPress site?
Image optimization significantly improves site speed, user experience, and overall performance of your WordPress website. By reducing the file size of your images, you can ensure faster loading times and smoother browsing for your visitors.
What are the best practices for optimizing images in WordPress?
When optimizing images in WordPress, following these best practices is essential: – Choose the right image format, such as JPEG or PNG, based on your specific needs. – Use compression techniques to reduce file size without compromising image quality. – Utilize image optimization plugins to automate the optimization process and maximize efficiency.
What is image compression, and why is it important for optimizing images?
Image compression refers to reducing the file size of an image without significantly affecting its visual quality. It is essential for optimizing images, as smaller file sizes lead to faster load times and improved site performance.
How do I choose the right image format for WordPress?
Consider your specific requirements when selecting an image format for WordPress. JPEG is suitable for photographs and complex images, while PNG works well for transparent graphics and images. It’s important to balance image quality and file size for optimal performance.
How can image optimization plugins help me in WordPress?
The optimization plugins offer features and benefits that simplify optimizing images in WordPress. They automate tasks such as resizing, compressing, and optimizing images, ensuring optimal performance without compromising quality. Popular plugins like ewww image optimizer can be used to optimize images after uploading them to WordPress.
What techniques can I use to optimize images before uploading them to WordPress?
Before uploading images to WordPress, the following techniques are recommended: – Resize images to the appropriate dimensions for your website. – Compress images without compromising quality. – Use tools or software to maintain image quality while reducing file size.
Final words on optimize images for wordpress
In conclusion, optimizing images for WordPress is crucial for improving site speed, user experience, and overall performance. Following the best practices outlined in this article, such as choosing the right image format, compressing images, and utilizing image optimization plugins, you can significantly boost your site’s speed and provide a seamless user experience.
It is also important to balance image quality and file size when optimizing images and consider lazy loading as a technique to enhance site performance further. By prioritizing image optimization, you can ensure that your WordPress site runs efficiently and maintains a competitive edge.

