
Have you ever dreamed of sharing your love for food with the world—and turning it into a profitable online business? If so, you’re in the right place. This is a complete step‑by‑step guide on how to start a food blog in 2026 and turn it into a profitable online business.
Starting a food blog in 2026 involves more than just sharing recipes. It’s about building a personal brand and growing a loyal audience. Monetizing happens through multiple streams like affiliate links, ad revenue, digital cookbooks, and sponsored content.
Social food content has exploded on platforms like Instagram, YouTube Shorts, and Pinterest. This growth has made food blogging one of the most rewarding and sustainable niches in the creator economy. You might be a passionate home cook. You could be a nutrition coach or a culinary traveler.
In any case, starting a food blog gives you the platform. It lets you showcase your expertise and creativity. You can also make money doing what you love.
This updated guide walks you step-by-step through:
- Choose a profitable food blog niche and define your target audience (cuisine, diet type, or cooking style).
- Pick a memorable domain name that reflects your food brand and register it.
- Buy reliable WordPress hosting that is optimized for beginners in 2026.
- Install WordPress.org on your hosting account with the 1‑click auto‑installer.
- Select a fast, mobile‑friendly food blog theme and customize your design.
- Install essential food blog plugins for recipes, SEO, image optimization, caching, and social sharing.
- Plan and publish your first 10 SEO‑optimized posts (recipes, how‑tos, listicles, and affiliate content) with strong images and recipe schema.
- Promote your blog using SEO, Pinterest, social media, and email marketing, then add monetization (ads, affiliates, digital products, sponsorships) as traffic grows.
If you’ve been wondering how to start a food blog that stands out, this guide is for you. It also helps you generate income. It is your roadmap for 2026 and beyond.
Why Start a Food Blog in 2026?

Food is universal—it connects cultures, sparks emotions, and brings people together. But in 2026, food blogging goes far beyond personal expression. It’s a thriving niche. Passion, creativity, and digital strategy combine to build an audience. They also create a sustainable income stream.
If you’re wondering whether starting a food blog is worth it in 2026, the answer is yes—food blogs remain one of the most profitable blogging niches when you combine ads, affiliates, and digital products.
Here’s why starting a food blog in 2026 is a smart move:
1. Evergreen and High-Demand Niche
People will always search for recipes, healthy eating tips, quick meals, and restaurant reviews. The food niche attracts millions of global searches per month, making it one of the most evergreen content categories online.
2. Multiple Income Opportunities
Food blogs offer a wide range of monetization strategies, including affiliate marketing (e.g., kitchen tools, meal kits), Google AdSense, sponsored recipes, and even the sale of your own cookbooks or meal plans. In fact, many successful food bloggers now earn $5K–$30K/month through a combination of ads, affiliate sales, and digital products.
3. Visual-First Content for Fast Growth
Platforms like Pinterest, Instagram Reels, and YouTube Shorts thrive on food visuals. With simple food photography and editing, your content can go viral. It can bring consistent blog traffic even if you’re just starting out.
4. Global Audience Reach
Food is a topic that resonates with people across the world. A single recipe post can attract readers from dozens of countries. Combine this with multilingual plugins (like TranslatePress), and you can scale your audience globally.
5. Easier to Rank with Recipe SEO
With the 2026 update to Google’s Recipe Schema, food blogs that properly use structured data now rank higher. Data such as cook time, nutrition facts, and step-by-step instructions helps them show up in rich snippets. Using plugins like WP Recipe Maker gives you a technical advantage from day one.
6. A Personal Brand You Can Monetize
As you grow, your food blog becomes more than a website—it becomes your brand. With consistent content and email list growth, you can launch products like:
- Printable meal planners
- Online cooking classes
- Branded merchandise
- Recipe subscription memberships
2026 Trends Making Food Blogs Even More Popular
| Trend | Why It Matters |
|---|---|
| AI tools for recipe generation | Bloggers use tools like ChatGPT & Jasper to scale content creation |
| Zero-click search decline | Owning a blog (not just relying on social media) is now essential |
| Pinterest SEO rebirth | Pins with alt-text, titles, and schema-rich links drive food blog traffic |
| Recipe Schema enhancements | Structured content ranks better in SERPs & Google Discover |
In short: If you love cooking, start a food blog. If you love storytelling or teaching others about food, this is the perfect time to begin. There’s no better opportunity to begin than the present. The tools are easier. The platforms are more rewarding. And the earning potential is real.
Points to Becoming a Successful Blogger with a Food Blog

In 2026, creating a food blog is just the beginning. With thousands of new food bloggers launching every month, standing out requires more than just tasty recipes. You need a strategy, consistency, and community to build a blog that gets traffic, ranks in search, and earns money.
Below are the key practices that successful food bloggers follow to grow their brand, audience, and income:
A. Publish Original Content Consistently
Fresh, helpful content is the lifeblood of your food blog.
- Google favors freshness—especially for recipe content. Updating or posting new recipes weekly helps keep your blog visible in SERPs.
- Stick to a content calendar using tools like Notion, Trello, or Semrush’s Marketing Calendar.
- Focus on content formats that drive long-term SEO, such as
- Step-by-step photo recipes
- “How-to” kitchen tutorials
- Ingredient spotlight series
- 1-minute video recipe breakdowns
Pro Tip: Use Google Trends and AnswerThePublic to find what your audience is searching for each month.
B. Be Authentic, Helpful, and Available
Authenticity is one of the most important factors to consider for any blog, especially one that deals with food. It is important to write about what you are truly passionate about. You must also be able to produce the highest quality content.
Authenticity builds trust—and trust drives clicks, shares, and conversions.
- Share your personal story behind each recipe. What inspired it? Could you share any challenges you encountered before perfecting it?
- Be transparent about nutritional info, substitutions, or affiliate links.
- Respond to comments and DMs—especially on social platforms like Instagram or Pinterest.
- Encourage feedback on your blog and build an email list to stay connected.
Engaged audiences are more likely to share your blog, buy your cookbook, or click on your affiliate links.
C. Make Your Blog Easy to Read, Navigate & Share
A great recipe is worthless if no one can read or access it easily. Prioritize the user experience (UX).
Tips for better blog usability:
- Use a fast, mobile-optimized theme like Kadence or GeneratePress
- Include a clear, clean recipe index (with categories like vegan, quick meals, etc.)
- Add Jump-to-Recipe buttons for impatient users
- Use WP Recipe Maker for well-structured, printable recipes
- Enable Pinterest-ready images with text overlays (Tasty Pins is helpful)
Make your social sharing buttons visible and frictionless. Integrate tools like Monarch or Socialwarfare.
Summary Table: What Sets Successful Food Blogs Apart in 2026
| Key Element | Why It Matters |
|---|---|
| Consistent Posting | Improves crawl frequency and authority |
| Authentic Voice | Builds trust and return visitors |
| SEO-Optimized Recipes | Ranks better with Recipe Schema 2026 |
| Mobile Usability | 85% of food blog traffic is mobile |
| Engagement & Email List | Grows audience outside of Google |
Types of Food Blogs and Sub‑Niches

There are many food blogs, each with a different purpose. Depending on the type of content they give in their food blogs, the kinds of wood blogs are similar.
You can explain different ways of creating food blogs by pointing out that not all food blogs are the same.
Starting a food blog can help you come up with quick ideas for starting a food blog.
Before you start a food blog in 2026, choosing the right niche helps you rank faster and monetize more effectively.
Choosing a food blog niche is critical to your growth in 2026. Successful food bloggers today are carving out micro-niches. These niches align with their passion and their audience’s needs.
Narrowing down your niche helps you:
- Rank faster for long-tail keywords
- Build a loyal, targeted audience
- Increase affiliate conversions and product relevance
Here are some of the most popular and profitable food blog sub-niches to consider:
A. Recipe Blogs
Great for ad revenue and affiliate links to kitchen tools
Food blogs are most commonly found as recipe blogs, where you can share your recipes with your audience. If you are an excellent cook, then you will be able to quickly start a recipe blog.
Recipe blogs remain the most popular and enduring type of content. Recipe blogs focus on:
- Step-by-step cooking guides
- Ingredient breakdowns
- Substitutes and seasonal options
- Printable recipe cards with schema
Use the WP Recipe Maker plugin to add the proper recipe schema for 2026. This will help achieve a better ranking in Google’s recipe carousel. This approach also enhances visibility in featured snippets.
Popular variations:
- Budget-friendly meals
- 30-minute dinners
- One-pot recipes
- Gluten-free or allergy-friendly meals
B. Restaurant Review Blogs
Ideal for local sponsorships and collaborations
Western restaurants are so familiar these days that customers often find their ratings and reviews online before visiting them.
The purpose of restaurant review blogs is to help this kind of audience find the best restaurants.
If you love dining out, this niche lets you review local or global restaurants. You can share:
- Ratings (taste, service, ambiance)
- Price comparisons
- Food photography from your visits
- Hidden gems and food trucks
Combine with Google Maps embedding and local SEO to target “near me” search terms (e.g., “best vegan restaurants in Austin”).
C. Cookbook and Recipe Reviews
We can find recipes in different cookbooks. By starting a recipe review blog, your audience can read your reviews of famous cookbooks and recipes from famous chefs.
This is perfect for those who have a passion for reading cookbooks or studying culinary arts. You can:
- Review and rate famous cookbooks or food influencers
- Replicate recipes and give your opinion
- Interview chefs or summarize cooking shows
Monetize through Amazon Associates, cookbook affiliate programs, or downloadable guides.
D. Food + Travel Blogs
Strong potential for brand deals and YouTube income.
Travel and food blogs are very popular nowadays, and will help you attract people who are interested in traveling.
Most of them are too busy traveling the world because of their busy schedules.
People who travel often will follow your blog to learn about food in different places.
This platform is ideal for individuals who are digital nomads and have a passion for cultural exploration. Combine food storytelling with global adventures.
Content ideas:
- “Street food around the world” series
- Hotel breakfast reviews
- Cooking classes in each country
- Cultural deep-dives into traditional cuisine
Great for visual platforms like YouTube, Veo, and Instagram Reels.
E. Food Photography Blogs
One of the best niches in the world is photography, which appeals to anyone.
A food photography blog will attract a lot more readers.
Photography is what makes food go viral. Start a blog focused on:
- Styling tips
- Equipment reviews (lighting, cameras, backdrops)
- Lightroom presets
- Behind-the-scenes of a food photoshoot
Monetize by selling presets, photography guides, or even stock photo packages.
F. Health-Focused Food Blogs
Health is becoming more important to people, and the type of food they consume impacts their health.
This sub-niche is projected to grow at the fastest rate by 2026.
As a result, beneficial eating blogs are way more popular than many street food blogs.
Focus on nutrition and wellness through food:
- Keto, vegan, paleo, Mediterranean, low-FODMAP, etc.
- Meal prep and macros
- Nutrition label breakdowns
- Dietitian interviews
Tip: Link with affiliate products like protein powders, meal delivery kits, or health trackers.
Bonus: Emerging Sub-Niches to Watch in 2026
| Niche | Opportunity |
|---|---|
| AI-Generated Recipes | Unique spins on common ingredients (use ChatGPT or Gemini) |
| Zero-Waste Cooking | Sustainability and reuse-focused content |
| Instant Pot / Air Fryer | Appliance-based meals and tutorials |
| Functional Foods | Gut health, hormone balancing, brain foods |
| Cultural Cuisine Deep-Dives | Heritage cooking and food history blogging |
List of Most Popular Food Blogs (Inspiration for 2026)

Before you start your food blog, it’s helpful to explore some of the most successful food blogs today. These blogs showcase various styles. They offer different monetization strategies. These niche approaches offer opportunities for learning and inspiration.
Below are some of the top-performing food blogs in 2026. Each is known for its unique value and visual appeal. They have strong branding and a consistent content strategy.
1. Pinch of Yum
- Niche: Comfort food with a healthy twist
- Founded by: Lindsay Ostrom
- Why it’s popular:
- Stunning food photography
- Clear recipe instructions
- Offers premium products (Tasty Food Photography, WP Tasty plugins)
- Monetization: Affiliate links, online courses, sponsored posts, display ads
Visit Pich Of Yum
2. Minimalist Baker
- Niche: Simple, plant-based recipes using 10 ingredients or fewer
- Founded by: Dana Shultz
- Why it’s popular:
- Gluten-free and vegan-focused
- Clean, fast-loading design
- Massive Pinterest traffic
- Monetization: Cookbooks, courses, sponsored brand campaigns, ad revenue
Visit Minimalist Baker
3. Budget Bytes
- Niche: Budget-friendly meals for beginners and students
- Founded by: Beth Moncel
- Why it’s popular:
- Meal cost breakdown per serving
- SEO-optimized and beginner-friendly
- Easy-to-follow recipe layouts
- Monetization: Ads, cookbooks, affiliate tools, email list funnel
Visit Budget Bytes
4. Smitten Kitchen
- Niche: Family-friendly, comforting home cooking
- Founded by: Deb Perelman
- Why it’s popular:
- Story-driven writing style
- Simple, relatable recipes
- Loyal readership built over 15+ years
- Monetization: Books, brand partnerships, courses, direct product sales
Visit Smitten Kitchen
5. Love and Lemons
- Niche: Fresh, seasonal vegetarian recipes
- Founded by: Jeanine Donofrio
- Why it’s popular:
- Strong visual branding
- High-quality photography and print cookbooks
- Optimized recipe filters and categories
- Monetization: Affiliate links, sponsored content, digital downloads
Visit Love and Lemons
What Can You Learn From These Blogs?
| Blog | Key Strength | Takeaway |
|---|---|---|
| Pinch of Yum | Strong branding + digital products | Monetize early through helpful eBooks and plugins |
| Minimalist Baker | Simple niche focus | Stick to a unique content rule (10 ingredients, 1 bowl) |
| Budget Bytes | Focus on affordability | Add value by including cost-per-meal calculations |
| Smitten Kitchen | Authentic storytelling | Build a personality readers connect with |
| Love and Lemons | Design and UX | Prioritize mobile usability and intuitive navigation |
Top Indian Food Blogs and Influencers (2026)
- Veg Recipes of India: One of the most trusted vegetarian blogs, offering traditional Indian dishes with detailed step-by-step photos.
- Archana’s Kitchen: A popular multi-cuisine blog focusing on healthy Indian meals, meal plans, and kid-friendly recipes.
- Raks Kitchen: Focuses on South Indian and Tamil-style home cooking, presented with easy instructions and clean photography.
- Chowder Singh: A blog that explores Indian street food and regional cuisines, featuring cultural food stories and heritage recipes.
- Manjula’s Kitchen: Specializes in simple vegetarian and Jain-friendly Indian recipes, hosted by Manjula Jain with helpful video tutorials.
- Yummy Tummy: Offers a mix of Indian and global comfort food with visual-heavy recipe posts, especially appealing for beginner cooks.
- Easy Cooking with Molly: This is a modern Indian food blog. It blends Indian flavors with global fusion recipes. The blog also focuses on meal prep and nutrition.
- Yummy Indian Kitchen: Focused on Hyderabadi, Andhra, and spicy Indian dishes with emphasis on meat-based curries and biryanis.
- Zesty South Indian Kitchen: Covers traditional South Indian cuisine, fusion recipes, and holiday treats with cultural insights.
- Food Blog India: A curated space for trending Indian food bloggers, featuring diverse recipes and food influencer interviews.
- Kannamma Cooks: Authentically captures Tamil Nadu and Chettinad cuisines with deep storytelling and family-style recipes.
- Divine Taste: A sattvic vegetarian food blog combining Indian flavors with Ayurvedic principles, spirituality, and mindful eating.
Study these successful food blogs while you plan how to start your own food blog in 2026—look at their branding, recipe layout, and how they promote content on social media.
Actionable Tips
- Explore 2–3 of these blogs in depth.
- Recognize what content formats and monetization strategies they use.
- Find a way to differentiate your blog using tone, format, or niche.
How to Start a Food Blog in 2026 (Step‑by‑Step)

Starting a food blog in 2026 is easier than ever. Yet, standing out requires more than just a few recipes and a domain. Below is a step-by-step roadmap to help you launch a visually appealing, search-optimized, and monetizable food blog. I outline the three simple steps to starting a food blog. First, plan and design the site; then, you have to create the content.
Step 1: Pick a Food Niche You Love
Choosing a specific food blog niche is the first step to starting a food blog that ranks well and makes money. Before choosing a name or platform, get clear on who you’re serving and what you’ll share.
Ask yourself:
- Do you enjoy cooking, reviewing, or photographing food?
- Are you passionate about a specific cuisine (e.g., Indian, vegan, or Mediterranean)?
- Are you targeting beginners, busy professionals, or health-conscious families?
Popular 2026 food blog niches:
- 30-minute meal blogs
- Meal prep & freezer-friendly blogs
- Air fryer & Instant Pot meals
- Gut-health & hormone-friendly recipes
- Gluten-free, sugar-free, or plant-based diets
Niche blogs rank faster in Google and attract more loyal, returning readers.
Step 2: Choose a Blogging Platform
While platforms like Wix, Medium, and Blogger exist, WordPress.org is the best option for serious food bloggers. WordPress.org is the best platform to start a food blog in 2026 if you want full control and monetization options.
Why WordPress (self-hosted)?
- Full control over design and monetization
- Ability to install essential food blog plugins
- SEO-friendly setup with schema support
- Easy to scale as your blog grows
Pro Tip: Use WordPress with a fast, SEO-optimized theme like GeneratePress or Kadence.
Step 3: Pick a Memorable Domain Name
Your domain is your online identity. Choose something that is:
- Short, brandable, and easy to spell
- Related to your niche
- Available as a .com (ideally)
- domain name ideas for food blogs (e.g., “quickveganbites.com”)
Use tools like Domains-Finder, NameMesh, or LeanDomainSearch for brainstorming.
Step 4: Buy Reliable Web Hosting for Your Food Blog (Hostinger Recommended)
Good hosting is crucial if you want your food blog to load fast and rank in Google in 2026. A fast and secure hosting provider ensures your site loads quickly—especially important for image-heavy food blogs.
For beginners, I recommend these Top 2026 hosting picks:
| Hosting | Best For | Key Benefits |
|---|---|---|
| Hostinger | Beginners and first food blogs | Affordable, fast, easy WordPress setup |
| ChemiCloud | Reliability and strong support | Great uptime, responsive support |
| Cloudways | Growing and high-traffic blogs | Scalable, performance-focused hosting |
| Bluehost | Simple WordPress blog setup | Easy onboarding, widely used, beginner-friendly |
Choose a hosting plan with:
- Free SSL
- One-click WordPress install
- SSD or NVMe storage
- Minimum 99.9% uptime guarantee
Step 5: Choose and Customize Your Theme
Use a fast-loading, mobile-optimized theme made for food blogs.
Best WordPress theme for food blogs in 2026:
| Theme | Why Use It |
|---|---|
| Kadence | Fast, easy to starter templates for recipe blogs |
| GeneratePress | Lightweight, SEO-friendly, good for beginners |
| Feast Plugin + Foodie Pro | Built specifically for food bloggers (schema + design) |
Make sure your theme supports
- Recipe schema
- Custom blog layouts
- Pinterest-optimized image placement
- Easy navigation and categories
Step 6: Food Blog Content Plan
Before writing your first post, plan your first 10 blog post ideas and SEO content strategy for food blogs based on
- Keyword research (use Semrush, LowFruits, or Google Trends)
- What your audience searches (e.g., “5-ingredient desserts,” “diabetic lunch ideas”)
- Seasonal or trending topics (e.g., “Easter brunch recipes 2026”)
Include a mix of
- Evergreen recipes
- Listicles (e.g., “10 quick dinners for busy nights”)
- Informational posts (e.g., “How to substitute almond flour”)
- Affiliate-rich content (e.g., “Top 10 kitchen tools under $50”)
At This Stage, You’ve:
- Selected a food blog niche
- Purchased a domain & hosting
- Installed WordPress
- Set up a theme
- Started your content plan
Next, we’ll walk through how to set up hosting. Then, we will install WordPress if you haven’t yet. Plugins are the next step. We will also cover SEO tools and content creation tips.
Check These Points Before You Start a Food Blog
Before diving into recipes and rankings, take a moment to check in with yourself.
Starting a successful food blog in 2026 isn’t just about tools and themes—it’s about clarity, mindset, and long-term commitment.
Here are five important self-check questions to think about before you start:
1. Why Do You Want to Start a Food Blog?
Is it to share your grandmother’s secret recipes? Is it possible to convert your skills in nutrition into a source of income? Is it possible to establish a personal brand within the culinary industry?
Clarity helps you stay motivated during slow traffic months and burnout seasons.
Tip: Write a personal mission statement like
“I want to help busy parents prepare 20-minute healthy dinners without stress.”
2. What Are Your Strengths and Gaps?
Before starting a food blog, evaluate your strengths and weaknesses. Use your strengths to fully commit to your blog and make it robust. Acknowledge your weaknesses to learn from them and find ways to overcome them.
Being truthful about your strengths can offer you a significant advantage. Understanding your weaknesses lets you either outsource tasks or acquire necessary skills.
Examples:
| Strength | Leverage It |
|---|---|
| Photography? | Share behind-the-scenes reels & presets |
| Writing? | Focus on SEO-rich, story-driven blog posts |
| SEO skills? | Rank faster by targeting long-tail keywords |
| Weak at tech? | Use drag-and-drop page builders like Elementor |
3. What Other Blogs Inspire You?
Getting inspired by other blogs would be helpful. Get ideas from other food blogs, but remember not to copy. Even if you find inspiration in other blogs, it’s important to avoid copying them in your blogging career.
List 3 food blogs you admire and break down what you like:
- Is it their clean design?
- What appeals to you about their tone and storytelling?
- What are the categories in which their recipes fall?
- What are their strategies for monetizing content?
BUT: Don’t copy—learn. Your authenticity is your edge in 2026.
4. What Will Make You Unique?
There are thousands of food blogs, but only one of you. Find your USP (unique selling point).
Ask yourself:
- Will I focus on a cultural angle (e.g., Filipino desserts)?
- Will I post 1-minute videos for busy people?
- Will I explore sustainable, zero-waste cooking?
Positioning is key to niche domination.
5. What’s the End Goal?
Having a clear idea of the end goal of your blog is always a good idea. Food blogs provide their readers with information.
A few food blogs sell recipes, food books, and travel food guides on their blogs.
Are you hoping to
- Monetize with affiliate links?
- Launch a digital cookbook or membership?
- Land brand deals or become a food influencer?
This vision will guide your branding, content strategy, and promotion plan from day one.
Pro Blogger Mindset Tips for 2026
| Mindset Shift | Why It Matters |
|---|---|
| Treat your blog as a business | Keeps you focused and disciplined |
| Be consistent, not perfect | Progress matters more than perfection |
| Build community, not just traffic | Loyal readers convert better than random visitors |
What You Need to Start a Food Blog

You can quickly start a food blog once you are done with your planning and vision. If you want to create a food blog, you need some basic requirements to start and run your blog.
Here’s a detailed guide on how to start a food blog from scratch.
Now that you’ve clarified your vision and niche, it’s time to get practical.
To start a food blog in 2026, you need the right tools. A streamlined setup is essential to make it fast, secure, and profitable.
Here’s everything you need to start your blogging journey smartly:
1. A Self-Hosted Blogging Platform (Use WordPress.org)
If you are an expert in coding, you can create your own food blog without a blogging platform. Various blogging platforms enable you to build your blog in different ways.
You can easily code a food blog. Your skills should include HTML, CSS, and other scripting languages like JavaScript. You do not need to use a blogging platform.
Skip the limitations of free platforms like Blogger or WordPress.com. Go for self-hosted WordPress.org, which gives you
- Full control over your design and monetization
- Access to powerful food blogging plugins
- Ability to implement Recipe Schema 2026 for SEO
Use one-click installation from your hosting dashboard.
There are many types of content management systems (CMS) available if you want to expand your food blog.
Globally, 37% of all websites use WordPress. Because of the advanced features and flexibility of the WordPress CMS, we have created this post with WordPress in mind.
2. A Domain Name
The name of your blog is important, as I said before. When users want to access your website, they will remember this name. The domain name serves as both the website name and the address of your blog. Make sure this domain name appeals to your users by carefully selecting it.
If someone else has already registered a domain name, you cannot use it. The name of your domain will resemble this: bestfoodblog.com.
Make sure that the address of your blog is:
- Short, easy to remember, and brandable
- Relevant to your niche (e.g., spicyveganbites.com)
- A .com domain, if possible
Tools: Namecheap, GoDaddy, NameSilo
Choose a domain that hints at your niche or your personality.
Use our verified link to grab a Namecheap .COM domain at a discount — new customers can register for as low as $6.79 with no coupon code needed.
3. Reliable & Fast Web Hosting
Web hosting is now required for your media and text files. Web hosting is simply the place where you display your online business to potential clients.
Your choice of web hosting provider is very important. You will lose money and valuable clients if you pick the wrong host. So you must proceed with extreme caution.
Food blogs require fast, secure hosting with SSD or NVMe storage because they contain a lot of images. Here are the top web hosting services for food bloggers.
Top 2026 hosting picks:
| Hosting | Why It’s Great |
|---|---|
| Hostinger | Affordable, SSD-based, free SSL, easy UI |
| ChemiCloud | Excellent uptime, reliable support |
| Cloudways | Best for scaling traffic & speed (uses DigitalOcean, Vultr) |
Look for:
- Free SSL certificate
- Daily backups
- 1-click WordPress installer
- Malware protection
- 99.9% uptime guarantee
4. A Lightweight, SEO-Friendly Theme
Your food blog theme should:
- Load fast on mobile
- Be compatible with Recipe Schema
- Offer good readability, layout flexibility, and image handling
Top WordPress Themes for Food Blogs in 2026:
| Theme | Features |
|---|---|
| GeneratePress | Blazing fast, modular, SEO-first design |
| Kadence | Drag-and-drop friendly, schema ready |
| Foodie Pro (Genesis) | Premium theme built for food bloggers |
| Astra + Feast Plugin | Great combo for structured, minimalist blogs |
5. Essential WordPress Plugins for Food Bloggers
Here’s a curated plugin stack for food blogs in 2026:
| Plugin | Use |
|---|---|
| WP Recipe Maker | Adds Recipe Schema, nutrition facts, print buttons |
| Rank Math SEO | Adds meta tags + recipe schema support |
| Tasty Pins | Pinterest-optimized images with hidden alt tags |
| ShortPixel | Compresses images for faster load speed |
| WP Rocket | Page caching and performance boost |
| Elementor Pro | Drag-and-drop page builder (for homepage/about) |
| MonsterInsights | GA4 analytics dashboard inside WordPress |
Optional:
- Nutrifox: Adds a nutrition label builder
- ConvertKit or MailerLite: for email capture and automation
6. Basic Branding Assets
Strong branding helps your food blog stand out on Pinterest, Instagram, and Google Discover, which are key traffic channels in 2026. To look professional and consistent, you’ll also need:
- A simple logo (use Canva or Looka)
- Brand colors and fonts
- A branded Pinterest template set (you can buy on Creative Market or Etsy)
7. SEO Tools & Content Research
Tools like Semrush, Ubersuggest, or LowFruits.io will help you:
- Find low-competition recipe keywords
- Analyze what’s trending
- Optimize your post with LSI keywords (e.g., “plant-based”, “30-minute dinner”)
Summary Checklist
| Requirement | Tool |
|---|---|
| Blogging platform | WordPress.org |
| Domain | Namecheap, GoDaddy |
| Hosting | Hostinger, HostArmada, ChemiCloud |
| Theme | Kadence, GeneratePress |
| Essential plugins | WP Recipe Maker, Rank Math, Tasty Pins |
| SEO tools | Semrush, LowFruits |
| Page builder | Elementor Pro |
| Email marketing | ConvertKit, MailerLite |
How to Buy Hostinger Hosting (2026 Guide)

If you’re starting your food blog in 2026, Hostinger is one of the best web hosting providers available. It’s beginner-friendly, extremely affordable, and offers seamless integration with WordPress—perfect for launching your blog without tech stress.
To launch your food blog, you need fast, secure, and affordable web hosting. In 2026, Hostinger stands out as one of the best choices for beginners and growing bloggers alike.
Why Choose Hostinger for Your Blog?
Hostinger offers everything you need to launch your blog quickly and reliably. Here’s why it stands out:
- Fast loading speeds: Hostinger uses LiteSpeed servers, which ensure your website loads quickly—especially important for image-heavy food blogs.
- Free domain name: You’ll get a free .com domain for the first year when choosing their Premium or Business plans.
- One-click WordPress installation: Hostinger includes an auto-installer that lets you set up WordPress in just a few clicks.
- 24/7 expert support: Need help? Their support team is available round the clock through live chat.
- Affordable pricing: Hosting starts at just $1.99/month, making it one of the cheapest options for new bloggers.
- Optimized for image‑heavy food blogs and recipe sites.
Here’s a step-by-step guide to buying web hosting with Hostinger:
Step 1: Visit the Official Hostinger Offer Page
First, click on this magic link to start grabbing the hosting. Use a special discount link to access exclusive savings—often up to 75% off regular pricing.

Click the “Claim Deal” button to be redirected to the best offer page. This is the first step to locking in great value for premium hosting at a fraction of the cost.
Step 2: Choose a Hosting Plan
Hostinger provides three shared hosting plans that are perfect for food bloggers:

| Plan | Great for a first food blog | Monthly Price |
|---|---|---|
| Single | Great for a first food blog | $1.99 |
| Premium | Ideal if you plan multiple niche sites | $2.99 |
| Business () | Best for food bloggers | $3.99 |
All plans come with:
- Free SSL certificate
- SSD storage for faster access
- Email accounts
- Free CDN for faster global delivery
- Unlimited bandwidth
Recommendation: The Premium Plan is ideal—it supports multiple websites and includes a free domain.
Step 3: Register a Domain Name

Hostinger gives you a free domain for the first year with Premium and Business plans.
- Type your desired domain name (e.g., tastyveganplates.com)
- Check availability
- Choose your top-level domain (.com, .net, etc.)
If you already own a domain from Namecheap or GoDaddy, you can also connect it during setup.
Step 4: Select Billing Duration

After choosing your hosting plan, you’ll be prompted to select the billing period.
- Hostinger offers options like 1-month, 12-month, 24-month, or 48-month plans.
- The longer your term, the lower the monthly cost. For maximum savings, choose 24 or 48 months upfront.
Note: Hostinger shows the discounted price first, then renews at standard rates—plan accordingly.
Step 5: Create Your Account

You’ll now create your Hostinger account. This can be done in seconds by:
- Signing up with your email address, or
- Connecting your Google or Facebook account
This step is required before completing your purchase.
Once done, you’ll receive a confirmation and access to your Hostinger dashboard (hPanel).
Step 6: Complete Your Payment

Select your preferred payment method from the following options:
- Credit/Debit Card
- PayPal
- Google Pay (great for Indian users)
- Alipay
- Crypto via CoinGate
Then, fill in your billing details (name, email, phone number, country, etc.) and click Submit Secure Payment to finalize your purchase.

You’ll instantly receive a confirmation email from Hostinger with login credentials.
Once you complete the above details, you need to click on Submit Secure Payment to complete the payment process.
Once you complete the above details, click Submit Secure Payment to complete the payment process.
Once your new hosting account is ready (usually in minutes), you’ll receive a welcome email from Hostinger. It will contain login details. Done! You now have hosting and can move to installation.
Why Hostinger Is Ideal for Food Bloggers in 2026
| Feature | Benefit |
|---|---|
| LiteSpeed servers | Handles image-heavy food blog traffic |
| Free SSL + CDN | Boosts security + Core Web Vitals |
| Automatic backups | Keeps your content safe |
| Global data centers | Better speed for international readers |
| Affordable plans | Scalable as your blog grows |
How to Install WordPress on Hostinger

Hostinger makes it easy to install WordPress with its user-friendly dashboard. When you choose Hostinger, you’re getting more than just hosting. You receive a powerful, free platform to build your website with WordPress. It’s the perfect choice for beginners who want to bring their blog or business idea to life.
Once you’ve purchased your hosting plan and registered your domain, it’s time to install WordPress. It is the most powerful and beginner-friendly blogging platform in 2026.
Thankfully, with Hostinger’s hPanel (custom control panel), you can install WordPress in just a few clicks. You don’t need coding or technical knowledge.
Step 1: Log In to Your Hostinger hPanel
- Go to the Hostinger official page once your payment confirmation.
- Now click Log In
- Enter the email and password you used during signup
- This brings you to the Hostinger Dashboard (hPanel)
- Then, click on the Manage button next to your website’s domain name.

Step 2: Choose AutoIstaller
On your hPanel Dashboard, find the Auto Installer button in the Website section.

After logging in:
- Click “Websites” > “Auto Installer.”
Step 3: Choose the installation application
Now choose the application from the Auto Installer page. click o “WordPress“.

Step 4: Enter WordPress Login Details

Now, fill out the install WordPress form.
- Add the title in the website title section.
- Enter the administrator username, password, and email for the WordPress login. The login information for the web hosting does not need to match the login details for the other accounts. To prevent security breaches, make sure to choose a strong password.
Pro Tip: Choose a strong password and use an admin name other than “admin” for security.
Step 5: Choose a Theme (Optional)
Hostinger allows you to pick a free WordPress theme right in the setup wizard. You can:
- Choose a starter theme now (optional)
- Or skip this step and install your preferred theme later via the WordPress dashboard
Step 6: Select Server Location
Choose a data center that’s closest to your target audience for faster site speed.
Example:
- If your audience is in India → choose Singapore or Mumbai
- If you’re targeting US readers → choose North America
Step 7: Click “Finish Setup”
Hostinger will now automatically:
- Install WordPress on your domain
- Connect your SSL certificate
- Create your database
- Launch your site within minutes
Step 8: Log In to WordPress Dashboard
Once installation is complete, visit:
yourdomain.com/wp-admin
Enter your admin username and password.
Once WordPress is installed, your food blog is technically live—you just need to design it and start publishing recipes.
You’re now inside your WordPress dashboard—the command center of your food blog.
Post-Install Essentials
Before you start posting, do the following:
- Install a theme (e.g., GeneratePress or Kadence)
- Install key plugins (e.g., WP Recipe Maker, Rank Math)
- Create basic pages (About, Contact, Privacy Policy)
- Set your site title and tagline under Settings > General
Setting Up a WordPress Theme for Your Food Blog
Now that your blog is live, it’s time to give it the look and feel that reflects your brand. A well-designed, mobile-friendly, and fast-loading WordPress theme is essential for food bloggers. It not only improves user experience but also boosts your SEO rankings and keeps visitors engaged.
What to Look for in a Food Blog Theme (2026)
When selecting a WordPress theme for your food blog, make sure it is
- Lightweight & optimized for speed (Core Web Vitals ready)
- Responsive (mobile & tablet-friendly)
- Compatible with recipe schema plugins
- Easy to customize (colors, fonts, layouts)
- Designed with image-rich content in mind
- Works well with drag-and-drop builders like Elementor
Best Themes for Food Blogs in 2026
| Theme | Why It’s Great |
|---|---|
| GeneratePress | Super fast, modular, SEO-first, and perfect for minimal design lovers |
| Kadence | Stylish templates, fast performance, beginner-friendly, works great with Gutenberg & Elementor |
| Foodie Pro (Genesis Framework) | Built specifically for food bloggers with structured recipe layout |
| Astra | Lightweight + works well with page builders and Feast Plugin |
| Cookely (WPZOOM) | Premium theme designed for recipe bloggers, includes nutrition facts layout |
Are you currently utilizing Elementor Pro? Choose a theme like Hello Elementor or Kadence for full design control.
How to Install a WordPress Theme
A clean, mobile‑friendly design is critical if you want your food blog to rank and keep readers engaged in 2026, because most recipe searches happen on phones. The way your blog looks plays a big role in keeping visitors around.
Choosing a good WordPress theme is important—but don’t worry, it’s easier than it sounds. You’ll find tons of free and premium themes in the WordPress directory.
If you’re just starting out and don’t have a designer, go with the Kadence theme. I highly recommend it. It’s what I use and trust.
Kadence is lightweight, fast, and built with SEO in mind. Even better? You don’t need to know a single line of code to make your blog look amazing.
In 2026, Kadence is one of the best themes for bloggers. It offers:
- Beautiful AI-powered starter templates
- Dozens of block layouts
- Easy customization (fonts, colors, design)
- Built-in speed and SEO optimizations
Honestly, Kadence saved me so much time and hassle. You can focus on writing great content while Kadence handles the design and performance side for you.
If you’re serious about growing your blog, starting with Kadence is a smart
You can install a theme in two simple ways. The first method is via the WordPress Repository for free themes. The second method is by uploading a premium theme ZIP file.
Option 1: Installing a Free Theme
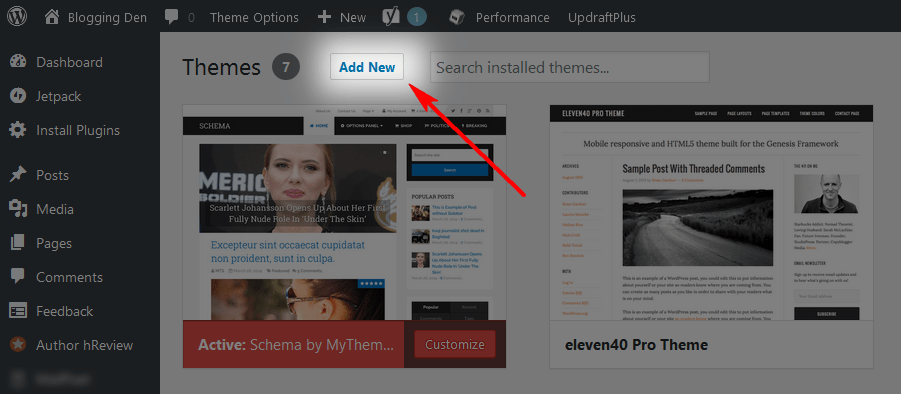
Step 1: Go to your WordPress dashboard → Appearance → Themes → Add New
Step 2: Use the search bar to find “GeneratePress” or “Kadence”
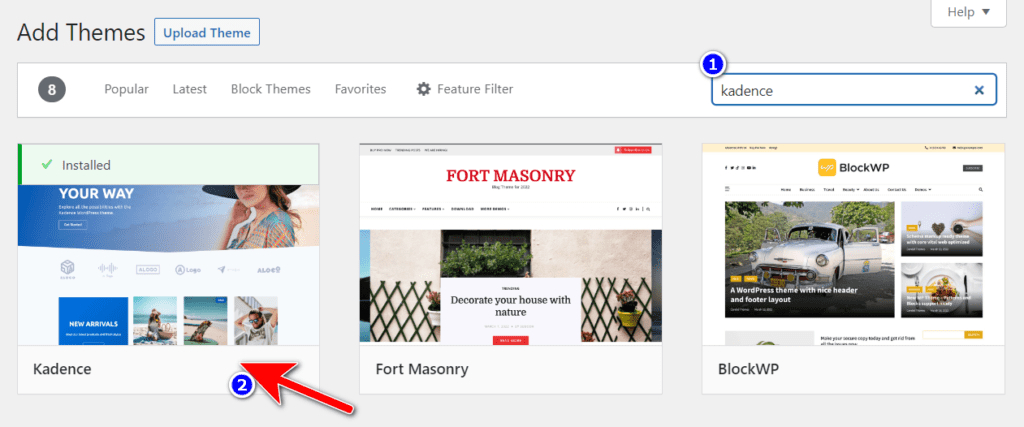
Step 3: Click Install, then Activate

You’re done! You can now customize the theme under Appearance → Customize
Option 2: Uploading a Premium Theme (ZIP File)
If you purchased a premium theme from sites like:
- GeneratePress Premium
- Kadence Pro
- Divi theme
- Feast Design Co
Then follow these steps:
Step 1: Go to Appearance → Themes → Add New → Upload Theme
Step 2: Click Choose File, select the “.zip file” you downloaded, and click Install Now
Step 3: Click Activate, and start customizing your site.
Customize Your Theme (Essential Edits)
After activation, go to Appearance → Customize to adjust:
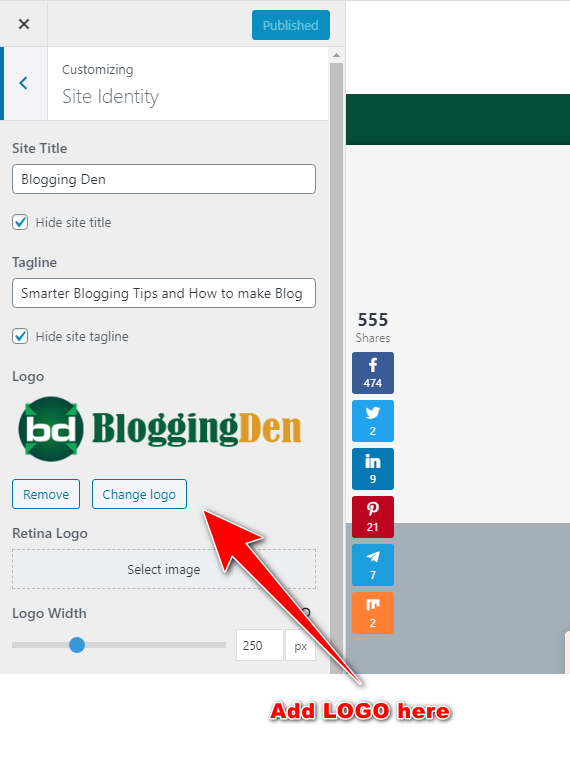
- Logo
- Fonts & colors
- Header & footer layout
- Homepage design
- Sidebar or no sidebar
- Recipe index page
Pro Tip: Use the Customizer or Elementor to build beautiful homepages and recipe layouts.
How to Install a WordPress Plugin (For Food Blogs in 2026)
Plugins add extra features and functionality to your food blog—without needing to write a single line of code.
You might want to display recipes. Perhaps you wish to speed up your site. You may aim to improve SEO. Maybe you want to grow your email list. There’s a plugin for each goal.
Let’s cover:
- How to install a plugin (two simple methods)
- The best WordPress plugins for food bloggers in 2026
How to Install a Plugin in WordPress
Method 1: Install From the WordPress Plugin Directory (Free Plugins)
Step-by-step:
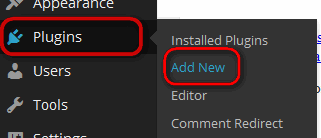
1. Go to your WordPress dashboard → Plugins > Add New
2. Search for a plugin (e.g., “Rank Math” or “WP Recipe Maker”)
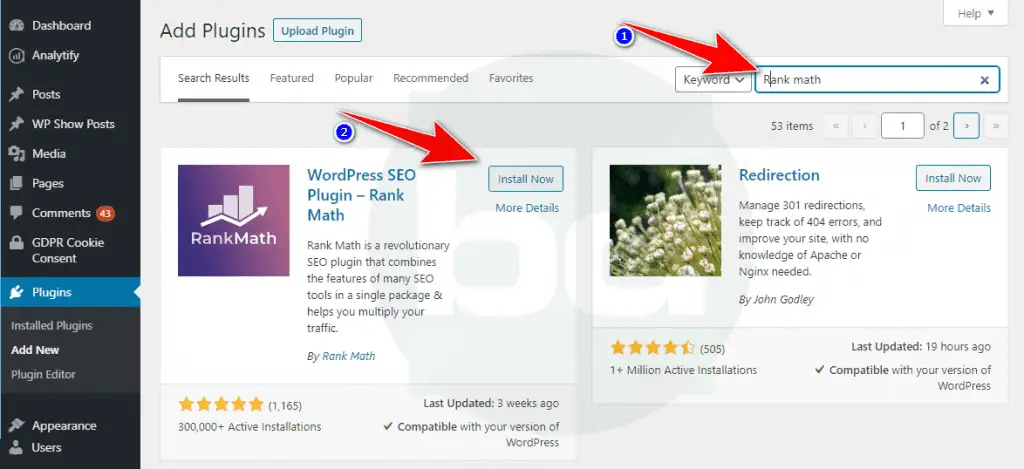
3. Click Install Now → then Activate
Method 2: Upload a Premium Plugin (.zip file)
Step-by-step:
- Go to Plugins > Add New → click Upload Plugin
- Click Choose File and upload your
.zipfile - Click Install Now → then Activate Plugin
Best Plugins for Food Bloggers in 2026
You don’t need to install dozens of plugins as a food blogger. Just install the right ones that save time. They should improve SEO and help your recipes shine. Here are my personal favorites that I’ve used (and recommend) for building a high-performing food blog:
1. WP Recipe Maker
This is the gold standard for food bloggers. It lets you add beautiful, printable recipe cards that are SEO-ready right out of the box.
Pro version unlocks nutrition facts, user ratings, video tutorials, and equipment lists.
Top Features:
- Automatically adds Recipe Schema 2026 (perfect for Google rich snippets)
- Readers can print, rate, and adjust servings
- Supports Pinterest pins, step-by-step photos, and video embeds
- Pro version adds nutrition facts, cooking times, and equipment lists
- It comes with recipe SEO and rich snippets for recipes.
Great for bloggers who want their recipes to rank on Google and Pinterest.
2. Rank Math SEO
It’s an all-in-one SEO powerhouse—and it’s free! Rank Math helps me optimize every post to rank higher and stay Google-friendly.
Top Features:
- Adds schema for recipes, articles, FAQs, and videos
- Built-in suggestions for keyword placement and meta descriptions
- Image SEO, internal linking, and 404 monitoring
- Pro version offers AI content scoring and an advanced schema builder
- It comes with recipe schema and FAQ schema for food blogs
📌 Perfect for bloggers who want to rank without hiring an SEO expert.
Use Rank Math Pro for AI schema generation and advanced content scoring.
3. Tasty Pins
If you’re serious about getting traffic from Pinterest, this plugin helps you write pin-friendly titles. It also assists with creating descriptions without cluttering your post. This plugin is the perfect choice to make Pinterest SEO for food bloggers.
These services are ideal for food bloggers who depend on Pinterest for recipe traffic.
Top Features:
- Add Pinterest-only descriptions (separate from alt text)
- Control which images can be pinned
- Helps increase pin shares and traffic effortlessly
Highly recommended if Pinterest is one of your top traffic sources.
4. ShortPixel or Imagify
Food blogs are image-heavy, and slow sites lose traffic. These tools help compress your images without any visible quality loss.
Top Features:
- Auto image compression + WebP support
- Boosts page speed for Core Web Vitals
- Reduces server load for mobile users
- Bulk optimize entire media libraries in minutes
I personally use ShortPixel—it keeps my blog lean and lightning-fast.
We recommend ShortPixel for food blogs that have a large image library.
5. WP Rocket
This plugin handles caching and performance tweaks with zero technical setup. It’s like putting your site on turbo mode.
Top Features:
- Page caching, lazy loading, and database cleanup
- Boosts LCP, FID, and CLS for Google PageSpeed
- Works seamlessly with CDNs like Cloudflare
- Preloads your sitemap for faster indexing
One of the easiest ways to improve site speed is in under 5 minutes.
6. Elementor Pro
I’m not a developer, but with Elementor Pro, I can build gorgeous homepages, recipe indexes, and landing pages without code.
Top Features:
- Drag-and-drop builder with responsive controls
- Create custom layouts (About page, Recipe Index, Contact page)
- Works with most modern themes (like Kadence and GeneratePress)
- Includes dozens of food blog-friendly templates and widgets
Great for bloggers who want full control over design without hiring help.
This plugin is ideal for bloggers seeking a branded, visually appealing layout.
7. MonsterInsights (or ExactMetrics)
This plugin integrates Google Analytics 4 into your WordPress dashboard. You can see what’s working in real time, as well as what’s not.
Top Features:
- View traffic stats, top posts, and bounce rate from your dashboard
- Track affiliate link clicks and scroll depth
- Simple setup—no coding or Google Tag Manager needed
- See which recipes bring in the most traffic or conversions
A must-have if you care about measuring growth and making smarter decisions.
Bonus Plugins You May Consider:
- Fluent Forms: Great for contact or recipe request forms
- Pretty Links: Cloak and track your affiliate links
- Site Kit by Google: An alternative for connecting Search Console and Analytics
- Newsletter Glue: Send blog posts straight to your email list with one click
These plugins are useful for tracking which recipes receive the most attention and generate the most income.
Optional/Bonus Plugins for Food Bloggers
| Plugin | Use |
|---|---|
| Nutrifox | Add custom nutrition labels to your recipes |
| Feast Plugin | Premium plugin that enhances design + SEO for food themes |
| ConvertKit | Build and grow your email list with recipe opt-ins |
| Thirsty Affiliates | Cloak and manage affiliate links (perfect for Amazon tools) |
How to Create Content for a Food Blog
Once your blog is set up and customized, it’s time to do the most important part. You should create high-quality, helpful content. This content should educate, inspire, and rank on Google.
In 2026, content creation for food bloggers is about more than recipes. You need to combine visuals, storytelling, and SEO to stand out in a crowded market.
I. How to Plan Content for a Food Blog in 2026
Having good content is key to attracting your audience and ranking highly in Google. You can write your content without hiring other content writers if you are an excellent writer.
You can also buy your content from different websites that provide unique content for your blog.
Before you write, plan your first 10 posts using a content strategy that aligns with your niche and keyword goals.
Types of content to include:
- Evergreen Recipes (e.g., “Easy One-Pot Vegan Chili”)
- Listicles (e.g., “10 Quick Dinners Under 30 Minutes”)
- How-to Tutorials (e.g., “How to Use an Air Fryer for Crispy Tofu”)
- Informational Posts (e.g., “Benefits of a Gluten-Free Diet”)
- Affiliate Content (e.g., “Top 5 Kitchen Tools for Healthy Meal Prep”)
Tools to research content ideas:
- Google Trends
- Semrush Keyword Magic Tool
- AnswerThePublic
- LowFruits
- Pinterest search bar
Pro Tip: Include low-competition, long-tail keywords in your early posts to rank faster (e.g., “budget Indian vegetarian lunch ideas”).
II. How to Write SEO‑Friendly Recipe Posts
Photos and visuals make a huge difference on a food blog. Trust me—when you add beautiful images or helpful infographics, people are way more likely to stay on your site (and come back for more!).
You can use your own food photos or grab free ones from royalty-free image sites. I sometimes design mine in Canva or edit them using simple tools before uploading.
Visuals drive food blogging. Strong photography and videos improve reader engagement, time-on-page, and shares—plus help your post qualify for Google Discover and Pinterest rankings.
Image Optimization Tips:
- Use vertical images (735×1102 px or similar) for Pinterest
- Compress with ShortPixel or Imagify
- Add alt text with your keywords (e.g., “vegan lasagna with almond ricotta”)
- Use branded templates on Canva for Pinterest or social media images
Video Integration: Short-form recipe videos (30–90 sec) can massively boost engagement.
Here’s what I do:
- Download or design your image
- Go to your WordPress post editor
- Click “Add Media” and upload your image right where you want it
Where to share your videos:
- Inside blog posts (upload to YouTube & embed)
- Instagram Reels
- Pinterest Idea Pins
- YouTube Shorts
- TikTok
Use tools like CapCut, Veed.io, or Canva Video Editor to create fast, scroll-stopping food videos.
Content SEO & Formatting Tips:
| Tip | Why It Works |
|---|---|
| Use H2/H3 subheadings | Improves readability + Google crawlability |
| Include bullet points & numbered lists | Makes content scannable |
| Add FAQ schema | Helps your blog win featured snippets |
| Use internal linking | Keeps users on your site longer |
| Write natural, human-like intros | Builds trust + reduces bounce rate |
Don’t forget to install Rank Math to optimize every post before publishing.
III. Using AI Tools Safely for Food Blog Content
- Use AI tools to brainstorm content ideas, outline posts, and draft rough versions of your articles, but always add your own experience, tips, and unique voice before publishing.
- Double-check every AI-generated recipe, measurement, and cooking step by actually testing or cross-verifying them, because wrong instructions can lead to bad results or safety issues.
- Avoid copying AI content verbatim; rewrite it in your style, add personal photos and process shots, and disclose when AI assistance is used if it significantly contributed to the content.
- Never rely on AI for sensitive topics like food safety, allergens, or medical/dietary claims without confirming with credible sources or professionals.
- Run AI-written sections through plagiarism checks and grammar tools, and always optimize them manually for SEO, readability, and your audience’s needs.
Set Up Google Analytics and Search Console
Once you start publishing content, you’ll want to track your traffic. You’ll also want to discover what’s working. Improve your SEO performance over time. That’s where Google Analytics 4 (GA4) and Google Search Console (GSC) come in.
These two free tools from Google are essential for food bloggers in 2026. The team helps food bloggers grow their audience, rank higher in search results, and monetize their content effectively.

To grow your food blog strategically, you need to track your visitors. It’s important to monitor top-performing posts. Understanding how people interact with your content is crucial. Google Analytics 4 (GA4) is the most powerful free tool for that—and it’s essential in 2026.
It helps answer questions like:
- How many people visited your recipe post last week?
- What percentage came from Google vs. Pinterest?
- Which device are they using—mobile or desktop?
- How long are they staying on your pages?
- Are they clicking on your affiliate or product links?
Let’s walk you through how to set up GA4 properly for your food blog.
Step-by-Step: How to Set Up Google Analytics 4
Step 1: Go to Google Analytics
- Visit the official site: https://analytics.google.com
- Sign in using your Gmail or Google account. If you don’t have one, please feel free to create one at no cost.
Step 2: Create a New GA4 Property
- Click on “Admin” (⚙️ icon in the lower-left corner)
- Under the “Account” section, click Create Property
Fill in:
- Property name (e.g., “Tasty Vegan Kitchen Blog”)
- Reporting time zone (choose your country’s time zone)
- Currency (e.g., USD, INR, EUR)
Click Next and select your business size (you can choose “Small”) and goals (e.g., “Generate leads” or “Measure content engagement”)
Step 3: Choose Platform – Web
Google will ask where you want to collect data from:
- Web
- iOS app
- Android app
Select Web
Step 4: Enter Your Website Details
You’ll be prompted to enter:
- Website URL (e.g.,
yourfoodblog.com) - Stream Name (e.g., “Main Food Blog Stream”)
Click Create Stream
You’ll now see a screen with your Measurement ID (looks like G-XXXXXXXXXX) and tracking code.
Step 5: Connect GA4 to WordPress
There are 3 main ways to connect Google Analytics to your food blog. Choose the one that fits your skill level:
Option A: Use the MonsterInsights Plugin (Beginner-Friendly)
MonsterInsights is the most beginner-friendly way to add GA4 without touching any code.
Steps:
- Go to your WordPress dashboard → Plugins → Add New
- Search for MonsterInsights → Click Install → Activate
- Launch the setup wizard
- Connect your Google account and select your new GA4 property
- Done! Tracking begins instantly.
The free version is good for basics, but Pro includes affiliate tracking, eCommerce, scroll depth, and more.
Option B: Use Site Kit by Google (Official Plugin)
Site Kit is Google’s official plugin to connect Analytics, Search Console, PageSpeed Insights, and AdSense.
Steps:
- Go to Plugins → Add New
- Search for Site Kit by Google → Install → Activate
- Click “Start Setup”
- Sign in with your Google account and give permissions
- Select your GA4 property
- You’re done! Real-time data appears in your dashboard.
This option is ideal for bloggers seeking a centralized integration of Google tools.
Option C: Add the GA4 Tracking Code Manually (Advanced Users)
If you don’t want a plugin, you can manually insert your GA4 tracking code.
Steps:
- Copy the global site tag from your GA4 “Data Stream” settings
- Go to WordPress → Appearance → Theme File Editor
- Open the
header.phpfile - Paste the code right before
</head> - Save the file
Only do this if you’re comfortable editing code. A small error can break your site’s layout.
How to Check if GA4 Is Working
After setup, visit your blog from another device or an incognito tab.
Then go to your GA4 dashboard:
- Click Reports > Realtime
- If you see an active user, it indicates that the system is functioning properly!
You can also install the Google Tag Assistant Chrome extension to verify GA4 tags.
What Is Google Search Console?
If you’re starting a food blog, one of the best free tools you can use is Google Search Console (GSC). I use it to monitor my blog’s performance in Google Search. It helps me see which recipes are showing up. I can also identify which keywords people are using to find me. Additionally, it shows whether Google is indexing my posts properly.
In short, it’s like a behind-the-scenes dashboard that shows how your site looks to Google.
What Google Search Console Helps You Do:
- Submit your blog to Google so it can start showing up in search results
- See which keywords people use to find your blog
- Track how many clicks and impressions each post gets
- Spot any errors, broken links, or mobile usability issues
- Make sure your recipe schema is working correctly
And yes—it’s 100% free!
How to Set Up Google Search Console (Step-by-Step)
Step 1: Go to the Google Search Console Website
Visit: Google Search Console, and click “Start Now” and sign in using your Gmail account.
Step 2: Add Your Blog
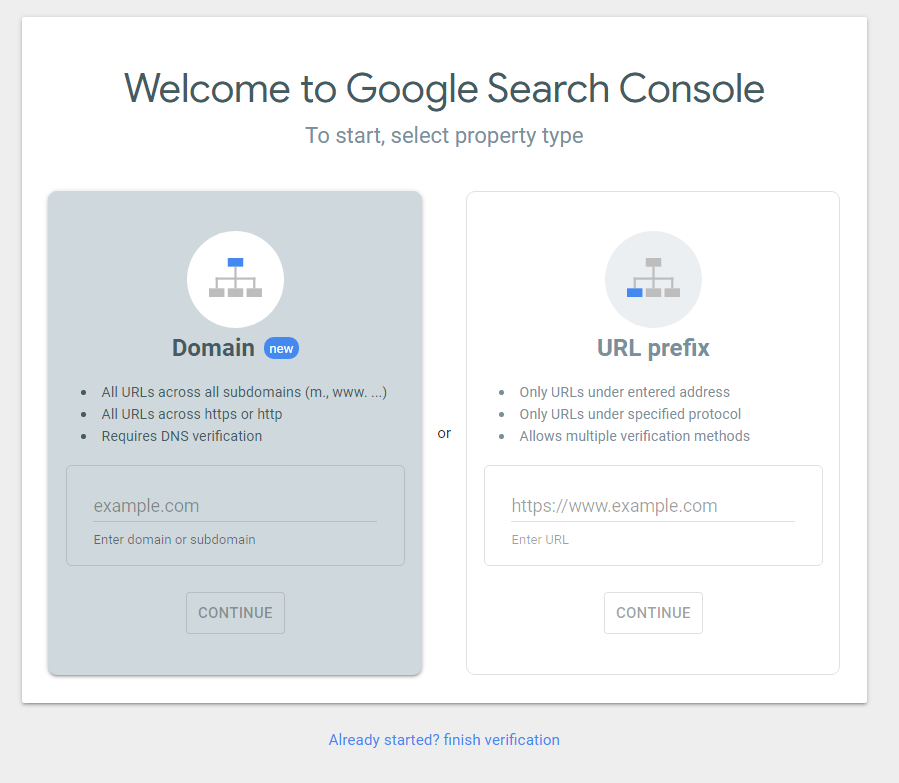
You’ll see two options:
- Domain (recommended): Covers your entire site
- URL Prefix: For a specific version like ‘bloggingden.com’
I always go with Domain—it’s easier in the long run.
Type in your blog domain (e.g., bloggingden.com) and hit continue.
Step 3: Verify Ownership
Google just wants to make sure the site is really yours.
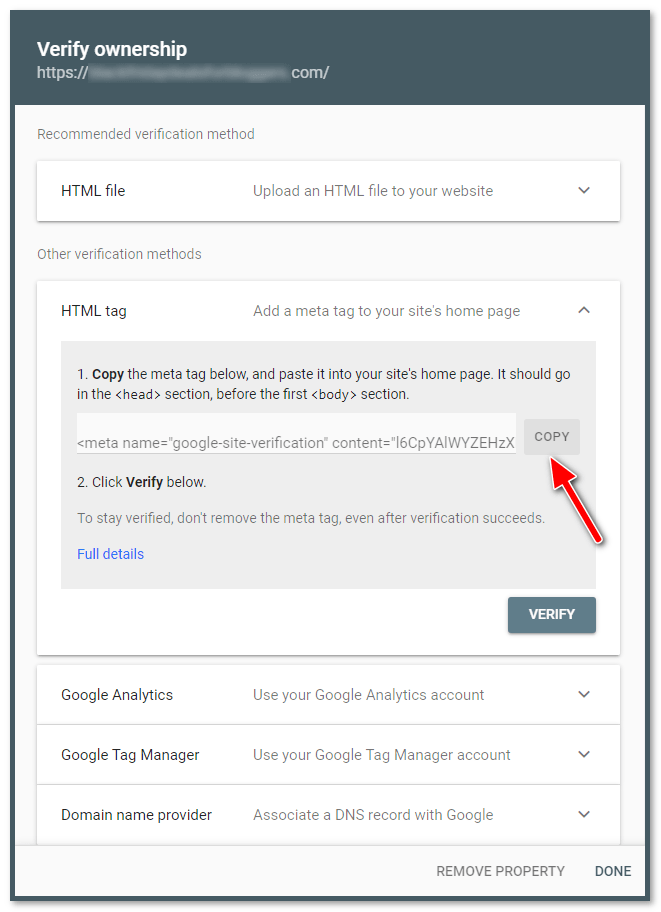
If you’re using Hostinger, here’s what to do:
- Copy the TXT record Google provides
- Head to your Hostinger dashboard (hPanel)
- Go to DNS Zone Editor under your domain
- Paste the code and save
- Wait a few minutes and click Verify
✨ That’s it—Google will confirm your site ownership shortly.
Step 4: Submit Your Sitemap

Once Google verifies that you own your blog, just hit “Continue”—you’ll land on your Search Console dashboard.
Now it’s time to submit your sitemap (don’t worry, it’s easier than it sounds!).
If you’re using an SEO plugin like Rank Math or Yoast, it already creates your sitemap for you. Just copy the sitemap URL—usually something like:
yourblog.com/sitemap_index.xml
Then, in the left-hand menu, click “Sitemaps”, paste that URL into the box, and hit Submit.
That’s it! You’ve told Google where to find all your content.
Boom! Your blog is now officially connected to Google and ready to start showing up in search results.
Bonus Tip: If you’re using the Rank Math SEO plugin, it automatically creates your sitemap. It submits the sitemap for you. This step is even easier!
Pro Blogger Tips
| Tip | Why It Matters |
|---|---|
| Enable scroll tracking | Helps you see if users are reading full recipes |
| Track affiliate clicks | Know which product links are converting |
| Create custom reports | Compare Pinterest vs. SEO traffic |
| Set up goals (e.g., email signup) | Track list-building success from blog content |
Add Basic Pages to Your Food Blog (Build Trust, Structure & Credibility)
Every successful blog needs more than just blog posts. It needs foundational static pages that establish trust. These pages boost SEO and comply with legal guidelines. They also prepare your site for future monetization.
Whether you’re just starting your food blog or polishing it before launching, these are the must-have pages for 2026:
A. About Page
Your About page is where you introduce yourself, share your backstory, and show the human side of your blog. It helps new visitors feel connected and builds authenticity—a key ranking signal under Google’s E-E-A-T guidelines.
What to Include:
- Who are, and what inspired you to start a food blog
- Your cooking philosophy or diet style (e.g., gluten-free, plant-based, quick meals)
- A friendly photo of you cooking or enjoying a dish
- A brief mention of your mission or goals
- Optional: Fun facts, behind-the-scenes kitchen insights, or personal food journeys
- CTA: Invite readers to subscribe or follow you on social platforms
B. Contact Page
A reader may have a question. A brand might want to offer a sponsored collaboration. A fellow blogger might want to network with you. Your Contact page makes you approachable and professional.
What to Include:
- A simple contact form (use plugins like WPForms or Fluent Forms)
- Your business email (avoid Gmail if possible—use “[email protected]” as a professional email)
- Links to your active social media accounts
- Optionally: Include turnaround time or collaboration preferences
Tip: If you accept sponsored posts or freelance work, link to your “Services” or “Work With Me” page from here.
C. Privacy Policy & Terms of Service
You’re legally required to inform users how you collect and use their data. This is especially important if you use Google Analytics, run ads, collect emails, or promote affiliate links.
What to Include in a Privacy Policy:
- Use of cookies (Google Analytics, affiliate links, ads)
- Third-party services like email providers
- How you store and protect user data
- How users can contact you for data requests
What to Include in Terms of Service:
- General rules for site usage
- Intellectual property notice (your content/photos)
- Affiliate disclosures and disclaimer
- Limitation of liability
Tools to generate these pages:
Make sure to link to these pages in your blog footer and mention affiliate disclosures when promoting products.
D. Services Page
This is your space to pitch your services—whether that’s food photography, recipe development, freelance writing, or digital product sales. It tells brands and potential clients what you offer and how they can work with you.
What to Include:
- A short introduction to your skills
- Clear descriptions of services (e.g., sponsored posts, UGC content, video reels, coaching)
- Packages or pricing (optional)
- Testimonials or client logos, if available
- Contact form or CTA: “Let’s Work Together” button
Don’t have services yet? You can leave this page unpublished until you’re ready to offer something.
Suggested Menu Layout (For Top Navigation)
| Page | Purpose | Placement |
|---|---|---|
| About | Builds trust and personal connection | Main menu |
| Contact | Opens communication channels | Main menu |
| Recipes / Blog | Navigates readers to your content | Main menu |
| Services | Showcases monetization or freelance offers | Main or submenu |
| Privacy Policy | Legal requirement | Footer |
| Terms of Service | Legal requirement | Footer |
Tip for 2026: Use a sticky header navigation bar on mobile for better UX. Tools like Elementor Pro or Kadence Theme allow easy drag-and-drop menu building.
How to Get Traffic to Your Food Blog in 2026
Publishing your first blog posts is exciting—but without promotion, even your best recipes can get buried in the internet noise. In 2026, you need a simple traffic system that works for you every day, not random sharing whenever you have time.
Focus on a few proven channels—SEO, Pinterest, social video, email, and collaborations—and use them consistently
Here’s how to get started:
1. SEO: Long‑Tail Keywords and Evergreen Posts
Google is still the most reliable source of long‑term, passive traffic for food blogs. When you target long‑tail recipe keywords and optimize your posts properly, a single article can bring visitors for years.
Do This:
- Target specific, intent‑based keywords (for example, “high‑protein vegetarian dinner,” “5‑ingredient paneer curry”) instead of broad terms.
- Use clear H2/H3 headings, descriptive slugs, and compelling titles/meta descriptions.
- Add Recipe Schema so your posts can appear as rich results and recipe cards.
- Internally link related recipes and guides to keep readers on your site longer.
- Regularly update older posts with better photos, clearer instructions, and fresher keywords to keep them ranking.
Use keyword tools to find low‑competition ideas your audience is already searching for.
2. Pinterest: Visual Search Engine for Recipes
Pinterest is still a goldmine for food bloggers because users go there specifically to save and try recipes. Treat it like a visual search engine, not just another social network.
Do This:
- Create vertical, Pinterest‑friendly images with text overlays that clearly state the recipe or benefit.
- Aim for 3–4 fresh pins per blog post over time, not just one, and publish new pins weekly.
- Write keyword‑rich pin titles and descriptions and group your content into focused boards (for example, “Instant Pot Indian Dinners,” “Sugar‑Free Snacks”).
- Use a scheduling tool if needed so you can stay consistent without spending all day on Pinterest.
Remember: even one viral pin can drive tens of thousands of visitors to your food blog.
3. Email List: Your Most Reliable Traffic Asset
Algorithms change, but your email list is yours. A small, engaged list can send more consistent traffic than a big social following that rarely sees your posts.
Do This:
- Offer a simple lead magnet such as a 7‑day meal plan, a mini eBook, or a printable shopping list related to your niche.
- Place opt‑in forms in key locations: homepage, sidebar, end of posts, and a dedicated “Freebies” page.
- Send a weekly or bi‑weekly newsletter that features your latest recipes, seasonal round‑ups, and useful tips.
- Use email to revive older posts (for example, “My top 5 one‑pot dinners for busy weeks”) and drive repeat visits.
Tip: Create a “Freebies” page to host all your lead magnets.
4. Promote on Social Media
Platforms like Instagram Reels, YouTube Shorts, and TikTok are ideal for visual brand awareness, but think of them as traffic boosters that support—not replace—SEO and email.
Where to show up and what to post:
- Instagram: short Reels of cooking steps, behind‑the‑scenes clips, and before‑and‑after plating.
- YouTube Shorts/YouTube: quick recipe videos or longer cooking tutorials that point viewers to the full recipe on your blog.
- TikTok: fast tips, kitchen hacks, “day in the life” cooking routines, and trending audio formats.
- Facebook Groups: share your best content inside relevant, non‑spammy communities where your target audience hangs out.
- Use tools like Canva or CapCut to repurpose one video into multiple formats and platforms.
Use tools like Canva or CapCut to repurpose one video into multiple platforms.
5. Repurpose Content Across Platforms
You don’t have to start from scratch every time—repurpose your strongest posts and build relationships with other creators to multiply your reach.
- Take one recipe post and turn it into: a Pinterest pin, a 60‑second TikTok, a 5‑step Instagram carousel, a YouTube voice‑over recipe, and a downloadable PDF for your email list.
- Repurpose older high‑performing posts when you update them—create new pins, new Reels, and new emails highlighting the refreshed content.
- Collaborate with other food bloggers through guest posts, recipe round‑ups, and link swaps so you can tap into each other’s audiences and build backlinks at the same time.
Content repurposing increases your reach and reduces burnout.
6. Instagram Reels and YouTube Shorts
Short‑form video is perfect for food content because it shows the result and the process in seconds. While these platforms aren’t always the best for passive traffic, they are powerful for brand awareness and sending people to your blog when you do it intentionally.
Do this:
- Create quick recipe videos (30–60 seconds) highlighting the most satisfying moments—sizzling, mixing, plating.
- Share behind‑the‑scenes clips, kitchen hacks, and “before/after” transformations to build a connection.
- Add clear CTAs in your captions and on‑screen text: “Full recipe on my blog—link in bio.”
- Repurpose one video across Reels, Shorts, and TikTok to save time instead of filming three separate pieces.
7. Collaborations and Backlinks
Collaborating with other creators helps you reach new audiences and build the backlinks that Google still relies on for rankings.
Do this:
- Write guest posts or contribute recipes to other food blogs in your niche.
- Participate in recipe round‑ups and link swaps where each blogger features and links to others’ posts.
- Join blogger communities or mastermind groups where you can share opportunities and promote each other’s content.
- Offer expert quotes or tips for articles on food, cooking, or nutrition, and request a link back to your blog.
Bonus Tools for Blog Promotion
| Tool | Purpose |
|---|---|
| Semrush | SEO keyword research & competitor insights |
| Tailwind | Pinterest & Instagram scheduling |
| ConvertKit | Email automation & newsletter growth |
| Later | Visual planner for Instagram & TikTok |
| Canva Pro | Design blog graphics, social pins, and promo banners |
Blog Promotion Summary Table
| Channel | Goal | Tools to Use |
|---|---|---|
| SEO | Long-term Google traffic | Rank Math, WP Recipe Maker, Semrush |
| Viral recipe pins | Tasty Pins, Canva, Tailwind | |
| Audience ownership & monetization | ConvertKit, MailerLite | |
| Social Media | Brand growth & community | Instagram, TikTok, YouTube |
| Content Repurposing | Multi-platform visibility | Canva, CapCut, Descript |
How to Monetize a Food Blog in 2026
Once you start getting steady traffic, it’s time to turn your food blog into a real income stream. In 2026, the most successful food bloggers don’t rely on just one method—they combine ads, affiliates, products, and brand deals to build stable, diversified revenue.
Whether your goal is a side hustle or a full-time blogging business, here are the best ways to monetize your food blog today:
a. Display Ads (Passive Income from Pageviews)

Display ads are the easiest way to start earning once you have traffic. You place ad code on your blog and get paid based on impressions and clicks.
- Start with beginner‑friendly networks when your traffic is low, then move to premium networks (like Mediavine/Raptive‑style programs) as your pageviews grow.
- Focus on improving RPMs with fast-loading pages, good UX, and content that attracts high‑value audiences.
Best Ad Networks for Food Bloggers:
| Network | Requirements | Notes |
|---|---|---|
| Google AdSense | No minimum traffic | Best for beginners, low RPMs |
| Ezoic | 5,000+ sessions/month | AI-optimized ad layout |
| Mediavine | 50,000 sessions/month | High RPMs, excellent support |
| Raptive (ex-AdThrive) | 100,000+ pageviews/month | Premium advertisers, best earnings |
Start with AdSense or Ezoic, and upgrade to Mediavine as traffic grows.
b. Affiliate Marketing (Recommending Products You Use)
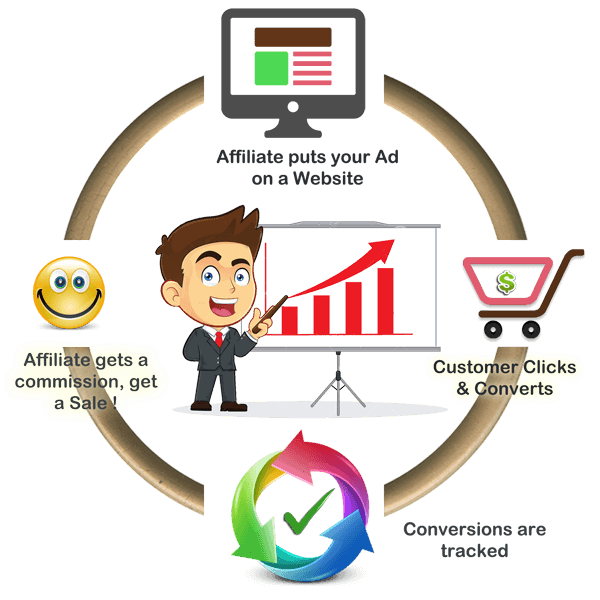
Affiliate marketing works extremely well for food blogs because readers naturally want tools, ingredients, and services that make cooking easier. Promote kitchen tools, cookware, meal kits, or eBooks using special referral links. When someone buys through your link, you earn a commission.
- Join affiliate programs for kitchen tools, appliances, pantry ingredients, meal kits, cookbooks, and even web hosting or blogging tools.
- Add affiliate links inside recipe posts, equipment guides, and “best tools for…” articles, always with honest recommendations.
- Create a few dedicated money posts like “Essential tools for Indian home cooking” or “Best air fryers for small kitchens.”
- Track which products convert best and feature them more prominently in future content and email campaigns.
Top Food Blog Affiliate Programs:
| Platform | Products | Commission |
|---|---|---|
| Amazon Associates | Cookware, pantry items, small appliances | 1–4% |
| Impact | Instant Pot, Ninja Kitchen | Varies |
| ClickBank | Digital cookbooks, diet programs | Up to 50% |
Promote naturally within blog posts like:
- “My 5 Must-Have Kitchen Tools Under $30”
- “Top Vegan Meal Delivery Services (Tried & Tested)”
- “The Blender I Use in Every Recipe (and Why)”
Use Pretty Links or the ThirstyAffiliates plugin to cloak and manage your affiliate URLs.
- What is Affiliate Marketing (Beginners Guide for 2026)
- 8 Best Affiliate Marketing Platforms for Beginners
- 7 Best Affiliate Link Cloaking WordPress Plugins for Affiliate Sites
c. Sponsored Content and Brand Deals

As your brand grows, companies will pay you to feature their products in recipes, reviews, or social content. Partner with brands to create recipes, write reviews, or share content featuring their products—for a fee.
- Pitch or accept collaborations with brands that genuinely fit your cooking style and audience.
- Offer packages that combine a blog post, newsletter mention, and social posts instead of one‑off Instagram posts.
- Clearly disclose sponsored content and maintain your voice so you don’t lose trust with your readers
Common Campaign Types:
- Sponsored blog posts or recipes
- Instagram Reels or YouTube Shorts with product placements
- Recipe development or photography for brand websites
Payment varies: From $100/post (new bloggers) to $1,000+/post for established bloggers.
Create a “Work With Me” page and prepare a media kit that includes traffic statistics, audience demographics, and your niche.
d. Digital Products and Online Offers

Digital products are scalable and can become your highest‑margin income source once your audience trusts you. Use your expertise to create your own cookbooks, meal plans, courses, or merch—and sell them directly to your readers.
- Ideas include: recipe eBooks, meal plans, grocery planners, mini cooking courses, photography presets, or members‑only recipe libraries.
- Start small with one simple product that solves a specific problem (for example, “30‑day vegetarian dinner plan for busy professionals”).
- Promote your products from blog posts, email sequences, and social media, and consider occasional discounts or launch campaigns.
Where to Sell:
- Use Gumroad, SendOwl, or Podia for digital products
- Use WooCommerce (free) or Shopify for full eCommerce stores
Combine with email marketing (ConvertKit + lead magnet) to promote your products automatically.
e. Services and Offline Opportunities:
If you enjoy working directly with people or local businesses, your blog can also act as your portfolio.
- Offer services like food photography, recipe development, menu consulting, or 1:1 coaching.
- Partner with local restaurants, cafes, or food brands for content creation and campaigns.
- Use your blog, About page, and email list to promote these offers and showcase testimonials.
Start with one or two monetization methods that feel natural (usually ads + affiliates) and layer in more as your traffic and authority grow. Over time, this mix turns your food blog from a hobby into a stable online business.
Bonus Monetization Tips for 2026
| Tip | Why It Matters |
|---|---|
| Use GA4 to track affiliate click-through rates | Optimize what earns you money |
| Combine affiliate + ad revenue on the same post | Doubles your monetization power |
| Add “Shop My Kitchen” page | Great way to showcase affiliate tools |
| Collect emails early | Easier to launch products later |
| Use social proof/testimonials on product pages | Increases conversion rates |
Food Blog Monetization Summary
| Method | Income Type | Best For |
|---|---|---|
| AdSense / Mediavine | Passive (based on traffic) | Bloggers with consistent traffic |
| Affiliate Marketing | Passive & active | Product-rich blog posts |
| Sponsored Content | Active | Bloggers with engaged audiences |
| Digital Products | Active (scalable) | Niche expertise (meal plans, classes) |
FAQs About Starting a Food Blog in 2026
Is food blogging still profitable in 2026?
Yes, food blogging is still profitable in 2026, but it’s not a get‑rich‑quick model. With consistent publishing, smart SEO, and diverse income streams (ads, affiliates, products, sponsorships), many food bloggers earn a full‑time or strong side income
How much does it cost to start a food blog in 2026?
You can start a simple food blog for around 50–100 USD in the first year if you keep costs low (domain, basic hosting, and a free theme). A more polished setup with premium themes, plugins, and tools typically falls in the 200–500 USD range.
How long does it take to make money from a food blog?
Most new food blogs take at least 6–12 months to see meaningful income, and it can take 1–2 years to reach consistent, job‑replacing revenue. Your timeline depends on posting frequency, SEO, niche competition, and how aggressively you monetize.
Which platform is best to start a food blog?
Self‑hosted WordPress.org is generally the best platform for starting a food blog because it gives you full control, recipe‑friendly plugins, and flexible monetization options. If you prefer an all‑in‑one website builder, platforms like Wix or Hostinger Website Builder can work, but they are less flexible long-term.
Can I start a food blog without showing my face?
Yes, you can absolutely start and grow a food blog without showing your face. Focus on clear recipe photos, step‑by‑step shots, and strong writing—plenty of successful food blogs are built around recipes and branding rather than the blogger’s image.
Do I need to be a professional chef to start a food blog?
No, you don’t need to be a professional chef; many successful food bloggers are home cooks who share tested recipes and practical tips. What matters most is that your recipes work, are clearly explained, and offer real value to readers in your niche
Final Words – Start Your Food Blog Today
Starting a food blog in 2026 is no longer just about posting a few recipes and hoping for the best—it’s about building a real online asset that can grow your brand and your income over time.
You now know how to choose a niche, set up WordPress, pick hosting and themes, install the right plugins, create SEO‑optimized content, drive traffic, and monetize your work.
Will it happen overnight? No. But if you publish consistently, focus on long‑tail keywords, use Recipe Schema, promote your posts on Pinterest and social media, and build an email list, your food blog can start attracting steady readers and earning from ads, affiliates, and digital products within months.
Remember: Every big blog started as someone’s first post. Rather than waiting for perfection, the most successful food bloggers started their journey and learned as they went.
Ready to Start Your Food Blog Today?
Here’s your quick action checklist:
- Choose your niche
- Buy your domain and hosting on Hostinger
- Set up WordPress and install a fast, recipe-friendly theme
- Publish your first 3–5 blog posts with optimized images and keywords
- Promote through Pinterest, SEO, and email
- Monetize with affiliate links, ads, and digital products
The most important step is simply getting started. Pick your niche, register your domain, set up your hosting, and publish your first recipe—even if it isn’t perfect.
You can always improve your photos, rewrite posts, and optimize SEO later, but you can’t edit something that doesn’t exist.
If you’re serious about turning your passion for food into a profitable online business, today is the best day to take action and start your food blog.